
Work with an interaction overview
Prerequisites
- Analytics > Conversation Detail > View permission
- Conversation > Communication > View permission
- Recording > Recording > View permission or Recording > RecordingSegment > View permission
- View and hear sensitive data: Recording > Recording > View Sensitive Data permission
- Speech and Text Analytics > Data > View permission
Interaction overview incorporates numerous features that not only allow you to play back and listen to an interaction, but also enables you to discover unusual interaction dynamics, underlying issues with a product or service, customer sentiment, and agent productivity.
Notes:
- To work with a voice transcript, first select an interaction that contains the transcript you want to view. You can select an interaction from the results of an Interactions view search or a Content Search view search.
- When agents work with voice interactions, they can only access a recording that belongs to their division.
In the interaction overview, you can perform these tasks:
- Click Performance > Workspace > Interactions.
- Click Menu > Analytics > Analytics Workspace.
- In the Default section, search for Interactions and then click the view name to open it.
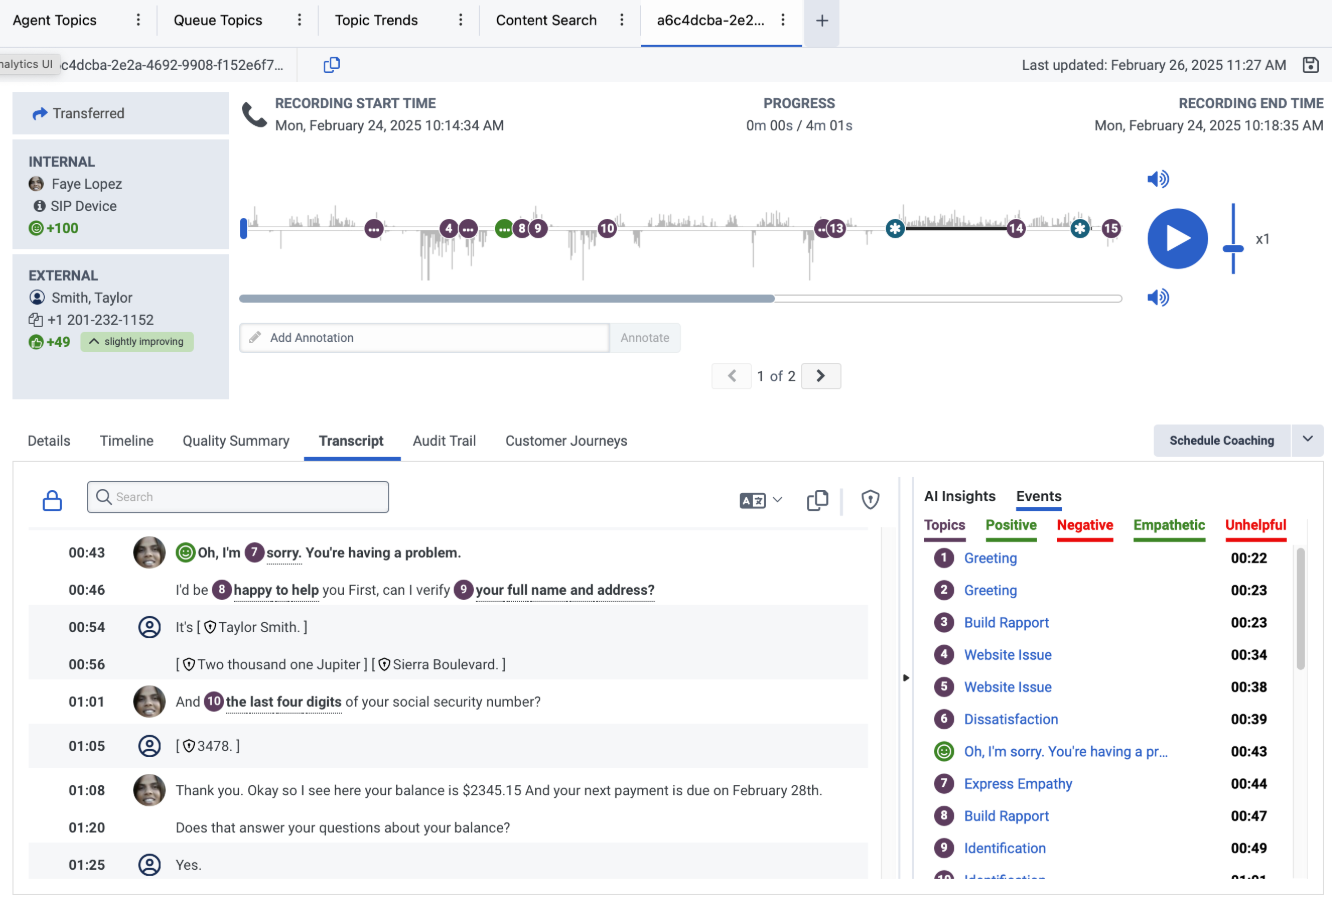
- Click the row of the interaction that you want to play back. The interaction opens, and the top of the page includes a visual representation of the selected interaction.
- Click Play to play the interaction and click Pause to stop the interaction playback.
Notes:
- If recording segment access control is applied when viewing the interaction details, only the segments of the call recording that you can access are available for playback. For more information, see Access control transactional objects and View an interaction’s details.
- In accordance with the Payment Card Industry Data Security Standard (PCI DSS) guidelines, Genesys recommends the use of Secure Pause or Secure Flows to ensure that no PCI data is transcribed and made available to Genesys Cloud users.
- The playback limit for recordings is 10 hours. If the recording duration exceeds 10 hours, Genesys Cloud truncates the recording.
- To protect the privacy of your customers, automatic reduction is enabled by default to ensure that all sensitive PII or PCI data collected from a voice interaction is automatically redacted and silenced. The user hears silence in the audio playback where the data is found. To hear sensitive data, an administrator must manually grant you the Recording > Recording > ViewSensitiveData permission. By default roles do not come with this permission. For more information, see the View sensitive data section in the Work with a voice transcript article, and Enable automatic redaction of sensitive information.
The interaction overview synchronizes with the interaction transcript. When you play an interaction, the spoken words are highlighted with a blue background as they are spoken and the interaction transcript scrolls down in unison with what is being said.
You can turn the interaction transcript scroll option on or off at any time via the Playback Scroll Lock option, located on the left side of the transcript Search option.
Click the Playback Scroll Lock option to turn the interaction transcript scroll option on or off. By default the option is locked.
When the Playback Scroll Lock option is locked, the interaction overview synchronizes with the interaction transcript, and the interaction transcript scrolls down in unison with what is being said. The transcript scrolls to each spoken word that you hear during the playback and the word is highlighted with a blue background in the transcript at the exact time it is spoken. After the words are spoken, they are dimmed in the transcript.
When the Playback Scroll Lock option is unlocked, the interaction overview does not synchronize with the interaction transcript. The transcript does not scroll down to each spoken word that you hear during the playback. To view the spoken words when this option is unlocked, you must manually scroll down.
Note: The transcript Search option is active when the Playback Scroll Lock option is locked. When you click the next or previous search options, the interaction playback pauses. For more information, see Work with a voice transcript.
In the interaction overview at the top of the page, click the speed slider bar and adjust it to the appropriate speed. The speed slider bar appears on the right side of the interaction overview.
Speed slider bar

In the interaction overview at the top of the page, click the customer or internal participant’s Volume icon and adjust it to the appropriate volume.
- Control the internal (IVR, ACD, Agent, Conference, or Voicemail) participant’s volume with the Volume icon above the Play or Pause button.
- Control the external (the customer) participant’s volume with the Volume icon below the Play or Pause button.
- Click Performance > Workspace > Interactions.
- Click Menu > Analytics > Analytics Workspace.
- In the Default section, search for Interactions and then click the view name to open it.
- Click the row of the interaction that you want to play back. The interaction opens and the top of the page that appears includes a visual representation of the selected interaction.
- View the following interaction details.
-
- Recording Start time – The start time appears above the beginning of the progress bar on the left side. The start time includes the time and date at which the interaction began and an icon that represents the interaction type.
- Recording End time – The end time appears above the end of the progress bar on the right. The end time includes the time and date at which the interaction ended.
- Progress – The recording duration appears under the word Progress above the waveform in the center. The recording duration indicates the length (mm:ss) of the interaction.
- Waveform – Represents the recording timeline. It includes a graphic representation of the sound in the recording, speaker identification (Customer, IVR, ACD, agent, conference or voicemail), and displays topics and sentiment markers.
- Speaker separation – Lines above and below the waveform indicate when the internal or external participant spoke. Lines above the waveform indicate that the internal participant is speaking. Lines below the waveform indicate that the external participant (customer) is speaking.
- Silence time – Indicates when neither the internal or external participant were speaking. The silence time appears on the waveform as a horizontal line without vertical lines above or below.
- Sentiment marker – A sentiment marker ( positive negative) identifies a positive or negative phrase within the interaction. For more information, see to Work with sentiment analysis.
- Topic marker – A topic marker identifies where specific words and phrases were conveyed during the interaction. For more information, see Work with a topic.
- Recording pause – Represented by a Pause icon, recording pause indicates that the recording was paused due to a specified reason, which can be:
- Secure Pause – to avoid recording sensitive information, such as a Social Security number or credit card number, during the interaction.
- Flow or Queue – the recording was not captured because the call is in IVR, or waiting in a queue.
- Hold – the recording was not captured as the call is on hold.
Hover over the Pause icon for the following information:
-
-
-
- Paused at – Indicates the exact time the recording was paused.
- Type: Indicates the type of annotation.
- Duration – Indicates the length of the sound inserted into the recording to avoid sensitive information exposure. Note: When a recording pause is added, a tone (1.5 seconds long) is played to indicate the start of the pause. Every pause adds an extra 1.5 seconds to the duration of the recording.
- Real-time duration – Indicates the amount of time the recording was paused.
- Reason – Indicates the reason of the recording pause.
-
- Transferred – When the current interaction is the result of a transfer, the Transfer icon appears above the internal participant.
-
- Click Performance > Workspace > Interactions.
- Click Menu > Analytics > Analytics Workspace.
- In the Default section, search for Interactions and then click the view name to open it.
- Click the row of the interaction that you want to play back. The interaction opens and the top of the page that appears includes a visual representation of the selected interaction.
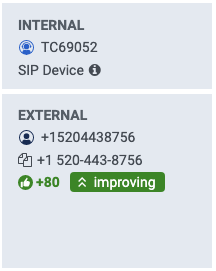
- View the following customer details in the External section in the lower left side of the interaction overview.
- Customer’s name – The customer’s name appears next to the following Customer icon .
- Customer’s phone number – The customer’s phone number appears under the customer’s name.
- Copy contact – Click to copy the customer’s phone number.
- Click Performance > Workspace >Interactions.
- Click Menu > Analytics > Analytics Workspace.
- In the Default section, search for Interactions and then click the view name to open it.
- Click the row of the interaction that you want to play back. The interaction is opened and the top of the page that appears includes a visual representation of the selected interaction.
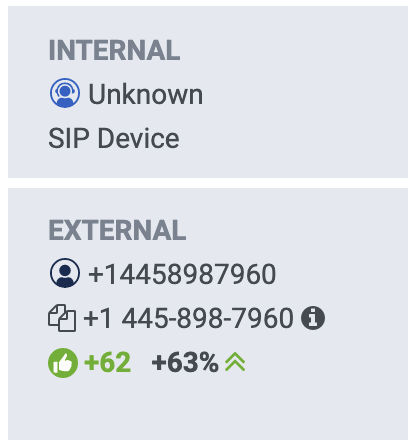
- View the following agent details in the Internal section in the upper left side of the interaction overview.
- Multiple – Indicates that more than one internal participant participated in the interaction.
- Single – Indicates that one internal participant participated in the interaction.
The agent can hear the supervisor or administrator only during the coaching session.
When an interaction includes information about monitoring or coaching an agent during the conversation, the Multiple list under Internal includes a list of who participated in the interaction and a list of who monitored or coached the participant.
For example, the following image indicates that the interaction included two participants (Agent 1 and Agent 2) who were monitored and coached. Agent 1 was coached by Supervisor 1 and monitored by Supervisor 2. Agent 2 was monitored by Supervisor 3. The green indicator depicts the monitoring or coaching session is live.
Monitored ![]()
Coached ![]()
Click the image to enlarge.

- Click Performance > Interactions.
- Click Menu > Analytics > Analytics Workspace.
- In the Default section, search for Interactions and then click the view name to open it.
- Click the row of the interaction whose sentiment you want to analyze.
- Click the Transcript tab.
- Determine the overall customer sentiment experienced by the customer throughout the interaction:
- Sentiment markers – Markers are placed throughout the interaction overview and its corresponding transcript. The sentiment markers appear in the interaction overview waveform at the exact time that the phrase began and in the transcript at the beginning of the phrase. Every phrase associated with a sentiment analysis marker is tagged with a positive or negative sentiment number. The magnitude of the number indicates the strength of the detected positive or negative sentiment. The positive marker indicates a positive sentiment and the negative marker indicates a negative sentiment. To view details about a specific sentiment marker for a specific phrase, hover over the sentiment marker in the waveform at the top of the screen or in the transcript. A tooltip with the sentiment phrase appears in both locations.
- Overall customer sentiment – Located on the left side of the interaction overview at the bottom of the External participant section, the overall sentiment represents the customer’s overall sentiment during the interaction. It ranges from -100 to +100. This score weighs all positive and negative markers throughout the interaction, awarding more weight to events that took place toward the end of the interaction, to highlight the customer parting experience with the contact center. This marker can indicate if the customer was satisfied or dissatisfied at the end of their interaction.
- Sentiment trend – The sentiment trend is determined by comparing the sentiment events found in the first half of the interaction to the sentiment found in the second half of the interaction. For this reason, the sentiment trend can update when more follow-ups occur within the same interaction. There is a minimum number of customer phrases required for the sentiment trend to be calculated, usually around six or more customer phrases are required.
- Sentiment trend values – There are five sentiment trend values.
- Improving – If the change is greater than +55 the sentiment trend is defined as improving.
- Slightly improving – If the change is between +20 and 55 the sentiment trend is defined as slightly improving.
- No Change – If the change is between -20 and +20 the sentiment trend is defined as no change.
- Slightly Declining – If the change is less than -20 the sentiment trend is defined as slightly declining.
- Declining – If the change is less than -55 the sentiment trend is defined as declining.
Note: The quality of audio interaction transcriptions can affect sentiment analysis. Low-quality interactions can result in mislabeled positive or negative markers. For this reason, and to confirm the sentiment it is important to listen to interactions that include numerous negative sentiments.
The following image shows the sentiment trend and the overall sentiment. This information appears on the left side of the interaction overview. In this example, the sentiment trend has increased by 80 and the overall sentiment is improving.
Click the image to enlarge.
For more information, see How is the overall customer sentiment score calculated? and How is the sentiment trend calculated?.
Create an annotation to mark a point on the recording for future reference. For more information, see Annotate a recording.
Silently listen to or coach (whisper) to your agent during interactions that are in progress. For more information, see Monitor in-progress interactions.
- Click Performance > Workspace >Interactions.
- Click Menu > Analytics > Analytics Workspace.
- In the Default section, search for Interactions and then click the view name to open it.
- Click the row of the interaction whose sentiment that you want to analyze. The interaction is opened and the top of the page that appears includes a visual representation of the selected interaction.
- Click the Copy icon in the upper left corner of the screen. The interaction URL is copied to your clipboard.
The previous or next interaction recording opens the previous or next recording associated with the specific interaction. When the interaction has only one recording, this option does not appear in the interaction overview.
- Click Performance > Workspace > Interactions.
- Click Menu > Analytics > Analytics Workspace.
- In the Default section, search for Interactions and then click the view name to open it.
- Click the row of the interaction whose sentiment that you want to analyze. The interaction opens and the top of the page that appears includes a visual representation of the selected interaction.
- Click the previous interaction recording button or the next interaction recording button to open the previous or next interaction recording.

The interaction overview waveform can include sentiment markers.
A sentiment marker (green smiley positive, red sad negative) indicates that the customer said a positive or negative phrase during the interaction.
Click the sentiment marker (green smiley positive, red sad negative) to go to the positive or negative phrase within the interaction transcript.
For more information, see Work with sentiment analysis and Work with a voice transcript.
- Click Performance > Workspace >Interactions.
- Click Menu > Analytics > Analytics Workspace.
- In the Default section, search for Interactions and then click the view name to open it.
- Click the row of the interaction that you want to play back. The interaction opens and the top of the page that appears includes a visual representation of the selected interaction.
- Click the Transcript tab.
- Click the waveform at the top of the screen to go to specific spoken words, a topic marker, or a sentiment marker in the transcript. The selected words, topic marker, or sentiment marker are highlighted with a blue background in the transcript.
Click the image to see an example for interaction overview.
The interaction overview includes topic markers that enable you to identify phrases, each associated with a specific topic that highlights specific moments of the interaction where the events were found. For more information, see Work with a topic.
When working with an audio interaction you can control whether agents and supervisors can access an entire interaction recording, or only segments of a recording. Applying access control at the segment level enables users to view only the recording content that relates to them.
The following permissions are required when applying access control to an entire recording, or only segments of the recording.
- Recording > Recording Segment > View – Provides agents and supervisors with access to only the segments of a recording that are conditioned to them.
- Recording > Recording > View – Provides agents and supervisors with access to the entire recording.
Permission conditions can be applied to restrict access to specific objects. For example,
- To give agents access to their own interactions and recordings, give the agent the Recording > RecordingSegment > View permission, with the condition User = Current User. This condition ensures that the agent can only listen to segments of the interaction recording in which the specific agent participates.
- To give supervisors access only to their agent’s recordings, limit the supervisor’s access to recording segments within their own division. To limit supervisors to recording segments within their own division, provide the following permission and role.
- Grant the Recording > RecordingSegment > View permission to a role.
- Grant the same role to a user, with the division specified. For more information, see Grant a role and a division to a user.
This access confines the supervisor to listen only to segments of the recording for which an object (IVR Flow, Queue, Participant) associated with the selected division was involved in that segment.
- If the permission condition is on User, only the recording subject is considered the sole participant of the station-side recording. For example, with the condition User = Current User, only the agent would be granted to access the recording, even if other participants are involved in certain portions of the call (for example, a specialist was contacted in a call consult scenario).
- If the permission condition is on Queue, only the queue from where the recording subject accepts the call is considered as the contributing queue of the recording. For example, even if the call traverses through Queues A and B (due to transfers), with the condition Queue=A, the supervisor can only access the station-side recording of the agent who accepted the call from Queue A, and not the station-side recording where another agent who accepted the call from Queue B.
- If the permission is granted to a Role that has a specific division assigned, the supervisor can only access the station-side recording if the recording subject’s division or the queue’s division matches with the specific assigned division.
It is important to remember that to access control at the recording segment level, the permission Recording > Recording > View for media type = call must not be granted to the agents and supervisors. Otherwise, those users can listen to the complete recordings rather than just the appropriate segments.
In addition, when a user that is granted access at the recording segment level loads the Interaction Details view, Genesys Cloud only enables the user to play back the accessible audio segments associated with the specific audio interaction recording. Similarly,
- You can only view and add annotations to recording segments that you have access to.
- In the Transcript tab, you can only view a transcript and detected sentiment markers and topics associated with recording segments that you have access to.
- You can only download a recording segment that you have access to.
Applying recording segment access control does not limit users from accessing information such as interaction metrics, wrap-up data, participant data, timeline details, and audit trail details. For more information, see View an interaction’s Details tab, View an interaction’s timeline, and View an interaction’s audit trail.
Access control of recording segments is only applicable to audio interactions. The Recording > RecordingSegment > View permission does not grant access to any digital recording (email, chat, or message) channels. Access to digital recordings is possible with the Recording > Recording > View permission. This permission grants the user access to the complete digital recording.
To allow agents to view speech and text analytics results, the permission Speech And Text Analytics > Data > View must be granted. Without this permission, agents cannot view any speech and text analytics including voice transcripts, topics, sentiment and agent empathy, categories, and acoustics data.
Barge in to an active voice interaction, so you can provide real-time assistance to the agent or customer. For more information, see Monitor, coach, and barge into live voice interactions.