
Configure voice transcription
- Genesys Cloud EX license
- Genesys Cloud CX 1 WEM Add-on II or Genesys Cloud CX 2 WEM Add-on I, or Genesys Cloud CX 3 license
- When using a Genesys Cloud CX license, call recording must be enabled. For more information, see Enable recording.
- When using a BYOC Premises telephony connection, the recordings must be dual channel and use one of the following codecs:
- audio/PCMU
- audio/PCMA
- audio/L16
- audio/opus
The voice transcription feature transcribes voice interactions (for example, Automatic Call Distribution (ACD) calls) in the contact center into written words that are stored as speaker-separated conversational text. This feature helps you uncover the information that is stored in the contact center audio interactions. This information can be used to improve employee training and feedback and to identify business problems and opportunities.
Notes:
- Voice transcription is not available in all Genesys Cloud supported languages. For more information, see Genesys Cloud supported languages.
- In a Genesys Cloud Voice or BYOC Cloud telephony connection, transcription occurs in near real-time and is available in the user interface and API within minutes of the interaction completing.
- With a BYOC Premises telephony connection, the transcription occurs after the recording has been completed and uploaded, and depends on the length of the interaction. Usually, this process takes about half the length of the interaction. As an example, once a 10-minute interaction has finished and is uploaded to the cloud, it takes around 5 minutes for the transcription to complete and become available to users. As a result, no real-time capabilities/use cases are supportable with this type of configuration.
- The EnabledGlobally setting in the /api/v2/routing/settings/transcription API enables transcription from the start of the conversation for the following call types: Direct External to Agent, Direct Agent to External, Inbound (Flow/Queue), and Outbound (Campaign). However, when encountering a Flow or Queue the transcription turns off unless turned on through a Flow Action or Queue configuration.
- When EnabledGlobally setting is enabled, ALL Outbound Campaigns and Direct calls are transcribed. There is no way to select which numbers or campaigns are transcribed.
Set up voice transcription
- Enable voice transcription in speech and text analytics.
- Enabled voice transcription based on agent queues. For more information, see Set behaviors and thresholds for all interaction types in Create and configure queues.
- Enable voice transcription for call flows. For more information, see Transcription action.
- (Optional) Enable voice transcription for outbound calls by turning on EnabledGlobally in the /api/v2/routing/settings/transcription API.
- Review how Genesys Cloud handles language selection on the Edge line and in Architect. Make any changes to ensure that the correct language is selected for voice transcription:
- Edge: For more information, see Set the trunk language.
- Architect: For more information, see Select a flow’s supported language and Set up a language selection starting task.
Select which transcription engine to use for voice transcription
By default, Genesys Cloud uses its own native Genesys Cloud Voice Transcription engine. Genesys also supports Extended Voice Transcription Services, which uses a third-party transcription service for added flexibility and access to more dialects and languages.
As an administrator you can choose which transcription engine to use for a specified dialect in a program. This step can only be done when Extended Voice Transcription Services is enabled as an Integration. For more information, see Purchase and install Extended Voice Transcription Services from Genesys AppFoundry.
- When a transcription engine is not defined, the system defaults to Genesys Cloud Native Transcription.
- Using Extended Voice Transcription Services incurs an additional per minute charge. See pricing for more details.
- Extended Voice Transcription Services does not support all languages.
- Agent Assist with a Google Cloud platform overrides both Native and Extended Voice Transcription. For more information about. Agent Assist, see Get started with Agent Assist.
- Enable voice transcription in speech and text analytics.
- Click Admin > Quality.
- Click Programs. A list of all available programs are displayed.
- From the Name column, click the name of the program for which you want to configure extended transcription. The selected program details are displayed.
Click the image to enlarge.
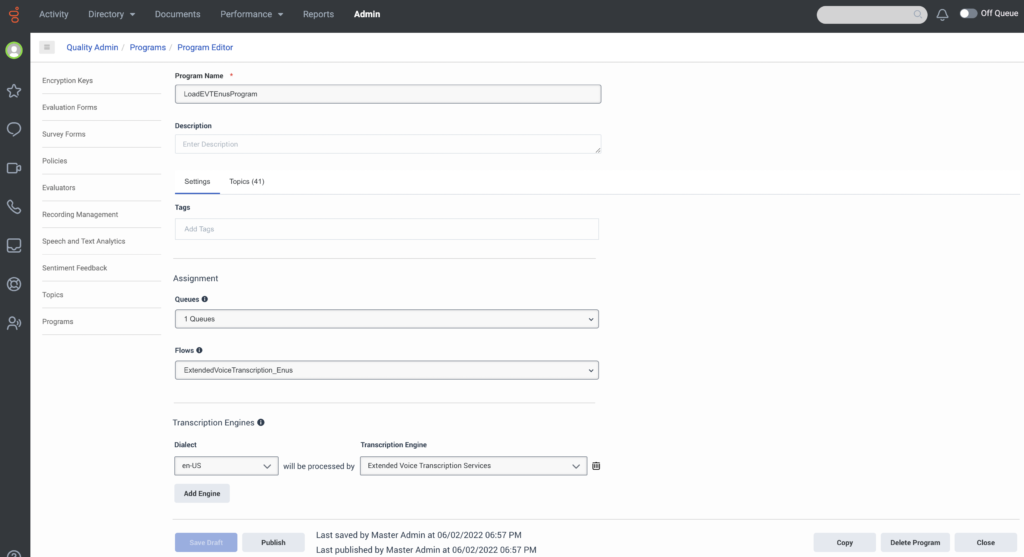
- In the Transcription Engine section of the UI, select the dialect and transcription engine to transcribe the interactions.
- Click Add Engine to add an additional transcript engine.
- Click Publish to update the system with your changes.
For more information about creating and editing programs, see Work with a program.