
Save a view’s filters and column settings
Prerequisites
- Analytics > View Configurations > View permission
- Analytics > View Configurations > Edit permission
- Any permissions needed for the selected view
Save the current view’s filter and column settings. Use the saved settings to switch quickly between different data of interest in the same view. For example, you could save a view that shows only certain queues, agents, or metrics, then change the view to show other data and save the view again. Now you can switch between those saved views. You can also save detail views that show aggregate data for groups of agents, queues, or DNIS numbers.
You can save view settings in the following views:
- Abandon Intervals Metrics view
- Action Map Blocked Offer Detail view
- Action Map Blocked Offer Interval Detail view
- Agent Development Detail view
- Agent Development Summary view
- Agents Evaluation Summary view
- Agents Evaluation Detail view
- Agents Interactions Detail view
- Agents Performance Summary view
- Agents Performance Detail view
- Agents Status Summary view
- Agents Status Detail view
- Agent Timeline Detail view
- Agent Topics Detail view
- Agent Topics Summary view
- Agents Queues Detail view
- Agent Workitems Performance Detail view
- Agent Workitems Performance Summary view
- Agents Wrap-Up Detail view
- Agents Wrap-Up Interval Detail view
- API Usage view
- Bot Performance Detail view
- Bot Performance Summary view
- Campaign Interactions Detail view
- Campaign Performance Detail view
- Campaign Performance Summary view
- Content Search view
- Data Actions Performance Detail view
- Data Actions Performance Summary view
- DNIS Performance Summary view
- DNIS Performance Detail view
- Email Agent Performance Detail view
- Email Agent Performance Summary view
- Email Queue Performance Detail view
- Email Queue Performance Summary view
- Flow Outcomes Summary view
- Flow Outcomes Detail view
- Flow Outcomes Interval Detail view
- Flows Destinations view
- Flow Milestone Detail view
- Genesys Agent Assist Performance dashboard
- Flow Milestone Interval Detail view
- Flows Performance Summary view
- Flows Performance Detail view
- Flow Topics Detail view
- Flow Topics Summary view
- Interactions view
- Journey Action Maps Summary view
- Journey Outcomes Summary view
- Journey Segments Summary view
- Message Agent Performance Detail view
- Message Agent Performance Summary view
- Message Queue Performance Detail view
- Message Queue Performance Summary view
- My Development view
- My Interactions view
- My Performance view
- My Status view
- My Evaluations view
- Predictive routing queue detail view
- Predictive routing queue impact view
- Predictive routing queues performance view
- Queues Activity Summary view
- Queues Activity Detail view
- Queues Agents Detail view
- Queues Interactions Detail view
- Queues Performance Summary view
- Queues Performance Detail view
- Queue Routing Performance summary view
- Queue Topics Detail view
- Queue Topics Summary view
- Queue Workitems Performance Detail view
- Queue Workitems Performance Summary view
- Queues Wrap-up detail view
- Scheduled Callbacks view
- Scheduled Exports view
- Skills Performance view
- Surveys Performance Detail view
- Surveys Performance Summary view
- Topic Trends Detail view
- Topic Trends Summary view
- Wrap-Up Performance Summary view
- Workitem Performance view
- Virtual Agent performance dashboard
Save a view’s current settings
- Click Performance > Workspace.
- Click Menu > Analytics > Analytics Workspace.
- Select the view that you want to save.
- Use the filter and column customization features for the view to show and organize the information you want.
Customization options to consider include:- Filter by media types
- Filter by interaction details
- Filter by user or queue
- Show or hide columns
- Reorder columns
Note: Each view has its own filtering abilities and column options. For more information about each view’s customization options, see its article. - To save the view with your filter and column settings, click Save View . The Save view pane opens.
- Click the Save To drop-down list and choose New.
- In the View Name field, enter a name for the view.
- To select a date range for the saved view, select one of the following default time periods:
- Selected Interval – Saves the view data with a static list of filtered interactions created within the selected time interval.
- Today – Saves the view data for that day. This dynamic list of interactions filter according to the specified time period.
- Yesterday – Saves the view data for the previous day. This dynamic list of interactions filter according to the specified time period.
- This week – Saves the view data for a Sunday through Saturday time period. This dynamic list of interactions filter according to the specified time period.
- Last week – Saves the view data for the previous week, Sunday through Saturday. This dynamic list of interactions filter according to the specified time period.
- This month – Saves the view data for the current month, with no extra days. This dynamic list of interactions filter according to the specified time period.
- Last month – Saves the view data for the previous calendar month with no extra days. This dynamic list of interactions filter according to the specified time period.
The date range is relative to the day that you use the saved view, not the day you saved the view. This dynamic list of interactions filter according to the specified time period.
Note: Some views do not support date ranges longer than one month. For those views, you cannot select Prior 3 months.
- Click Save.
Replace a saved view’s current settings
- Click Performance > Workspace.
- Click Menu > Analytics > Analytics Workspace.
- Select the view that you want to save.
- Click Save View . The Save view pane opens.
- Click the Save To drop-down and choose the existing view’s name.
- In the View Name field, enter a name for the view.
- To select a date range for the saved view, select one of the following default time periods:
- Selected Interval – Saves the view data with a static list of filtered interactions created within the selected time interval.
- Today – Saves the view data for that day. This dynamic list of interactions filter according to the specified time period.
- Yesterday – Saves the view data for the previous day. This dynamic list of interactions filter according to the specified time period.
- This week – Saves the view data for a Sunday through Saturday time period. This dynamic list of interactions filter according to the specified time period.
- Last week – Saves the view data for the previous week, Sunday through Saturday. This dynamic list of interactions filter according to the specified time period.
- This month – Saves the view data for the current month, with no extra days. This dynamic list of interactions filter according to the specified time period.
- Last month – Saves the view data for the previous calendar month with no extra days. This dynamic list of interactions filter according to the specified time period.
The date range is relative to the day that you use the saved view, not the day you saved the view. This dynamic list of interactions filter according to the specified time period.
Note: Some views do not support date ranges longer than one month. For those views, you cannot select Prior 3 months.
- Click Save. The Overwrite Existing View dialog box appears.
- Click Confirm.
Open and use a saved view
- Click Performance > Workspace.
- Click Menu > Analytics > Analytics Workspace.
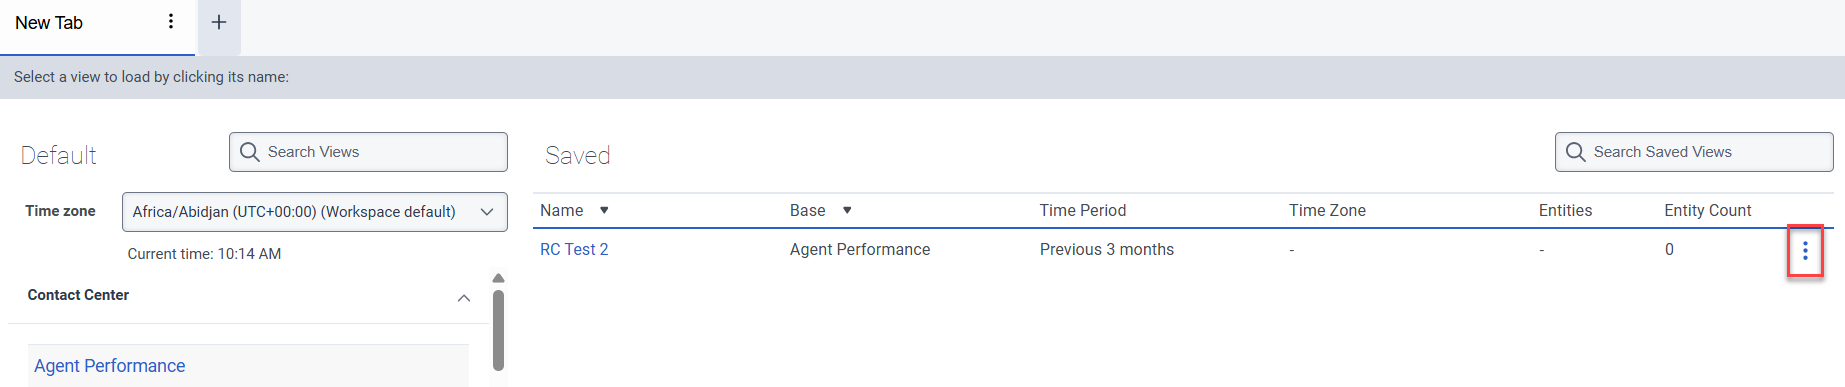
- From the Saved list, select the workspace you want to open.
Note: If the saved view has None selected as the default time period, then you do not leave the saved view when you change the date range on the view.
Edit the name of a saved view
- Click Performance > Workspace.
- Click Menu > Analytics > Analytics Workspace.
- From the Saved list, select the three dots at the end of the view’s row.
- Click the Rename view icon
 . The rename view pane appears.
 - Enter a new name in the field provided and click Save.
Note: You can only edit the name of a saved view. You cannot edit any filter, column, or date range settings. However, you can open a saved view, make changes, save your changes as a new saved view, and delete the saved view you no longer need.
Delete a saved view
- Click Performance > Workspace.
- Click Menu > Analytics > Analytics Workspace.
- From the Saved list on the right side, select the three dots at the end of the view’s row.
- Click Delete view. The Delete view dialog box appears.
- Click Confirm.