Queues Activity Detail view
The following permissions:
- Analytics > Conversation Aggregate > View
- Analytics > Conversation Detail > View
- Analytics > Queue Observation > View
- Directory > User > View (for division access)
- Routing > Queue > View
- UI > Supervisor Queue Details > View
- Routing > Queue > Edit or Routing > QueueMember > Manage (to activate and deactivate agents)
- UI > Supervisor Status Control > View (to change an agent’s status)
- OAuth > Token > Delete (to log an agent out of Genesys Cloud)
- Telephony > Station > Disassociate (to disassociate an agent from a station)
- Presence > UserPresence > Edit (for supervisors to toggle agents on and off queue)
- Conversation > Call > Assign (to assign a call to an agent manually)
- Conversation > Webchat > Assign (to assign a chat to an agent manually)
- Conversation > Message > Assign (to assign a message to an agent manually)
- Conversation > Callback > Assign (to assign a callback to an agent manually)
- Conversation > Email > Assign (to assign an email to an agent manually)
- Conversation > Call > Pull (to assign a call to yourself manually)
- Conversation > Webchat > Pull (to assign a chat to yourself manually)
- Conversation > Message > Pull (to assign a message to yourself manually)
- Conversation > Callback > Pull (to assign a callback to yourself manually)
- Conversation > Email > Pull (to assign an email to yourself manually)
- To preview an email in a queue that is enabled for manual assignment, require one of the following permissions:
- Conversation > Email > Assign
- Conversation > Email > Pull
- To preview an email in a parked state:
- Conversation > Communication > Target (for division access restriction)
- Conversation > Communication > Transfer
- One of the following permissions:
- Conversation > Communication > blindTransfer
- Conversation > Communication > blindTransferAgent
- Conversation > Communication > blindTransferQueue
The Queues Activity Detail view allows you to see real-time information about a specific queue. See a queue’s current interactions, agents, and service levels in one view. Check the number of interactions that are waiting or interacting and the status of agents in that queue. Manually assign waiting interactions in a queue to an available agent. Activate or deactivate agents based on need.
Available columns
To view the available columns, see the Queues Activity Detail view section in the View available columns in performance views by category article.
- To view the consolidated list of available columns in the performance views, see Consolidated view of available columns in performance views.
- To view the list of available columns in the performance views by category, see View available columns in performance views by category.
To open a queue’s activity detail view, complete the following steps:
- Click Performance > Workspace > Contact Center > Queue Activity.
- Click Menu > Analytics > Analytics Workspace.
- In the Default section, search for Queue Activity and then click the view name to open it.
- From the Queues Activity Summary view, click a queue’s name.
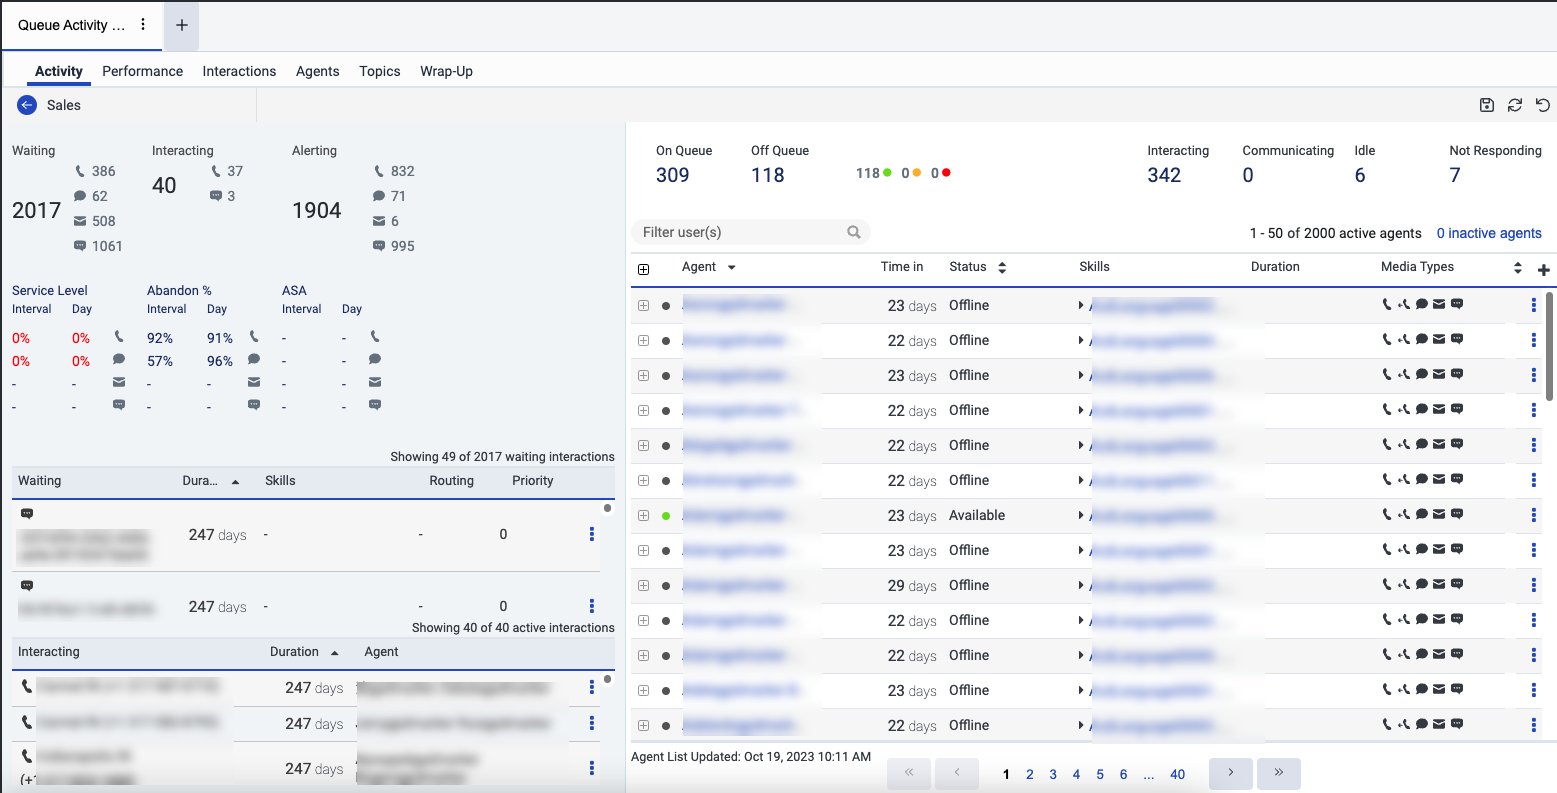
The information in the Queues Activity Detail view updates in real time. The Interaction panel information on the left side and the agent status counts on the upper right always update in real time. The data in the agent table in the lower left, except status and interaction data, do not update live until you apply a status filter.
The agent Activate and Deactivate settings prevent the auto-page refresh. When you activate or deactivate an agent, to update the Agent list, click Refresh at the top of the page.
- Calls that are part of the callback appear as a separate interaction from the callback. These interactions appear as two separate interactions.
- The Queues Activity Detail view is based on real-time statistics. The active callback interactions are available for 14 days.
- A consult with two agents appears as two separate interactions.
- The Waiting list and Interacting lists show a maximum of 100 interactions per media type across both lists. If a media type has more than 100 interactions, then the lists display only 50 interactions for that media type.
- The Updated time stamp, at the bottom of the agent panel, indicates the last time the list of agents was updated before you apply a filter or click Refresh .
Manage access to Queue Activity detail view based on division permissions
You can manage access to the Queue Activity detail view based on the division permissions of the user. You can restrict the managers and team leads from viewing the agent detail or performance information in the Queue Activity detail view. For example, if you have permission for division 1 and division 2 alone, then you can view the detail or performance information of the agent belonging only to division 1 and division 2 alone. You cannot view the agent detail or performance information of other divisions. The details of the agents belonging to other divisions are blurred out.
If obfuscation is on, you must have the Directory > User > View permission for the division to access any user in that division.
To enable the division permission, use Developer Tools or your application of choice to make the following API call:
PATCH /api/v2/analytics/reporting/settings
{ “queueAgentAccessObfuscation”: true }
Click the image to enlarge.

On exporting the Queue Activity detail report, the blurred-out agent name displays as REDACTED.
Click the image to enlarge.

The following information is available in the Queues Activity Detail view.
These terms relate to interactions in the queue and are on the left side of the view.
| Term | Description |
|---|---|
| Waiting | Interactions that are in the queue and waiting for an agent to answer them. |
| Interacting |
Interactions that an agent has answered and is working on. |
| Alerting | The total number of alerting conversations. |
|
Priority |
The priority assigned to the conversation when it was routed to the queue. |
| Duration |
The amount of time since an interaction entered the queue or an agent answered the interaction. In the Waiting list, Genesys Cloud bases duration on the amount of time an interaction has been waiting in the queue. In the Interacting list, Genesys Cloud bases the duration on the amount of time since an agent answered the interaction. |
| Skills | The skills specified for the interaction. |
| Routing |
Displays the routing methods that were requested for the interaction. Note: Depending on the routing method selected for each queue, administrators set up timeout options where, after a set period, Genesys Cloud transitions from one routing method to another. For example, the queue starts out by using Preferred Agent Routing, and after some time, transitions to Bullseye Routing, and after another amount of time, transitions to standard routing. Depending on the setup and how long it takes for an interaction to be answered, different combinations are listed. |
| Agent | The agent who is working on the interaction. |
| Service Level | Service level target is a contact center performance statistic expressed as “X percent of conversations answered in Y seconds.” For example, a goal of answering 80% of voice calls within 20 seconds provides a service level target of 80/20. You can set the service level target for each media type in a queue. Analytics uses this service level target to calculate whether you are within the service level % defined by your service level agreement (SLA). For more information about setting the service level target, see Create queues or Edit or delete queues. Note: In the performance views that are not queue-specific, the Service Level % is calculated by queue and displayed as a – on the aggregated group row since SLA targets vary by queue. The affected views are DNIS Performance Summary and Skills Performance views. To view individual queue service level %, click the + to expand the row.
The service level % is the percentage of interactions that meet your contact center's service level target. The formula to calculate the service level % is:
Number of Conversations Answered within SLA The numerator is calculated by taking the total answered conversations and subtracting the conversations that were not answered within the SLA threshold. Calculated by: (Answered Count – SLA Violation Count) Total Number of Conversations The Service Level Options configuration determines the denominator. With all the options below unchecked, the denominator is the count of answered conversations.
As the service level calculation depends on an organization’s configured options, the final formula to calculate the service level is:
Notes:
|
| Abandon % | The percentage of offered interactions in which the customer disconnected before connecting with an agent. The abandon rate can identify queues that require extra staff to handle interactions in a timely manner. Calculated by: (Abandoned Count / Offered Count) * 100 |
| ASA | The average amount of time an interaction waits in the queue before an agent answers. This metric does not include interactions that agents do not answer. Average Speed of Answer (ASA) is directly associated with the service level and provides insight into the customer service your organization provides. ASA is recorded in the interval in which the agent answered the interaction. Calculated by: Total Answered (tAnswered Sum) / Answered Count (tAnswered Count) Note: Raw values are provided in milliseconds. |


These terms relate to agents in the queue and are on the right side of the view.
| Term | Description |
|---|---|
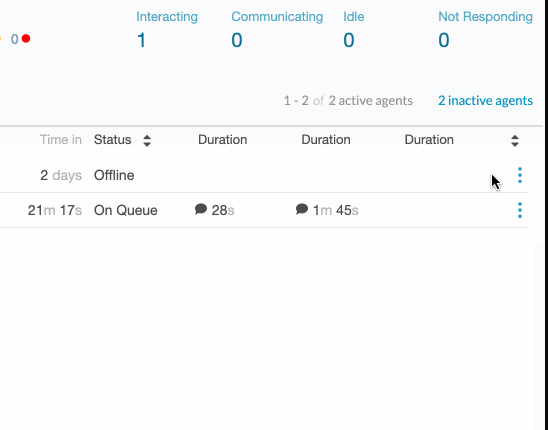
| On Queue | The On Queue metric represents the number of agents that are on queue for a specific queue. |
| Off Queue | Off Queue represents the number of agents that are off queue for a specific queue. These agents are in another status, such as Available, Busy, or Meeting. Agents in the Out of Office and Offline statuses are not included in this number. |
| Presence indicators | Indicates the number of agents off queue and in a particular status: green (Available), yellow (Away, Break, Meal, or Training), or red (Busy or Meeting). |
| Interacting | The number of agents working with interactions. This number includes agents completing after call work. |
| Communicating | The agent is on a non-ACD call, and, in relation to agent utilization and call routing, Genesys Cloud treats the non-ACD call like an ACD call. For example, administrators could configure agent utilization so Genesys Cloud does not route new interactions to agents while they are on an ACD or non-ACD call. This status only appears if administrators have selected “Count non-ACD calls in utilization capacity” within the agent utilization configuration. |
| Idle | The amount of time an agent spends in the Idle routing status. This routing status represents agents who are On Queue and able to take interactions but are not currently working with interactions. |
| Not Responding | An agent was On Queue or Interacting and did not answer an offered interaction. The agent could still be handling and completing other previous interactions. While Not Responding, the agent does not receive new interactions. |
These icons indicate specific media types throughout the view.
| Icon | Media Type |
|---|---|
| Voice | |
| Callback | |
| Chat | |
| Messages |
Customize the view
To show only certain data, customize the Queues Activity Detail view. For example, you can choose to show only certain columns or filter to see agents in certain statuses. Your customizations remain as you leave and return to a view. You can also save your customizations as a saved view to switch between different data of interest in the same view.
To filter the displayed interactions to see only waiting interactions, click the Waiting statistics section. 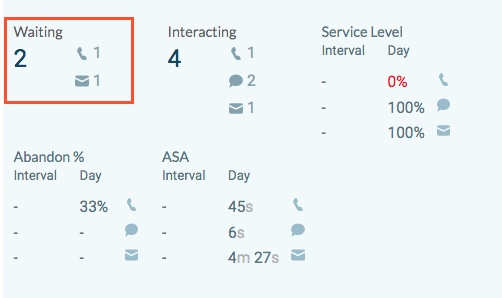
To filter the displayed interactions to see only interacting interactions, click the Interacting statistics section. 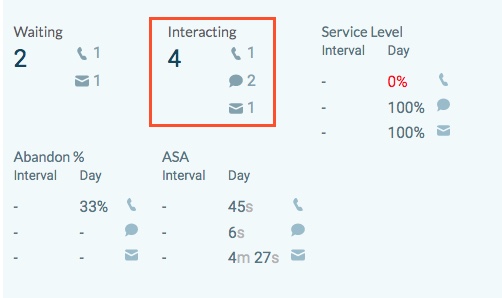
To stop filtering, click the selected filter again.
To sort the Waiting and Interacting lists by duration, click the Duration column header. 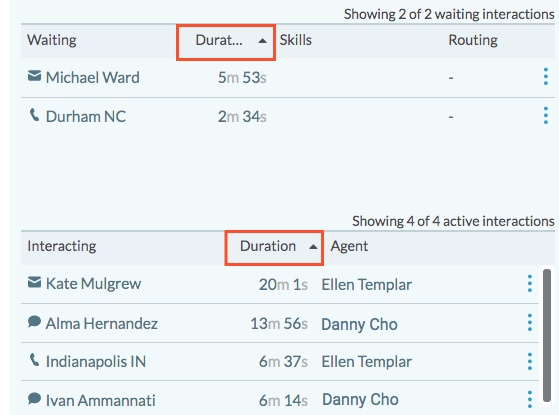
In the Waiting list, Genesys Cloud bases duration on the amount of time an interaction has been waiting in the queue.
In the Interacting list, Genesys Cloud displays the time duration since an agent answered the interaction.
You can manually assign waiting interactions to on-queue agents, or to yourself.
Manually assign a waiting interaction in a queue to an on-queue agent
- From the Queues Activity Detail view, in the Waiting list, find the interactions waiting in the queue.
- For a waiting interaction, select the moremenu beside the interaction.
- On the menu, select Assign to Other.
- In the search box, begin typing the on-queue agent's name. As you enter a name, agent names are displayed in the search results.
- Select the agent's name.
For an agent to assign a waiting interaction to themself
- From the Queues Activity Detail view, in the Waiting list, find the interactions waiting in the queue.
- For a waiting interaction, select the moremenu beside the interaction.
- On the menu, select Assign to Self.
To monitor an interaction, select More beside the interaction in the Interacting list. Then click View Details.
The interaction’s detail page appears in a new tab. You can jump between the interaction tabs to see the interaction list view and the interaction detail view. The title of the interaction detail view tab shows the truncated Interaction ID and has a fixed width as all other tabs in the workspace. When hovering on the tab name, a tooltip with the untruncated Interaction ID displays.
- When switching between the interaction detail view tabs, the recording playback stops working.
- When switching between the interaction detail view tabs, the following features on the interaction detail view tab continue to work as expected:
- Monitor/coach/Barge a live call
- Interaction download
- Quality management/evaluations
- Schedule Coaching
- Audit Trail tab
- The number of interaction detail view tabs that can be opened at a time is limited to a maximum of 20 tabs. If the user opens a new tab by clicking an interaction while 20 tabs are open, the new interaction detail tab opens in the existing tab.
Click More in the title of the interaction detail view tab and choose the required task to perform any of the following:
| Columns | Description |
|---|---|
| Reload | Reloads the current tab alone. |
| Duplicate | Creates a duplicate copy of the current tab. |
| Close | Closes the current tab alone. |
| Close all tabs | Closes all the open tabs. |
| Close other tabs | Leaves the current tab open and closes all the other open tabs. |
To rename the title of the interaction detail view tab:
- Click Save View on the right side. The Save view pane appears.
- Click the Save To drop-down list and perform one of the following steps:
- To save the view as a new view, click New and in the View Name field, enter a name for the view.
- To overwrite the existing view’s current settings, click the existing view’s name.
- Click Save. The title of the interaction detail view tab changes.
The interaction’s detail page appears. For more information about monitoring an interaction, see Monitor in-progress interactions.
The supervisor can preview an active email while in queue or parked state to gain a clear understanding of the content before assigning it to themselves or another agent. The email preview feature helps evenly distribute the workload to prevent burnout, significantly improve query handling speed and productivity, and ensure faster response times to customer inquiries while maintaining high service levels.
To preview an active email:
- From the Queues Activity Detail view, in the Waiting list, find the interactions waiting in the queue.
- Click the More icon corresponding to the required interaction and click the Preview email icon. The preview email window opens.
To filter the agent list to see only agents who are in a specified routing status, click the routing status above the agent list that you want to filter by. For example, click Not Responding to see only agents who are not responding.
To stop filtering, click the selected routing status again.
For more information, see Routing status.
Search for and filter agents in the agent list by an agent’s name, skills, or language.
- In the Filter user(s) box, type the name, skill, or language that you want to filter the agent list by.
- From the list that automatically displays, select a category for the keyword. For example, if you want to filter the agent list to show only agents who speak English, type English, then select in Languages.
- If you want to add more filters, repeat the previous steps. You can filter by multiple skills and languages, but you can only filter by one agent name.
- To delete a filter, click X next to the filter’s keyword.
To filter the agent list by an agent’s status, click the up and down arrows beside the Status column heading.
Then select a status from the list. To filter by more than one status, select another status.

- You can filter by multiple user presence statuses, such as Busy and Meeting, or multiple routing statuses, such as Idle and Not Responding. However, you cannot filter by a combination of presence and routing statuses.
- On filtering the agents’ list by user presence or routing status, the list of agents gets updated in real time as agent statuses go in and out of the selected filters.
- When filtering by Status, the Agent column arrows are not available for ordering the agents’ list. Use the Time in column to order the agents’ list when filtering by Status.
- On applying a status filter, the list of agents is limited to five pages of users.
To show or hide columns:
- At the top right corner of the columns, click the Pick columns icon. The Add/Remove Column pane appears.
- Click the Manage columns tab.
- (Optional) To sort the columns in ascending or alphabetical order, click Sort by > Column Name A-Z.
- (Optional) To sort the columns in descending or reverse alphabetical order, click Sort by > Column Name Z-A.
- (Optional) To categorize or uncategorize the columns, click Sort by and enable or disable the Group by Categories toggle.
- Search or scroll to select the columns you want to view. Note: You can also use keyboard navigation to choose the columns.
- Click Save. The selected columns appear on the screen. Note: The column selections appear only after saving the changes and do not apply to the table immediately.
To reorder the columns within the column picker:
- At the top right corner of the columns, click the Pick columns icon. The Add/Remove Column pane (column picker) appears.
- Click the Reorder columns tab.
- Click the grid icon
 of a column, and then drag and drop to reorder it within the column picker.
- Click to select the grid icon of the column to be reordered, and on the keyboard, press the Spacebar.
- To position the column, use the Up or Down arrow keys.
- Press the Spacebar. The chosen column is reordered.
To rearrange the columns outside the column picker, click a column header and drag it.
To reset a view to default column settings, click Reset view to defaults .
You can select up to 20 columns.
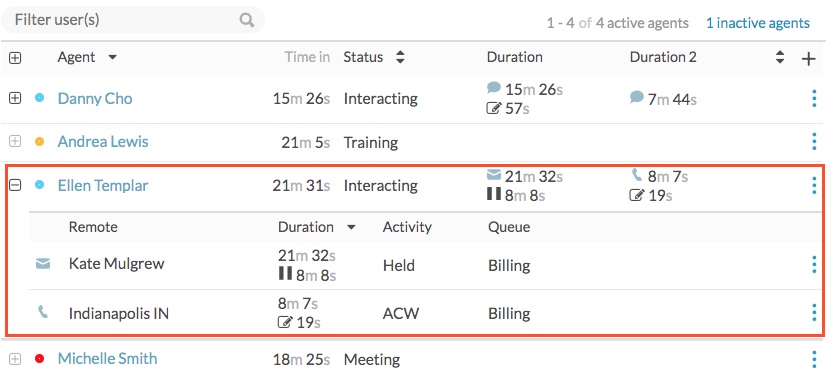
When a user is on multiple conversations, Duration columns can be displayed, horizontally, to show the duration time for the interactions from Shortest to longest, or Longest to shortest.
To rearrange the Duration columns in the agents list:
- Click the Sort icon to the right of the Duration columns in the table header.

- Select either Shortest to longest or Longest to shortest. Here’s an example.
This setting also applies to the interactions listed below an agent when you view more information about an agent’s activity.
To see more information about an agent’s current activity, click More details next to that agent’s name. When expanded, the row shows the current activity for each of the agent’s interactions, such as Interacting, ACW, or Hold. It also shows how long the interaction has been in that state.
Managers can activate and deactivate agents in queues.
- To activate an agent for a queue, the agent must be a member of that queue.
- To view more information about an agent or activate them for a queue, the agent must be in a division granted to you in the Directory > User > View permission. For more information about divisions and access control, see About access control.
After you activate an agent for a queue, when the agent’s status is On Queue, the agent receives interactions from that queue. Agents can also choose the queues to work themselves.
Activate and deactivate agents to and from queues
- Click Performance > Workspace > Contact Center > Queue Activity.
- Click Menu > Analytics > Analytics Workspace.
- In the Default section, search for Queue Activity and then click the view name to open it.
- Select the appropriate queue.
- From either the active agents or inactive agents list, click the more menu beside an agent’s name.
- Click either Activate or Deactivate to activate or deactivate the agent for the queue.
To change an agent's status, complete the following steps:
- Click Performance > Queues Activity.
- Click Menu > Analytics > Analytics Workspace.
- In the Contact Center section, click Queue Activity.
- Select a queue in which the agent is a member.
- From the queue's activity detail view, hover over the presence dot beside an agent's name.
- To set the agent's status to Off Queue or On Queue, select On Queue or Off Queue. If you change the status from On Queue to Off Queue, then the agent's status automatically also changes to Available.
- To set the agent's user status, select a status from the status drop-down. If the agent's status is On Queue, selecting a user status also sets them to Off Queue.
Note: The status drop-down does not have an option to change an agent’s status to Out of Office. If an agent’s presence status is Out of Office, it cannot be changed. - If the status you select has secondary statuses, select a secondary status in the drop-down below the primary status.
From the Queues Activity Detail view, hover over the presence dot beside an agent’s name.
To log out an agent, click Log off. If the agent is On Queue, set the agent's status to Off Queue, and then click Log off.
From the Queues Activity Detail view, hover over the presence dot beside an agent’s name.
To disassociate an agent from the station, click Disassociate Station.
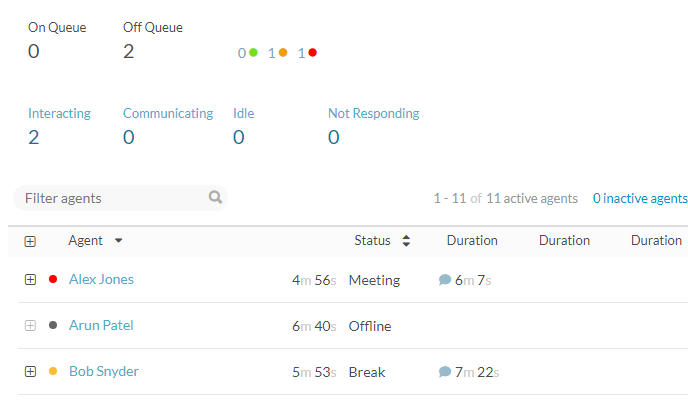
In both the Queue Activity Summary and Detail views, user statuses and routing statuses sometimes add up to more than the total number of agents in the queue. This situation arises when agents change their user status while working with interactions.
For example, agents Bob and Alex are each working with an interaction. Bob changes his status to Break, and Alex changes his status to Meeting, but they both still have a chat interaction. In this situation, the view displays “2” in the Off Queue section, but it also displays “2” in the Interacting section.