
Export view data
The following permissions:
- Analytics > Data Export > All
- Analytics > Data Export > Publish (to export to email addresses)
- Analytics > Data Export > Schedule (to schedule exports)
- Reporting > Custom Participant Attributes > view (to export custom participant attributes)
- Analytics > dataExportStaticLink > View
Note: If you have the Analytics > dataExportStaticLink > View permission and the export URL, you can download all static link exports. You can share the static link exports with users and third-party applications. The user’s export configuration dictates the control over data shared within a static link export.
Export the data from selected views as a CSV file or a PDF report delivered to your inbox in Genesys Cloud. You can export all the data from a view or export only the data from selected columns.
You can export data from the following views, including aggregate performance data for the detail views listed:
- Abandon Intervals Metrics view
- Action Map Blocked Offer Detail view
- Action Map Blocked Offer Interval Detail view
- Agent Development Detail view
- Agent Development Summary view
- Agents Evaluation Summary view
- Agents Evaluation Detail view
- Agents Interactions Detail view
- Agents Performance Summary view
- Agents Performance Detail view
- Agents Status Summary view
- Agents Status Detail view
- Agent topics detail view
- Agent topics summary view
- Agents Queues Detail view
- Agent Workitems Performance Detail view
- Agent Workitems Performance Summary view
- Agents Wrap-Up Detail view
- Agents Wrap-Up Interval Detail view
- Bot Performance Detail view
- Bot Performance Summary view
- Campaign Interactions Detail view
- Campaign performance detail view
- Campaign performance summary view
- Content Search view
- Data Actions Performance Detail view
- Data Actions Performance Summary view
- DNIS Performance Summary view
- DNIS Performance Detail view
- Email Agent Performance Detail view
- Email Agent Performance Summary view
- Email Queue Performance Detail view
- Email Queue Performance Summary view
- Flow Outcomes Summary view
- Flow Outcomes Detail view
- Flow Outcomes Interval Detail view
- Flows Destinations view
- Flow Milestone Detail view
- Flow Milestone Interval Detail view
- Flows Performance Summary view
- Flows Performance Detail view
- Flow topics detail view
- Flow topics summary view
- Interactions view
- Journey Action Maps Summary view
- Journey Outcomes Summary view
- Journey Segments Summary view
- Message Agent Performance Detail view
- Message Agent Performance Summary view
- Message Queue Performance Detail view
- Message Queue Performance Summary view
- My Development view
- My Interactions view
- My Performance view
- My Status view
- My Evaluations view
- Queues Agents Detail view
- Queues Interactions Detail view
- Queues Performance Summary view
- Queues Performance Detail view
- Queue Routing Performance summary view
- Queue topics detail view
- Queue topics summary view
- Queue Workitems Performance Detail view
- Queue Workitems Performance Summary view
- Queues Wrap-up detail view
- Scheduled Callbacks view
- Scheduled Exports view
- Skills Performance view
- Surveys Performance Detail view
- Surveys Performance Summary view
- Topic Trends Detail view
- Topic Trends Summary view
- Wrap-Up Performance Summary view
- Workitem Performance view
- Click Toggle export panel . The Export pane opens.
- Change the name of the file or keep the default file name in the Export Name field. The default file name includes the date and the name of the view. If you export data from the same view multiple times in one day, then all of those files have the same default name.
- Agent Status Summary view only: Select one of the following options:
- Agent Log In – Log Out Details – Exports the agent’s log in and log out activity.
- Agent Status Timeline Details – Exports the agent’s changes.
- Agent Status Duration Details – Exports the time the agent spent in each status.
- Agent Status Detail view only: To obtain agent log in and log out information in the Export file, select the View as group and Split Filters options.
- Agents Evaluation Summary view and Agents Evaluation Detail view only: Select one of the following options:
- Agent Evaluation Summary (default) – Exports the evaluation summary information of single or multiple agents.
- Agent Evaluation Detail – Exports the evaluation details of single or multiple agents selected. The evaluation details include Interaction Date/Time, Evaluation Date/Time, Evaluator, Media Type, Total Score, Critical Score, and Evaluation Form.
- Campaign Interactions Detail view only: Select one of the following options:
- Campaign Interactions Details (default) – Exports the interactions for the campaign based on the view that you have selected.
- Detailed Attempt History – Exports the details of each attempt of a campaign.
- In the Recipients field, to send a CSV file or a PDF report in an email, enter up to 10 email addresses, separated by a semicolon (;) or a comma (,). Note: If the entered email address is invalid, an alert message appears. To export to email addresses, make sure that you have the Analytics > Data Export > Publish permission. The limit for an email attachment export is 10MB.
- Interval breakdown exports only: Select a Granularity according to the selected time period. Note: The Granularity option applies to both the Scheduled export of all views and the ad-hoc exports of these views:
Queues Performance Detail view
Abandon Intervals Metrics view
Agent Performance Detail View
Agents Status Detail view
Agents Wrap-Up Interval Detail view
DNIS Performance Detail view
Campaign performance detail view
Data Actions Performance Detail view
Bot Performance Detail view
Flows Performance Detail view
Flow Outcomes Interval Detail view
Flow Milestone Interval Detail view
My Performance view
My Status view
Topic Trends Detail view
Abandon Intervals Metrics view
Flow Outcomes Interval Detail view
Flow Milestone Interval Detail view - In the file Format box, select CSV or PDF.
- To export all the columns shown in the view, enable Include all columns.
- To export associated participant data for conversations, enable Include Custom Attributes. The attribute data is only available for export on conversations processed by an overnight data pipeline.
- Click Schedule. Under Frequency, choose one of the following:
- Run Once – To export data only once. Note: The granularity for the log in and log out data in the export varies, based on the selected time period. If the chosen time period is today or yesterday, then the granularity is 30 minutes. If the chosen time period is one of the following: this week, last week, the previous seven days, this month, last month, and the previous 30 days, then the granularity is daily. If the time period is greater than 30 days or this month by week, then the exports do not include log in and log out data.
- Recurring – To schedule export data to recur. Upon selecting a recurring schedule export, perform the following:
- Choose a Time period.
Note: Delivery time can vary depending on the amount of data requested and the number of concurrent exports the platform runs. - Interval breakdown exports only: Select a Granularity according to the selected time period. Note: The granularity for the export data in the export varies, based on the selected time period. If the chosen time period is today or yesterday, then the granularity is 30 minutes. If the chosen time period is one of the following: this week, last week, the previous seven days, this month, last month, and the previous 30 days, then the granularity is daily. If the time period is greater than 30 days or this month by week, then the exports do not include log in and log out data.
- Select a Recurrence for the export to run. Note: The recurrence options vary based on the chosen time period. Choose the options for your selections, such as Run on hours, Minutes past the hour, Request Time, Run on Days, Day of week, Day of month, and Day of quarter. The day of the month is set to go up to 28 to ensure that the recurrence applies to all the months.
- (Optional) Enable Generate Static Link to create a static link to an exported file in a centralized location. A third-party tool can access the file repeatedly. When an external tool downloads the file from the static link location, the most recent scheduled export downloads from the Genesys Cloud platform. When working with third-party applications that require a system account to download a static export, Genesys recommends that you create an OAuth client with permission to access static exports. For more information, see Generate static link. All export URLs are in the following locations:
- Inbox – On delivering a completed export to a user’s inbox and selecting a Generate Static Link, you can copy the static link. Open your inbox and select the Exports icon at the top of the page. Locate the export and expand the three-dot menu . Select the Copy Static Link option to copy the static link to your machine’s clipboard.
- Scheduled Exports view – On delivering a completed export to a user’s Scheduled Exports view and selecting a Generate Static Link, you can copy the static link. Select Preferences > Workplace > Scheduled Exports, click the three-dot menu associated with the static link that you want to copy, and click the copy link icon. Note: The copy link button gets disabled when the export is incomplete. After the export’s first successful scheduled run, the copy link button will be available.
- Choose a Time period.
- Run Once – To export data only once.
- Click Formatting and perform the following:
- Select the required Duration Format. Time values are in Milliseconds, Seconds, HH:MM:SS, and H:M:S.
- (Optional) To view time values in the column heading, enable Show duration format in column headers.
- To convert the export file time values from the time zone set on your computer to a different time zone, from the Time zone drop-down menu, select the required time zone for your export file. The scheduled export feature does not choose the time frame automatically.
- To set the locale for the data exported from a view, select the required Language in the locale box. The locale setting displays text, date, and time formats in the selected language.
- To separate values, select the Semicolon (;) Delimiter or Comma (,) Delimiter. Note: The delimiter option is available for CSV export files only.
- If you view the data as a group (View as group) of agents, queues, or DNIS numbers, then to include the group aggregate data for all the filters plus the individual data for each of the filters, in the Export pane, select Split Filters.
- To split metrics by media type within the export, enable the Split by Media Type.
Note: When using the split by media type option and selecting only one media type, the export includes all other media types as well. - To add a row to the top of your export that includes the sum of all the numeric columns, enable the Include Summary Row check box. Note:
The Include Summary Row option is available only for the views with Include Summary Row only.
In the export file, the summary row displays the aggregates of all the rows in the file. - To remove rows in the export file that do not have data, enable the Exclude Empty Rows check box. Note:
The Exclude Empty Row option is available only for the views with Exclude Empty Rows only.
On selecting the Exclude Empty Rows option, the export excludes the rows without data only in the visible columns.
- Click Export. The file appears in your inbox.
The top portion of the inbox shows the number of Expired Exports and the number of Exports Expiring Soon.
- Expired Exports are defined as exports that were created 100 days ago.
- Exports Expiring Soon is defined as the exports that were nearing the export expiration criteria of 100 days. The exports are added to the exports expiring soon list before seven days of expiry.
Click View Scheduled Exports to navigate to the Scheduled Exports view page.
Click Renew Expiring Exports to renew the list of scheduled exports about to expire.
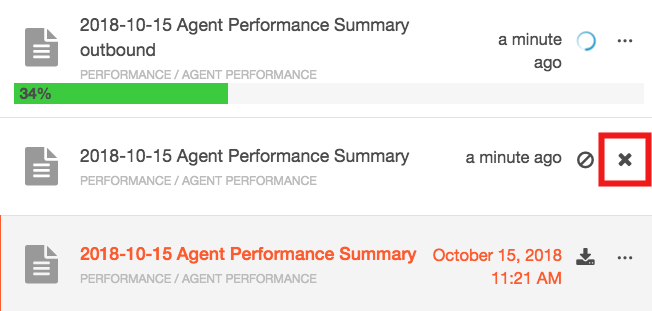
In the inbox, you can see the status of your exports including a progress bar displaying the completion percentage of the export.
| Symbol | Status | Description |
|---|---|---|
| Submitted | Genesys Cloud received your request for the export and creates the export. | |
| In Progress | Genesys Cloud is creating your export. | |
| Canceling | Genesys Cloud is in the process of canceling the export. | |
| Canceled | Genesys Cloud canceled the export. | |
| Error | An error occurred during the creation of the export. | |
| Complete | The export is complete and you can download it. | |
| Partial results | The export contains partial results and that you can download. |
Genesys Cloud completes exports in the order that you request it. To start another export, cancel a current long-running export.
- On the sidebar, click Inbox
 .
. - In the Inbox pane, click Exports .
- Beside an in-progress export, click More .
- Click Cancel Export. Genesys Cloud starts the next export waiting to run.
- To clear the canceled export, click the X beside the export.
-
- On the sidebar, click Inbox .
- In the Inbox pane, click Exports .
- Beside the export you want to download, click Download. The system downloads the export to your computer’s Downloads folder.

- To delete the file, click More > Delete Export.
 Note: When you delete a scheduled export, previously exported files for the schedule no longer appear in your inbox.
 - To mark an export as read, click More > Mark as Read.
- To copy an Export ID, click More > Copy Export ID.
- To copy a static link, click More > Copy Static Link. For more information about how to copy the static link, see Generate static link.
Note: The Copy Static Link option appears only if you configure it on the export.
- On the sidebar, click Inbox .
- In the Inbox pane, click Exports .
- To rerun the failed export, click More > Run Now.
Note: The Run now option is limited to only once per hour. You can only retry the failed exports once. If an export repeatedly fails, contact Genesys Product Support for further investigation.
Exports that run frequently or cover large data sets affect responsiveness for your entire organization. Exports are queued for processing in the order they are submitted, so when many exports are triggered at the same time, you might find that the exports are showing in the Inbox with a submitted status. Therefore, when creating exports configure them so that they give you the information to run your business effectively, but consider some of the following best practices to maximize performance.
Genesys Cloud does not have rules for when you can run exports because factors vary by organization: export responsiveness is a combination of view settings, time of day, and how busy the system is when exports run. To minimize export run time, ask yourself the following questions:
- Are my view filters overly broad? For example, am I running a "year to date" export every day? Am I running an export that has hundreds of users when I only care about a smaller number?
Best practice: Adjust export filters so that the export includes fewer agents, queues, interactions, or days. The less data in the export, the quicker it completes.
- Am I running my exports at the same time as other users?
Best practice: If possible, run exports during non-peak hours. For example, run daily, weekly, and monthly exports late at night or early in the morning. For hourly exports, we see that many users run right at the hour or a few minutes after, so choose non-peak times of day: 10 or 15 minutes before or after the hour.
- Do all my colleagues run this exact same export at the exact same time?
Best practice: Ask one user to run and distribute exports that the entire team uses.
- Am I asking for more data than I need?
Best practice: If you only need a subset of the total columns available, using Selected Columns speeds up your export time, especially for the agent views.
Limits
Consider these data export and view constraints:
- Exports for the Views that contain large datasets can take longer to generate and are unavailable to download immediately. These exports appear as “in progress” in the inbox and are downloadable from the inbox upon completing the export process.
- Genesys Cloud automatically deletes the exported file from your inbox 10 days after you create it.
- You can export up to 2,500 entities at a time in aggregate Performance views. Use primary filters to break down your export into separate export files. For example, you can filter the agents by Agent name, Role, Reports to, Location, Group, or Division.
- When you export via the View as group option in the aggregate detail views, you can export up to 100 Queue IDs or 300 User IDs. If you exceed these limits, a warning message appears, preventing the export. Consider reducing the number of queues or user IDs in your group to filter out the number of entities in your view when exporting to a file.
- You can export a maximum of 1,000,000 rows.
- Several columns cannot be included when exporting CSV files or PDF reports. For more information, see Available Columns in Agents Status Summary view and Agents Performance Summary view.
- The maximum number of schedules per user is 20 and not able to be expanded.
- For more information on limits, see Genesys Developer Center.
What data is exported?
The export file contains all the exported data available in the view with the following differences:
- The export contains all the rows for the view and not just the rows visible on the current page.
- All the available columns in the pre-defined order are included in the export by default. To export only selected columns and/or change the order in which the columns appear in the exported file, select Selected Columns options.
- The additional filters column includes the information on the filters that were used in the View. The column is empty when no filter is used.
- The export displays time values in milliseconds, seconds, HH:MM:SS, and H:M:S. You can select the required time value and export the views.
- The export displays percentage values as decimals, while the views display them as whole numbers. For example, the export displays 0.8 for 80 percent.
- If the view shows the current interval, then the Interval Complete column in the export says FALSE.
- Exporting from the Interactions view has restrictions when exporting newer conversations. When you use the filtering by date option to export recent conversations and if the number of conversations per 12-hour period exceeds the preset limit, the export file has only partial results. The export file includes a partial result date and time indicating the most recent available conversations. If you need the recent conversations, apply filters to the search criteria so that the total conversations queried are below the preset limit. For more information about platform limits, see Genesys Cloud Platform Limit API.
- The Interactions views’ export file contains two more columns: Full Export Completed, and Partial Result Timestamp. For more information about these columns, see Interactions view, Agents Interactions Detail view, and Queues Interactions Detail view.
- The Interactions views’ export file contains a Wrap-up Notes column that includes agent after-call work notes.
- The Detailed Attempt History view’s export file contains the following columns for the selected interactions or all the interactions:
- Name of the campaign
- Date of attempt
- Conversation ID
- Start time of the attempt
- Dialing
- Time to Agent
- Time to flow
- Time to abandon
- Disconnect time
- Conversation Duration
- DNIS
- Caller-ID
- Caller-ID Name
- Wrap-up code
- Wrap-up duration
- Contact ID
- Contact List
- For more information about the columns that export, see View available columns in performance views by category.