
Generate static link
The following permission:
Analytics > dataExportStaticLink > View
Static URLs leverage the existing export functionality within the Analytics Workspace to provide the exported file to a centralized location. This process enables third-party tools to access the file repeatedly. When an external tool downloads the file from the static link location, Genesys Cloud downloads the most recently scheduled export.
The diagram illustrates the key difference between a scheduled export versus a scheduled export that drops the latest run to the static link location.

When you configure a scheduled export from the Analytics Workspace and the Generate Static Link option is enabled, each export run replaces the file in the static URL location. Any application that supports downloading files from third-party sources can then be configured to download from this location (according to a schedule), to receive the latest export run.
Export configuration
Configure an export
- Choose a workspace that contains the data that you want to extract. For more information, see Export view data.
- Configure all columns and filters to display the data that you want to export.
- Click the Export icon . The export panel opens.
- Enter a name for the export and select the Schedule Export option to open the export schedule configuration.
- To designate the time period, recurrence, export time, and days of the week, select the preferred export parameters.
- To generate a static link for this export, select Generate Static Link. In the example below, the export runs the agent performance summary data every weekday at 10:00 p.m.
Locate the export URL
Method 1: Export inbox
When a completed export arrives in a user’s inbox and is configured to generate a static link:
- Copy the link from the inbox notification.
- Locate the export and expand the menu.
- Select the Copy Static Link option to copy the static link to your clipboard.
Method 2: Scheduled exports view
- In the analytics workspace landing page, locate the Scheduled Exports view.
- To pop out the export options, locate the export and use the menu.
- Click the copy link to copy the export URL to your clipboard.
General Account Authorization
For third-party applications that need a system account to download a static export, Genesys recommends creating an OAuth client with permissions to access static exports. For a detailed overview of client credentials, see OAuth Client Credentials Login Flow.
Using Python with Static Link URLs
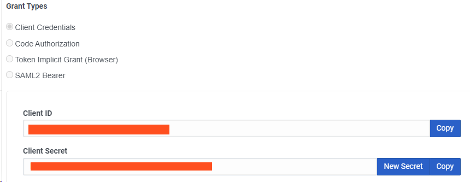
- Create a new OAuth client with a Client Credentials grant type. For more information, see Create an OAuth client.
- Under Roles, assign a role for the user with the Analytics > dataExportStaticLink > View permission for downloading static link exports.
- After creating the OAuth client, open the client from the OAuth admin menu.
- Copy the Client ID and ClientSecret to access a static download via an external application (Python).
Python script
Python is a general-purpose programming language used to extract a static link export. For external tools that do not support client credential grants natively, you can use a Python script to handle the authentication and download process to feed data into an external tool.
Install Python
Typically, Python is already installed on Mac and Linux machines. If it is installed on your machine, go to the Package dependency section. For Windows users, follow the steps below to install Python. For more information, see Python.
- Install the latest Python version. For more information, see Python.
- Add python.exe to a PATH.
- After the Python installation completes, open a command prompt on your machine and type the command python –version. The command terminal displays the Python version that your machine runs.
Package dependencies
The sample Python script requires the installation of two packages. Genesys recommends that these packages be installed using pip.
- To check if your Python installation includes pip, run the pip –version command.
- Install the following packages using a pip requirements file, or manually by running two commands. For more information, see the pip requirements file, or The requirements file and how to create it.
- pandas==1.5.3
- requests==2.28.2
- To manually install these two packages, run these commands:
- pip install pandas
- pip install requests
- pip install matplotlib
After you complete the Python installation and the required packages, the script is ready to download static link data.
import base64, requests, sys, io
import pandas as pd
CLIENT_ID = "input client id for OAuth here"
CLIENT_SECRET = "input client secret from OAuth here"
ENVIRONMENT = "mypurecloud.com"
STATIC_LINK_URL = "paste static link URL here"
response = requests.post(f"https://login.{ENVIRONMENT}/oauth/token", data={
  "grant_type": "client_credentials"
}, headers={
  "Authorization": f'Basic {base64.b64encode(bytes(CLIENT_ID + ":" + CLIENT_SECRET, "ISO-8859-1")).decode("ascii")}',
  "Content-Type": "application/x-www-form-urlencoded"
})
if response.status_code != 200:
  sys.exit(response.status_code)
token_response_json = response.json()
response = requests.get(STATIC_LINK_URL, headers={
  "Authorization": f"{ token_response_json['token_type'] } { token_response_json['access_token']}"
})
if response.status_code != 200:
  sys.exit(response.status_code)
export=pd.read_csv(io.StringIO(response.content.decode('utf-8')))
print(export)
Parameters
Manually edit the following four parameters to enable the script to pull data for your environment:
- Pull CLIENT_ID from the OAuth client that you create in the General Account Authorization section.
- Pull CLIENT_SECRET from the OAuth client that you create in the General Account Authorization section.
- ENVIRONMENT – The root URL for the region where the organization resides. Retrieve the information from the static link URL copied from the export created earlier in this guide. A static URL looks similar to: https://apps.mypurecloud.com/platform/api/v2/downloads/75ae026h61b6a2b1.
For more information, see step 8 in the Export data from a view section.
The environment is the highlighted portion of this URL. - STATIC_LINK_URL – The URL copied from the static export created earlier.
Click the section below to see how lines 4–7 appear after you gather the parameter information.
CLIENT_ID = "b3f1f36e-4e92-2f03-b360-5498e7554d42"
CLIENT_SECRET = "eYi4bsDK2zSDMcHW2I-Uewb_P2sdLdpqEbVzLhSpXcc"
ENVIRONMENT = "mypurecloud.com"
STATIC_LINK_URL = "https://apps.mypurecloud.com/platform/api/v2/downloads/75ae026h61b6a2b1"
Test the script
- Open the command prompt and navigate to the directory containing the script.
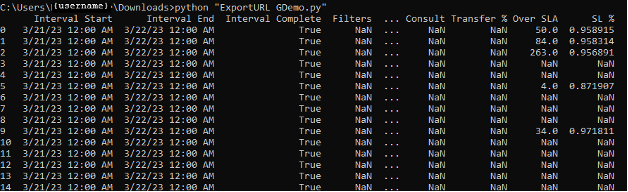
- To run the script, run the python ScriptName.py command. If the script succeeds, the script retrieves the data that needs to be exported.
Power BI demonstration
After you create the export and run the OAuth client, test the Python script. To automatically load data from the export file, configure Power BI.
- Open Power BI.
- Select the Get Data option to load data from more sources.
- Search for the Python script data source.
- Click Connect.
- In the Python script field, paste the Python script and click Load.
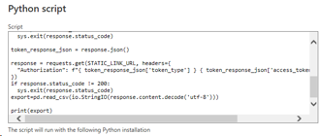
Power BI runs the script and the data preview screen appears. - Expand the folder and select the Export table. The table contains the data from the static link export.
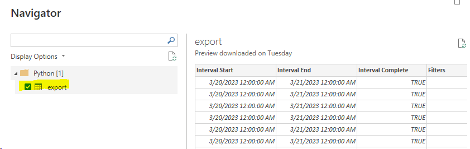
- Select the export checkbox and click Load.
The data is now available to build charts and visualizations within the tool.

- To refresh the data, configure an interval. Follow the instructions in the Configure scheduled refresh page so that the interval coincides with the static link report runtime.