
Navigate the schedule editor
View from a different time zone
By default, this view uses the business unit’s time zone. Users with administrator permissions can change the displayed time zone by selecting from the list in the upper right corner of the view. The time zone of the business unit is listed at the top of the list of time zones for reference. This option is helpful for administrators who access the view from a different time zone. Click the image to enlarge. 
At the bottom of the schedule editor, use the list to switch between viewing activity counts or viewing scheduled required and differences, with or without shrinkage. For more information, see Review activity counts and daily summaries and Review scheduled, required, and difference counts.
For more information, see Generate a schedule from a forecast.
For more information, see Generate a schedule without a forecast.
For more information, see Add a blank schedule.
Some available options depend on the current schedule view.
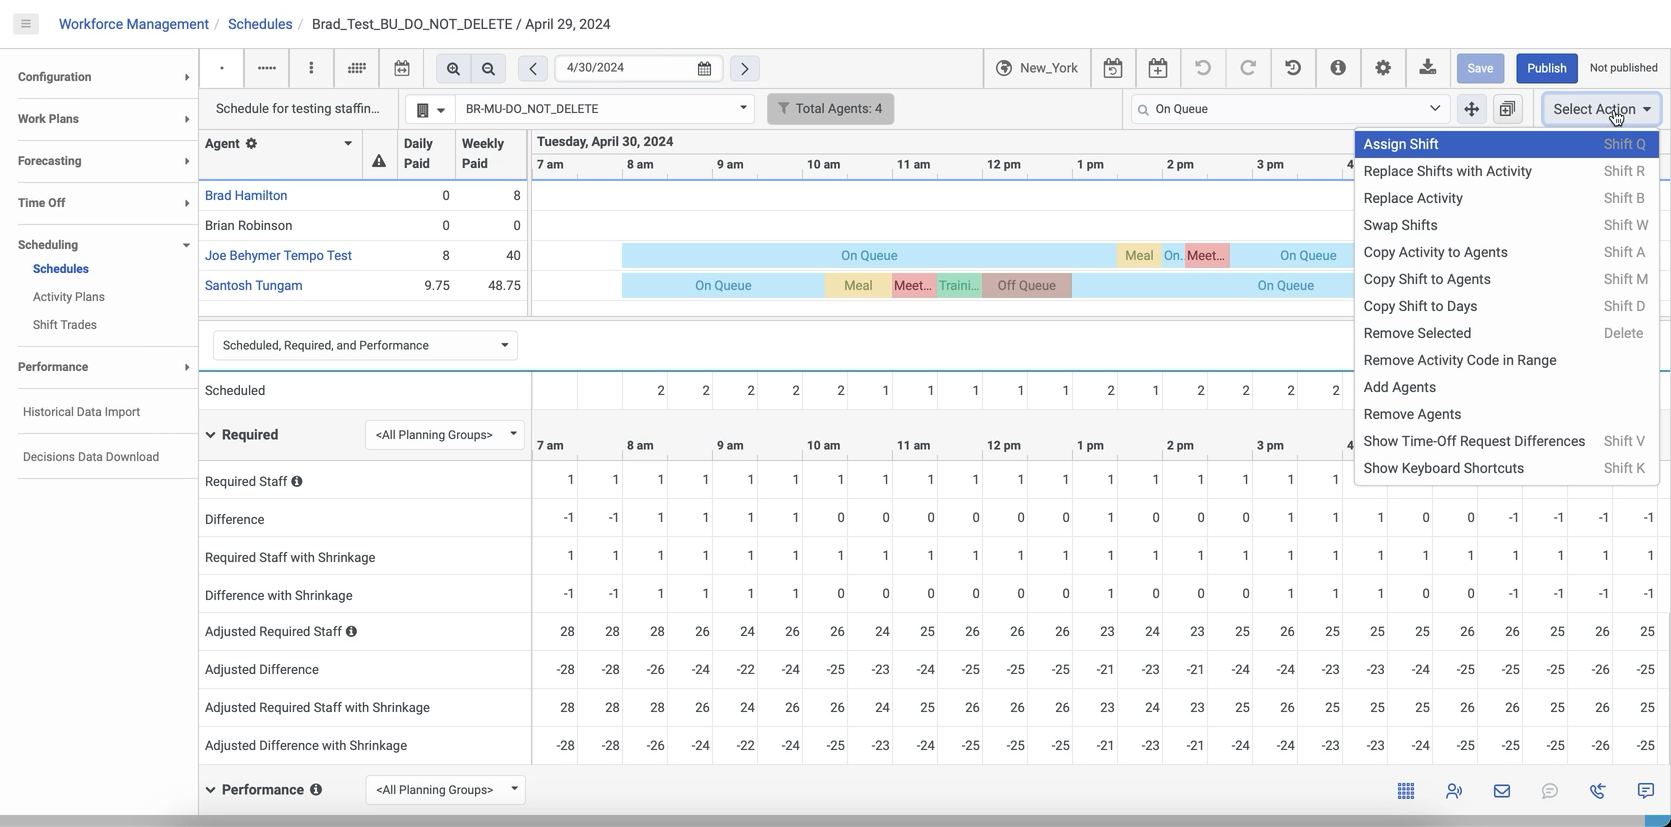
In the schedule editor, to view available options click the arrow at the end of the toolbar, or the Select Action menu. Click the image to enlarge.
![]()
| Task | Description | Keyboard shortcut |
|---|---|---|
| Day View |
When you select this option, day wise schedule is displayed. This is the default view. |
N/A |
| Week View |
When you select this option, week wise schedule is displayed. Click the image to enlarge.
|
N/A |
|
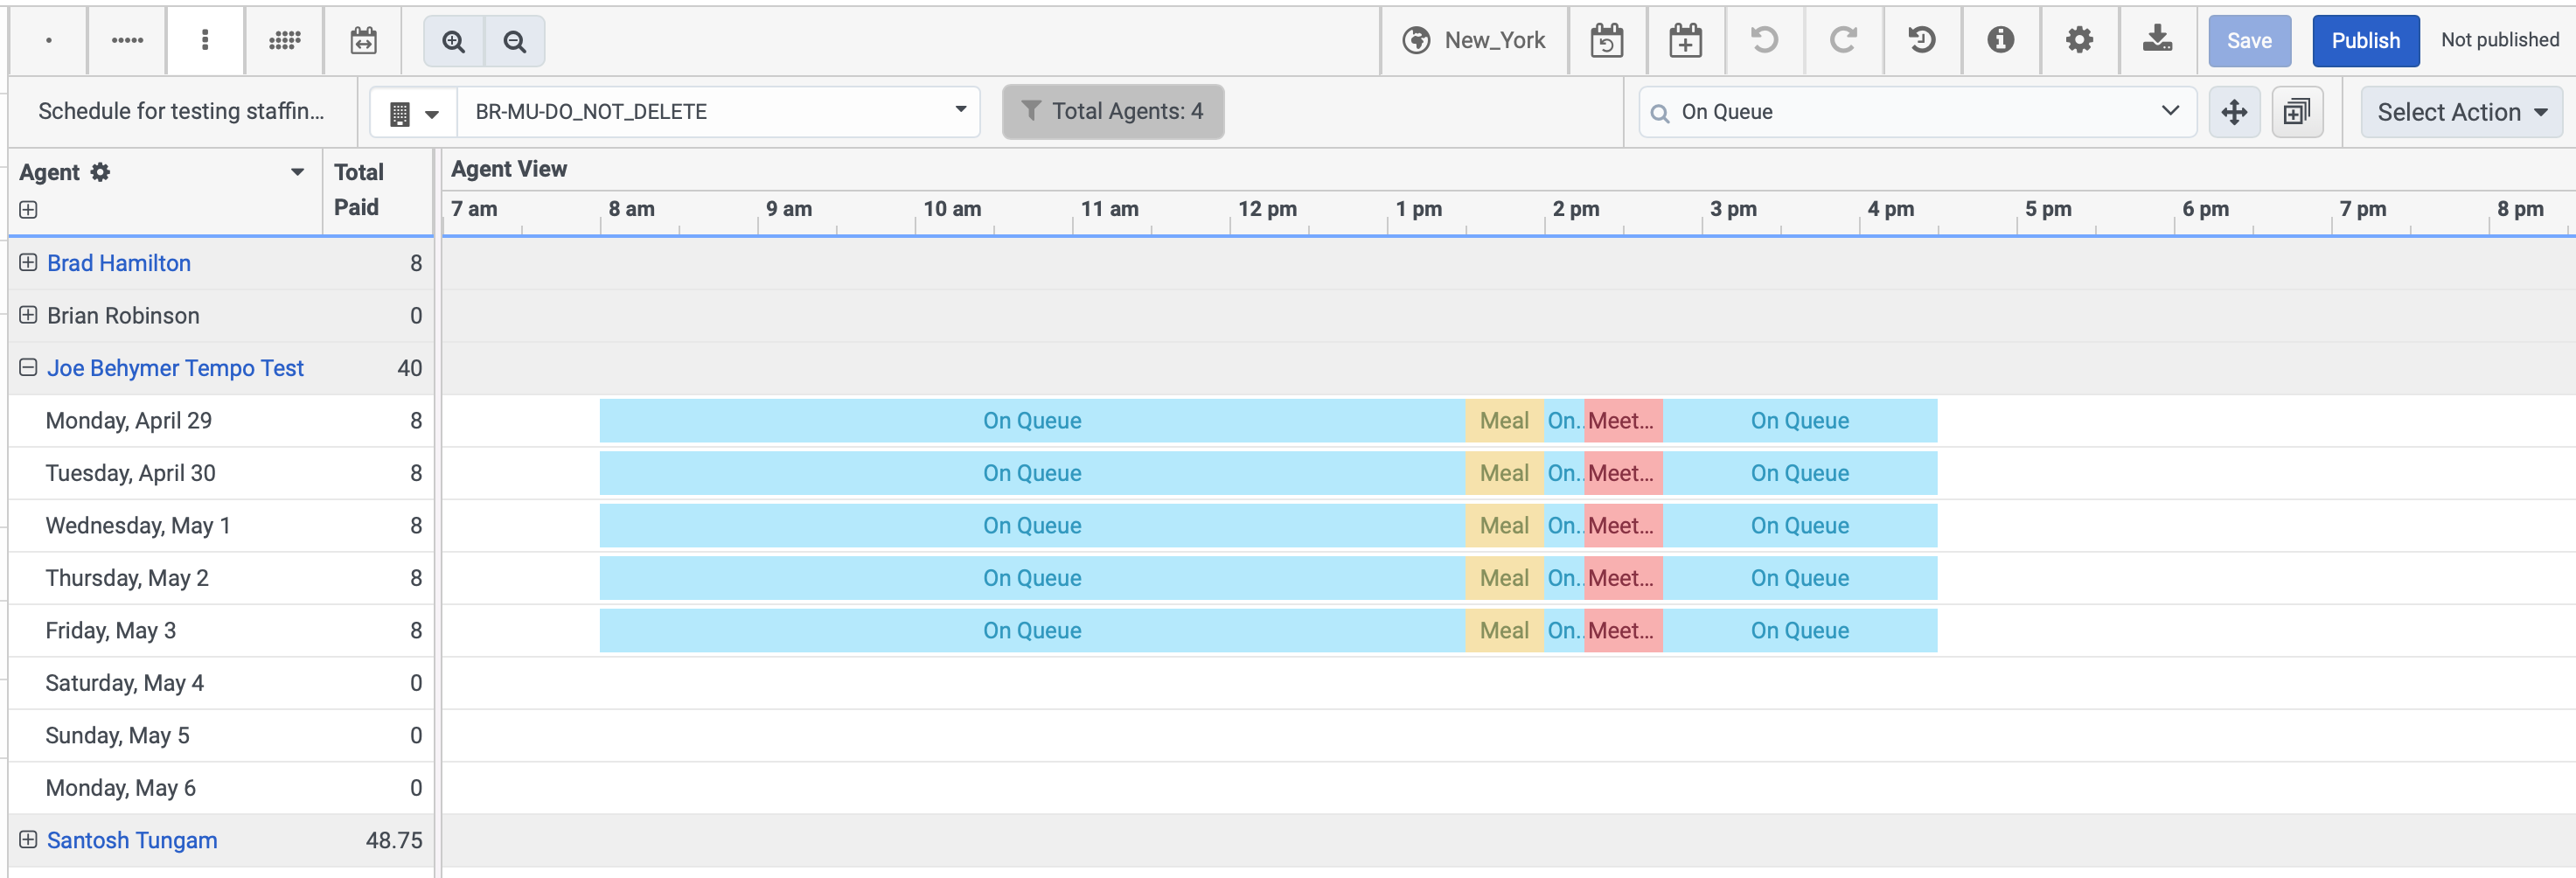
Vertical view
|
Indicates the vertical view. Displays the agents on the left panel and schedule details on the right panel. Click the image to enlarge.
|
N/A |
|
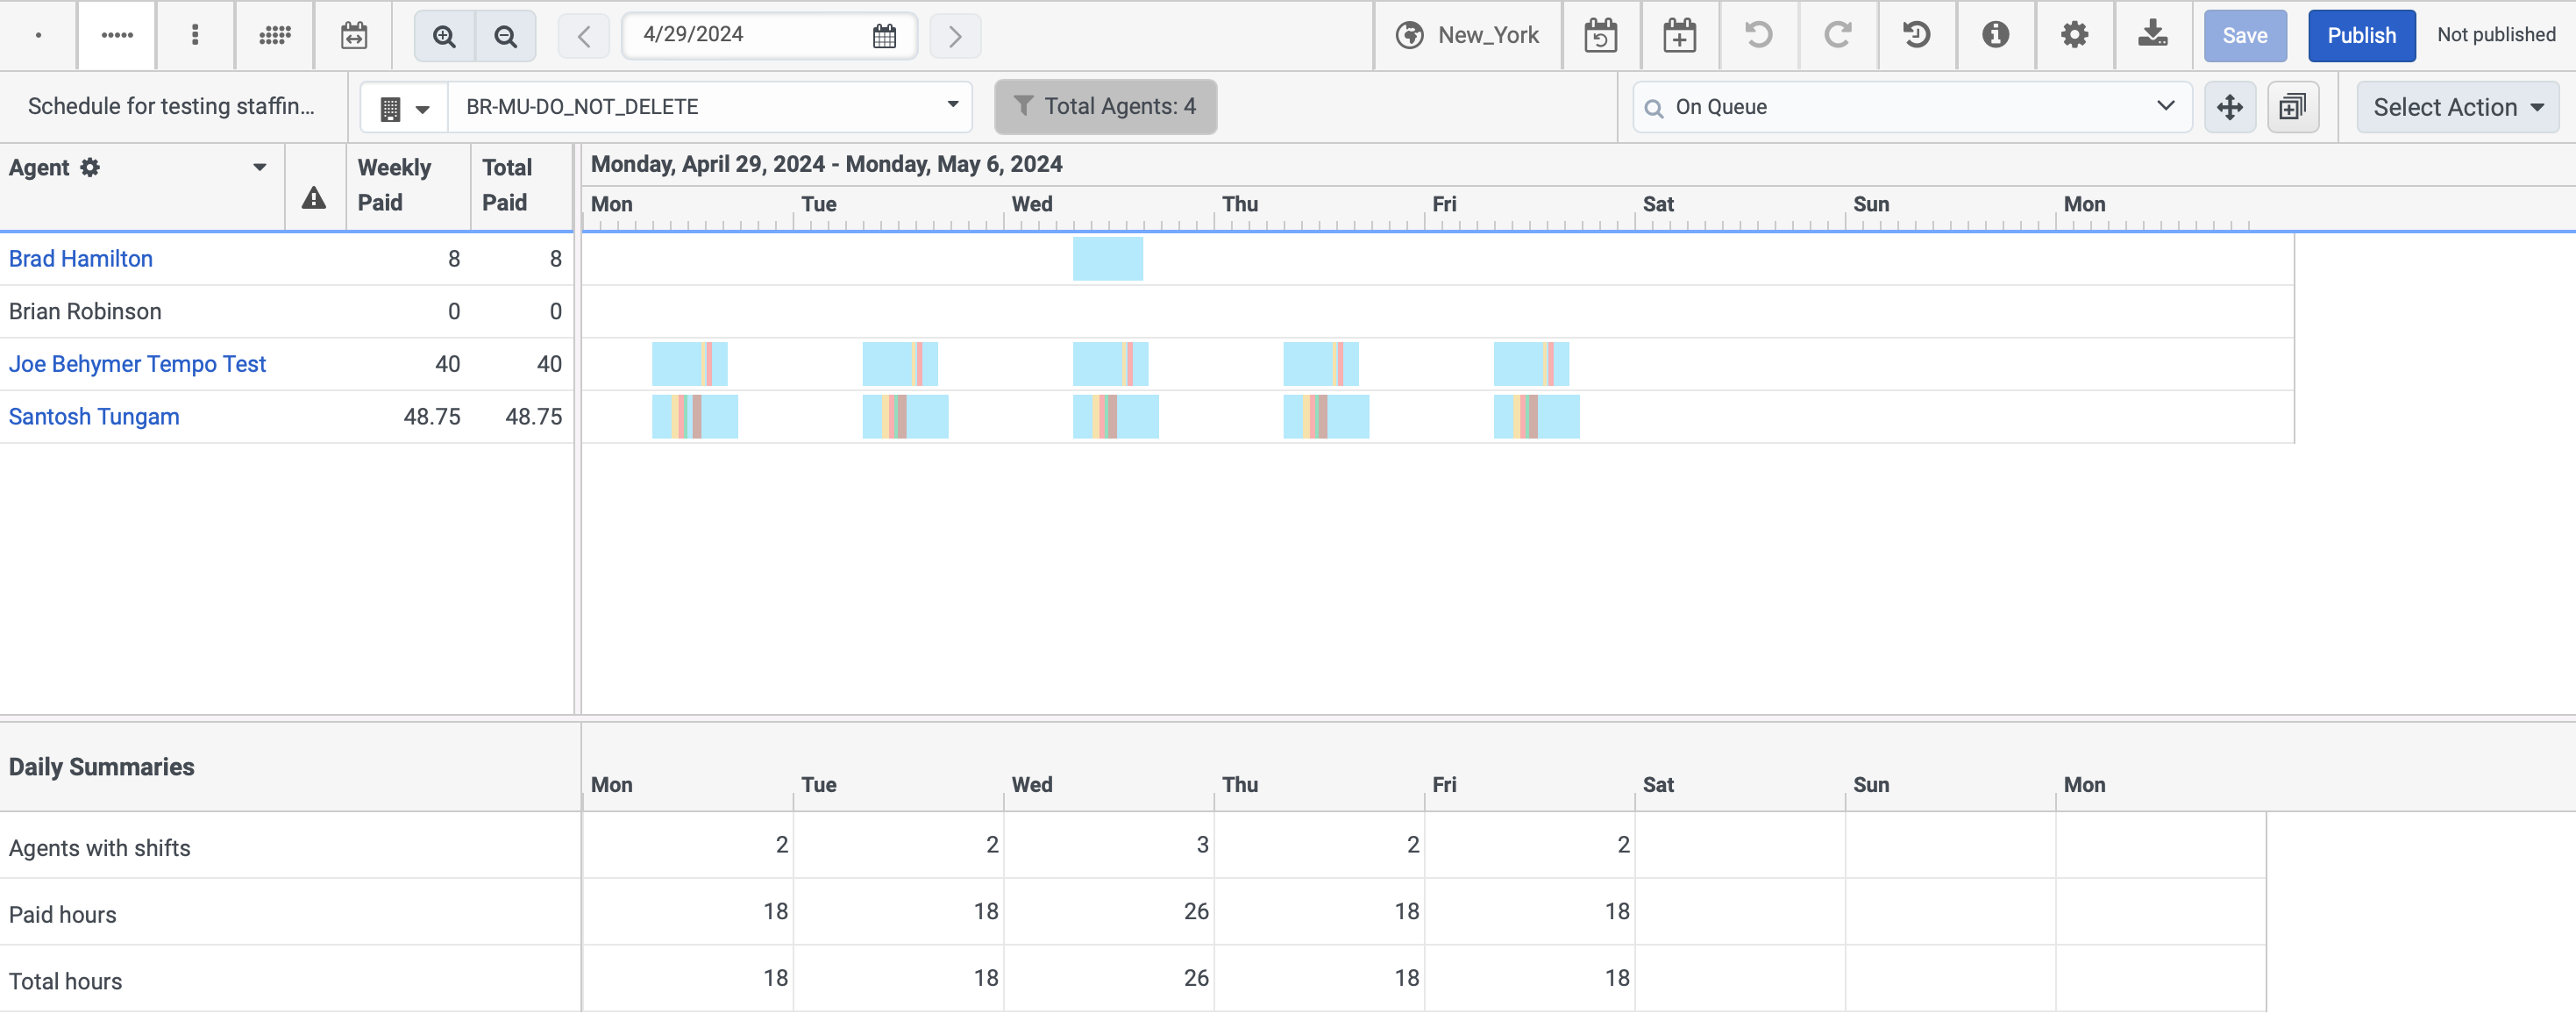
Multiple Week view |
Displays the schedule for multiple weeks. Click the image to enlarge.
The Average Daily Paid column displays the hours that the agents work during the day and does not consider the night hours logged when it is a night shift. The average daily calculations includes the length of the shift spent during the day. For example, A 10 PM Tuesday - 6 AM Wednesday shift counts as 8 hours for Tuesday, and not 2 hours for Tuesday, 6 hours for Wednesday. The Average Weekly Paid column displays the hours that the agents during the entire week. |
N/A |
|
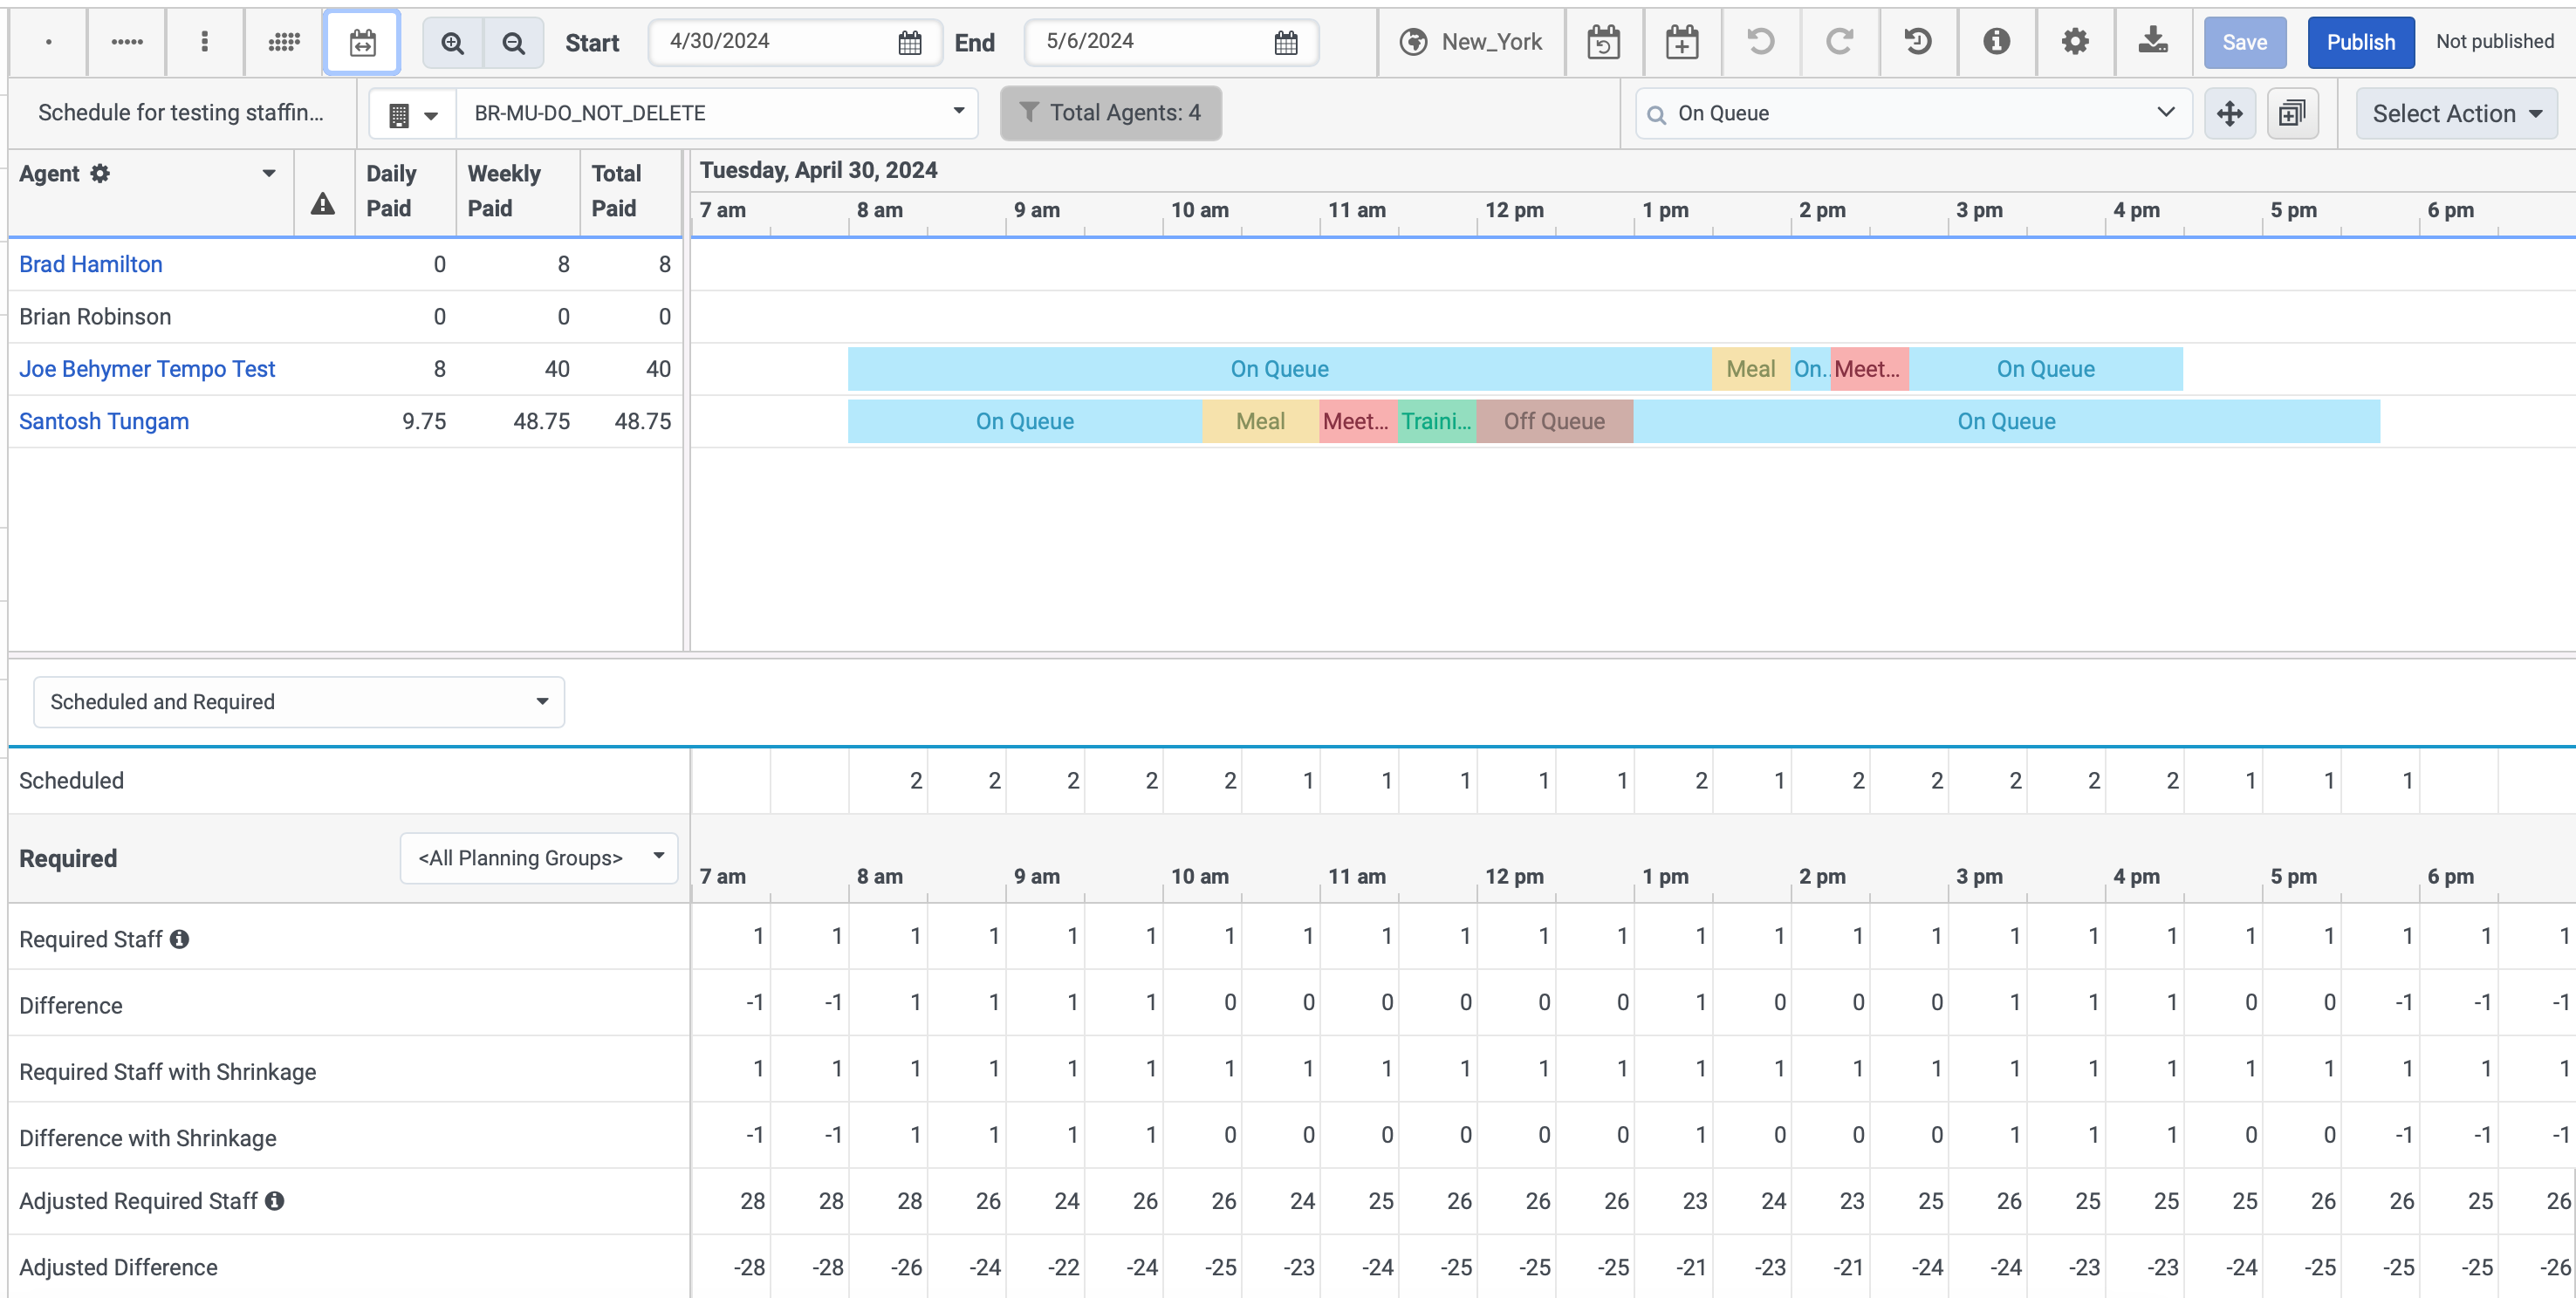
Custom Range view |
Displays the schedule based on the custom date range. When you select this option, the Start and End date fields are displayed using which you can define the range. Click the image to enlarge.
|
N/A |
|
Zoom in |
Maximizes the schedule view. |
N/A |
|
Zoom out |
Minimizes the schedule view. |
N/A |
|
Previous Published Schedule |
Click to load the details of the previous published schedule. This option is available only when you view a published schedule. |
N/A |
|
Previous Day |
Click to view previous day schedule details. |
N/A |
|
Date picker |
Click to select the date to view the schedule details. |
N/A |
|
Next Day |
Click the view the next day schedule details. |
N/A |
|
Next Published Schedule |
Click to load the details of the next published schedule. This option is available only when you view a published schedule. |
N/A |
|
Timezone selector |
Click to view the Time Zone Settings pop up to view the Display Time Zone dropdown. Select the required time zone. |
N/A |
| Perform an automated intraday rescheduling operation to incorporate manual changes made to the forecast associated with the schedule. | N/A | |
| Add a full day of time-off to an agent within a schedule. | Ctrl + Shift + F | |
|
Undo |
Reverses the last action performed. | Ctrl + Z |
|
Redo |
Repeats the last action performed. | Ctrl + Y |
|
View a history of unsaved shift changes and select from a list of modifications. |
Shift + H | |
| View and copy to your clipboard summary calculations for statistics in a specific schedule. | Shift + U | |
| In View by Day and View by Date Range, customize how information appears in the schedule editor for past schedules. | N/A | |
| Export schedule activities, agent shifts, scheduled and forecast counts, and activity counts. | N/A | |
|
Save |
Saves the schedule. This option is displayed for unpublished schedules. | N/A |
| Publish | Publish the schedule and optionally add informational details. | N/A |
| Filter and Sort | Filter agent schedules by queue, skills, or languages. Sort by agent name, paid hours, shift start or end time, and ascending or descending order. | Shift + F |

The Action menu lists the actions that you can perform on the Schedule Editor. The following table lists the tasks that you can view as options when you click the Action dropdown located below the toolbar on the upper right corner of the screen.
| Task | Description | Keyboard shortcut |
|---|---|---|
| Assign Shift | Assign shifts from one agent to another. | Shift + Q |
| Replace Shifts with Activity | Replace an entire shift or shifts with a selected activity. | Shift + R |
| Replace Activity | Replace an activity or activities with another activity in a schedule. | Shift + B |
| Swap Shifts | Swap one agent's shifts with another agent. | Shift + W |
| Copy Activity to Agents | Copy an activity to one or more agents in the schedule. | Shift + A |
| Copy Shift to Agents | Copy an agent's shift to one or more agents. | Shift + M |
| Copy Shift to Days | Copy an agent's shift to one or more days. | Shift + D |
| Remove Selected | Remove one or more agent shifts from the selected schedule. | Delete |
| Remove Activity Code in Range | Remove one or more activities from a single or multiple shifts within a specific time range. | N/A |
| Add Agents | Include more agents in the selected schedule | N/A |
| Remove Agents | Exclude one or more agents in the selected schedule | N/A |
| Show Time-Off Request Differences | View and synchronize time-off requests. | Shift + V |
| Show Keyboard Shortcuts | View the list of keyboard shortcuts that help administrators manage schedule editing | Shift + K |
| View adherence information in the schedule editor | In View by Day and View by Date Range, you can customize the schedule editor to show agent adherence information for past schedules. | Click the Gear icon and enable Show Adherence option. |
| View late information in the schedule editor | You can view the late explanations request for the next work activity submitted by the agent for specific categories. You can further approve or deny these requests. | In Schedule view, click the grey dotted line. |
In addition to managing the schedule from the toolbar or Select Action list, you can also:
| Task | Description |
|---|---|
| Add an activity to a shift | Add an activity to a shift within a schedule, and optionally adjust the length. |
| Available schedule views | Learn more about the various ways to view a schedule. |
| Change the schedule view | Select to view a schedule by day, week, date range, multiple weeks, or vertical view in the schedule editor. |
| Review scheduled, forecast, and difference counts | If your schedule was generated based on a forecast, details about scheduled, forecast (with and without shrinkage), and difference counts are listed in the schedule grid. |
| Review Scheduled and Forecast counts and daily summaries | Depending on your view, the schedule editor displays metrics that help you analyze and plan schedules. |
| View agent information | Click an agent name to view that agent's assigned skills and languages. |
| View an agent's paid hours per week | Depending on your view, you can see various details about an agent's paid hours for a specific day or week. |
| Adjust an activity's length | Adjust a non-default activity's length within a shift. |
| Modify activity details | Edit default values for non-default activities. |
| Use zoom to adjust the level of schedule detail |
Zoom in to see the current schedule in more detail, or zoom out to see a larger time period for the current schedule. |
| Undo or redo unsaved changes to a schedule |
Undo or redo unsaved changes to a schedule, one at a time, up to the last save. |
To filter and sort the agents, do the following:
- From the Schedules page, click Total Agents. Click the image to enlarge.

- The Filter and Sort dialog box appears. From the Filter tab, use the filters in the Basic Filters and Hierarchy Filters to further refine your search.
- In the Basic Filters section, perform a basic generic search of agents within a schedule. Follow any of these steps:
- To filter by agent, in the Agents field select the name of the agent. Select the Remember checkbox to retain the names of the agents for future filter actions.
- To filter agents by queues, in the Queues field select the queues.
- To filter agents by skill, in the Skill field select the required agent skill.
- To filter agents by language, in the Language field select the required language.
- In the Agents Display section, do the following:
- To filter only the edited agents, enable the Show edited agents only check box.
- To filter agents with explanations, enable the Show explanation agents checkbox. This filter is available only for a published schedule and when the Schedules > Display Options > Show Explanations option is active.
- In the Hierarchy Filters section, perform a search by specific categories of agents within a schedule. Follow any of these steps:
- To filter agents by groups, in the Groups field select the group.
- To filter agents by location, in the Locations field select the locations.
- To filter by supervisors, in the Reports To field, select the supervisor names.
- To filter agents by planning groups, in the Planning Groups field select the planning group.
- To filter agents by staffing groups, in the Staffing Groups field select the staffing group.
- In the Activity Codes section, select the required activity codes. To remember the filter selection, enable the Remember check box.
- In the Basic Filters section, perform a basic generic search of agents within a schedule. Follow any of these steps:
- From the Sort tab, sort the details using the fields in the Primary Sort and Secondary Sort sections. Workforce Management first sorts by the settings in the primary sort section and then sorts by the settings in the secondary sort section.
- In the Sort field, select the criteria to sort the schedules according to your selected criteria. For example, if you set this field to Agent name, the schedules are sorted by agent names.
- In the Sort Direction field, select the direction you want the schedule information to be displayed. Choose one of these options:
- Ascending
- Descending
- To remember the sort order, enable the Remember check box.
- Click Submit.
Your agent can submit a running late request for your next work activity, such as, Meeting, On Queue, Off Queue or Training Activity Categories. However, if your agent submits a running late request before and activity that has the Activity Category Break or Meal the request will take effect at the beginning of the next schedule work activity.