
Interactions view
Prerequisites
The following permissions:
- Analytics > Conversation Aggregate > View
- Analytics > Conversation Detail > View
- Analytics > Data Export > All
- Directory > User > View
- Groups > Work Team > View (to filter by Work Team)
- Reporting > CustomParticipantAttributes > View (to export custom participant attributes)
- Outbound > Campaign > View (to view Outbound columns)
- Outbound > Campaign > Search (to view Campaign names)
- Outbound > Contact List > Search (to view Contact List names)
- Routing > Queue > View, Routing > Queue > Search, and Routing > Wrap-up Code > View (to view Queue and Wrap-up columns)
- Analytics > interactionEvaluationDetails > View (to view Evaluations columns)
- Analytics > interactionSurveyDetails > View (to view Surveys columns)
- Conversation > Communication > reconnect (to reconnect to a closed email)
- Conversation > Email > Park (for an agent to park an email)
- Conversation > Communication > Target (for division access restriction).
- Architect > Flow > Search (to view flow names)
- For a supervisor to access Media and Messages columns, need one of the following:
- Genesys Cloud CX 1 Digital Add-on II, Genesys Cloud CX 2, Genesys Cloud CX 2 Digital, Genesys Cloud CX 3, Genesys Cloud CX 3 Digital, or Genesys Cloud CX 4.
- For a supervisor to reassign or blind transfer the parked email to another agent:
- Conversation > Communication > Transfer
- Conversation > Communication > blindTransfer or Conversation > Communication > blindTransferAgent
- For a supervisor to reassign or blind transfer the parked email to another queue:
- Conversation > Communication > Transfer
- Conversation > Communication > blindTransfer or Conversation > Communication > blindTransferQueue
One or more of the following permissions:
- Quality > Calibration > View
- Quality > Evaluation > Add
- Quality > Evaluation > Edit Score
- Conversation > Communication > View
- Conversation > Call > Assign (to manually assign a call to an agent)
- Conversation > Webchat > Assign (to manually assign a chat to an agent)
- Conversation > Message > Assign (to manually assign a message to an agent)
- Conversation > Callback > Assign (to manually assign a callback to an agent)
- Conversation > Email > Assign (to manually assign an email to an agent)
- Conversation > Call > Pull (to manually assign a call to yourself)
- Conversation > Webchat > Pull (to manually assign a chat to yourself)
- Conversation > Message > Pull (to manually assign a message to yourself)
- Conversation > Callback > Pull (to manually assign a callback to yourself)
- Conversation > Email > Pull (to manually assign an email to yourself)
- To preview an email in a queue that is enabled for manual assignment, require one of the following permissions:
- Conversation > Email > Assign
- Conversation > Email > Pull
- To preview an email in a parked state:
- Conversation > Communication > Target (for division access restriction)
- Conversation > Communication > Transfer
- One of the following permissions:
- Conversation > Communication > blindTransfer
- Conversation > Communication > blindTransferAgent
- Conversation > Communication > blindTransferQueue
To view in-progress and completed interactions, click Performance > Workspace > Contact Center > Interactions.
To view in-progress and completed interactions, perform the following:
- Click Menu > Analytics > Analytics Workspace.
- In the Default section, search for Interactions and then click the view name to open it.
Available columns
To view the available columns, see the Interactions view section in the View available columns in performance views by category article.
- To view the consolidated list of available columns in the performance views, see Consolidated view of available columns in performance views.
- To view the list of available columns in the performance views by category, see View available columns in performance views by category.
Extra columns for export
The export contains two extra columns: Full Export Completed, and Partial Result time stamp.
Full Export Completed
The values for Full Export Completed are YES, NO, or a number.
- YES = You received all the interactions requested.
- NO = Export exceeded the limit of exporting recent conversations. When you use the filtering by date option to export the recent conversations and if the number of conversations per twelve-hour period exceeds the preset limit, the export file has only partial results. Conversations typically greater than one day old can be exported at a significantly higher volume.
- A number = The file was truncated as the data exceeded the maximum row limit.
Partial Result Timestamp
A partial result timestamp exists under two conditions.
- Export attempted to pull recent conversations at a volume that exceeded the limit.
- Data exceeded the total maximum row limit. A number in the Full Export Completed column shows the number of rows that exceeded the maximum row limit and a timestamp for the most recent interaction in the export file.
There are four conditions that can exist for the Full Export Completed and Partial Result Timestamp columns.
| Full Export Completed | Partial Result Timestamp | Description of Condition |
|---|---|---|
| YES | All requested data was exported. | |
| NO | 8/19/19 18:45 | Export exceeded the limit for exporting recent conversations. The timestamp indicates the most recent transaction. |
| <####> | All requested data was not exported as the data exceeded the maximum row limit. The Full Export Completed column indicates the row limit. | |
| <####> | 8/19/19 18:45 |
All requested data was not exported due to exceeding the recent conversation volume limit and the total maximum row count. The Full Export Completed column indicates the row limit. The timestamp indicates the most recent transaction. |
Set a default time zone in the workspace
You can set the default time zone in the analytics workspace before viewing any analytics view.
To set the default time zone in the workspace, follow these steps:
- Click Performance > Workspace.
- Click Menu > Analytics > Analytics Workspace.
- On the left side, from the Time zone drop-down menu, select the required time zone as the default time zone for the analytics workspace.
To view more information about an interaction, click to open it and view the interaction detail page in a new tab or select the required interaction and click View Interactions. You can jump between the interaction tabs to see the interaction list view and the interaction detail view. The title of the interaction detail view tab shows the truncated Interaction ID and has a fixed width as all other tabs in the workspace. When you hover over the tab name, a tooltip with the untruncated Interaction ID appears.
- When switching between the interaction detail view tabs, the recording playback stops working.
- When switching between the interaction detail view tabs, the following features on the interaction detail view tab continue to work as expected:
- Monitor/coach/Barge a live call
- Interaction download
- Quality management/evaluations
- Schedule Coaching
- Audit Trail tab
- The number of interaction detail view tabs that can be opened at a time is limited to a maximum of 20 tabs. If the user opens a new tab by clicking an interaction while 20 tabs are open, the new interaction detail tab opens in the existing tab.
Click More in the title of the interaction detail view tab and choose the required task to perform any of the following:
| Columns | Description |
|---|---|
| Reload | Reloads the current tab alone. |
| Duplicate | Creates a duplicate copy of the current tab. |
| Close | Closes the current tab alone. |
| Close all tabs | Closes all the open tabs. |
| Close other tabs | Leaves the current tab open and closes all the other open tabs. |
To rename the title of the interaction detail view tab:
- Click Save View on the right side. The Save view pane appears.
- Click the Save To drop-down list and perform one of the following steps:
- To save the view as a new view, click New and in the View Name field, enter a name for the view.
- To overwrite the existing view’s current settings, click the existing view’s name.
- Click Save. The title of the interaction detail view tab changes.
To view interactions with voice transcript content, see Content Search view.
Protect or release recordings
To retain recordings for potential litigation, you can protect interaction recordings from deletion when complying with legal directives.
To protect recordings, follow these steps:
- From the Interactions list, select the interactions that you want to protect.
- Click Protect Recordings. The selected interactions are protected from deletion. For more information, see Protect recordings from deletion for a legal hold directive.
To release recordings, follow these steps:
- From the Interactions list, select the interactions that you want to protect.
- Click Release Recordings. The selected interactions are protected from deletion. For more information, see Protect recordings from deletion for a legal hold directive.
You can copy an interaction’s Conversation ID to the clipboard and use it to filter interactions or share it with others, including Customer Care.
Here's how to copy the Conversation ID to the clipboard.
- In an interaction's row, click More .
- Click Copy Conversation ID.

To add multiple interactions to the filters, select the required interactions and click Add to filters.
To navigate through the pages, use the Previous , Next , First , and Last icons on the pagination control. To jump multiple pages at a time, click the First and Last icons.
To save the view with your filter and column settings, click Save .
To export the data in the view, click Export .
This view does not update as new interactions occur. To see new interactions, click Refresh .
For example, in the Interactions view, if an interaction A is transferred into Queue X and Queue Y, then the call transfers count for the interaction A is 2. In the Queue performance view, if an interaction A is transferred into Queue X and Queue Y, the call transfers count in the Queue X is 1.
Customize the view
To show only certain data, customize the Interactions view. For example, you can choose to show only certain columns or filter to see certain types of interactions. Your customizations remain in effect even if you leave and return to the view. You can also save your filter and column settings as a saved view to switch quickly between different data of interest in the same view.
- The custom date range option in this view has a maximum length of 31 days.
- Results are based on conversations with activity within the specified date range matching all the supplied filters. The interval must cover the UTC date the conversation started to be included in the search results. For more information, see the developer center article.
- If you filter for a date and go back more than six-quarters (558 days), expect the performance to be slow when looking for data past that duration.
To customize analytics views, use the date filter.
To filter metrics by date or configure a custom date range, use presets. When filtering metrics for this view, select any custom date range up to one month.
To use a preset to filter metrics, complete the following steps:
- Click the date to display the date filter.
- In the Presets list, select a preset date option.
Date presets
| Presets | Description |
|---|---|
| Current interval |
Shows data for the current 30-minute time period. |
| Today | Shows data for the time period that includes the current interval. |
| Yesterday | Shows data for the previous day. |
| This week | Shows data for a Sunday through Saturday time period. |
| Last week | Shows data for the previous week and Sunday through Saturday. |
| Previous 7 days | Shows data for the previous seven days. |
| This month | Shows data for the current month with no extra days. |
| This month by week | If the month does not start on Sunday or end on Saturday, shows data for the current calendar month starting on Sunday and ending on Saturday including extra days. |
| Last month | Shows data for the previous calendar month with no extra days. |
| Previous 30 days | Shows data for the previous 30 days. |
| Interval |
Shows data for a 30-minute time period. |
| Day | Shows data for a single 24-hour day. |
| Week | Shows data for a Sunday through Saturday time period. |
| Month | Shows data for the exact month with no extra days. If the current month is selected, you see the data up to the current date. |
| Month by Week | If the month does not start on Sunday or end on Saturday, shows data for a calendar month starting on Sunday and ending on Saturday including extra days. |
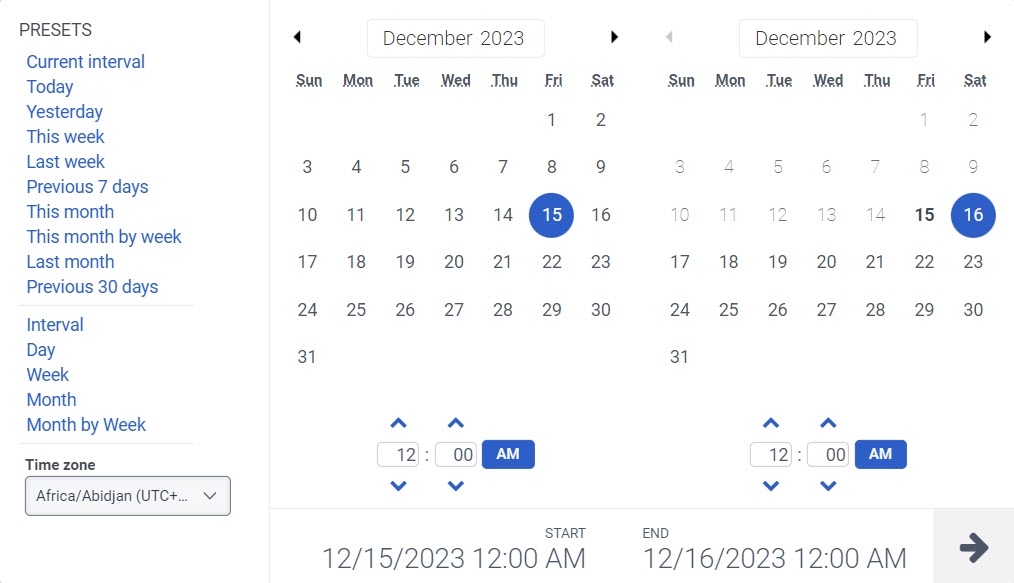
- To use a custom date range to filter metrics, complete the following steps:
-
- To display the date filter, click the date.
- Select a start date and an end date on the calendar, and click the filter arrow .
- To view data for a different time period using the same date presets, click the arrows on either side of the date display. For example, to view data for the previous day, click the Day preset, and then click the arrow on the left side of the date.
- To view data for a different time zone using the same date presets, from the Time zone drop-down menu, select the required time zone. You can create and save reports with the same selected time zone.
You can manually assign waiting interactions (interactions not chose up by an agent) to another agent or yourself.
- Genesys recommends that you filter your interactions list to show only the waiting interactions.
- The interactions in the list are not live interactions.
- Genesys Cloud automatically assigns the interactions. If you try to reassign an automatically assigned interaction at the same time, an error appears.
Manually assign a waiting interaction to another agent
- From the Performance > Workspace > Contact Center > Interactions view, find the interaction you want to assign to another user.
- Click Menu > Analytics > Analytics Workspace.
- In the Default section, search for Interactions and then click the view name to open it.
- Find the interaction that you want to assign to another user.
- Select the More menu associated with the interaction.
- From the menu, select Assign to Other.
- In the search box, begin typing the agent’s name. As you enter a name, agent names appear in the search results.
- Select the agent’s name.
Manually assign a waiting interaction to yourself
- From the Performance > Workspace > Contact Center > Interactions view, find the interaction you want to assign to yourself.
- Click Menu > Analytics > Analytics Workspace.
- In the Default section, search for Interactions and then click the view name to open it.
- Find the interaction that you want to assign to yourself.
- Select the More menu associated with the interaction.
- From the menu, select Assign to Self.
To filter by media type, perform the following:
- Click the Filter icon .
- Select the required media type.
- When filtering, you can select more than one media type. Click the relevant media type to select or deselect the type.
- You cannot select the voice and callback types at the same time.
- If you select voice, the callback option will be deselected. If you select callback, the voice interaction will be deselected.
- The available media types may vary from those shown above.
The selected media type icon is displayed above the column headers. For more information about various media types and their settings, see the Set behavior and thresholds for all interaction types section in the Create and configure queues.
Reconnect to a closed email
You can reconnect to a closed email from the Interactions view page.
To reconnect to a closed email interaction:
- Click Performance > Workspace > Contact Center > Interactions.
- Click Menu > Analytics > Analytics Workspace.
- In the Default section, search for Interactions and then click the view name to open it.
- Select the required interaction to reconnect to the closed email.
- Click the More menu corresponding to the required interaction.
- Click the Reconnect conversation Icon included icon. The interaction is routed to the conversation roster of the agent reconnecting the closed email. You can reply to it as you do with any other open email interaction.
For more information about replying to an email, see Reply to or forward an email message interaction.
- You cannot reply to or reconnect an expired conversation. Expired conversations include the following:
- Conversations that have been inactive for 30 days or more.
- Conversations for which the threading time has expired. For more information, see Configure organization-level email threading timeline
- Conversations in organizations where threading is disabled.
- You cannot reconnect to a conversation that is in a live or connected state. You can only reconnect disconnected conversations.
- When you reconnect a conversation and reply to its email, the conversation timeline displays a new segment in which the participant appears as user.
- When you reconnect and reply to an email, Genesys Cloud considers the reply to be outbound.
The supervisor can view the list of parked emails and reassign them to themselves or another agent or queue. When a previously parked email is reassigned to another agent, the reassigned email is delivered to the receiving agent’s roster by auto answer regardless of the agent’s utilization. As the agent who parked the email gets disconnected when the parked email is reassigned to another agent, the email status becomes unparked. If an auto-answer is enabled, the receiving agent gets two toasts.
If an email is parked while screen recording is enabled, the recording is stopped. A separate recording gets created when unparking the email. For example, when an email is parked by agent 1, the screen recording of the agent 1 is stopped. When the email is reassigned to agent 2, a new screen recording of agent 2 gets created. The future default AHT excludes park duration.
A follow-up email interaction, associated with a parked email, is delivered to the agent roster even when the agent is off queue.
You can reassign the parked email to:
- Yourself.
- Another agent.
- Queue.
To copy the conversation ID of the parked email:
- Click Performance > Workspace > Contact Center > Interactions.
- Click Menu > Analytics > Analytics Workspace.
- In the Default section, search for Interactions and then click the view name to open it.
- Select the required interaction.
- Click the More icon corresponding to the required interaction and select Copy Conversation ID.
To reassign the parked email to yourself:
- Click Performance > Workspace > Contact Center > Interactions.
- Click Menu > Analytics > Analytics Workspace.
- In the Default section, search for Interactions and then click the view name to open it.
- Select the required interaction.
- Click the More icon corresponding to the required interaction and click the Assign to Self
 icon.
icon.
The reassigned email is delivered to your roster by auto answer regardless of your utilization.
To reassign the parked email to another agent or queue:
- Click Performance > Workspace > Contact Center > Interactions.
- Click Menu > Analytics > Analytics Workspace.
- In the Default section, search for Interactions and then click the view name to open it.
- Select the required interaction.
- Click the More icon corresponding to the required interaction and click the Assign to Other icon.
- In the Search bar, enter the name of the agent or queue and click the name to reassign it to the agent or queue.
The supervisor can preview an active email while in queue or parked state to gain a clear understanding of the content before assigning it to themselves or another agent. The email preview feature helps evenly distribute the workload to prevent burnout, significantly improve query handling speed and productivity, and ensure faster response times to customer inquiries while maintaining high service levels.
To preview an active email:
- Click Performance > Workspace > Contact Center > Interactions.
- Click Menu > Analytics > Analytics Workspace.
- In the Default section, search for Interactions and then click the view name to open it.
- Select the required interaction.
- Click the More icon corresponding to the required interaction and click the Preview email icon. The preview email window opens.
To show or hide columns:
- At the top right corner of the columns, click the Pick columns icon. The Add/Remove Column pane appears.
- Click the Manage columns tab.
- (Optional) To sort the columns in ascending or alphabetical order, click Sort by > Column Name A-Z.
- (Optional) To sort the columns in descending or reverse alphabetical order, click Sort by > Column Name Z-A.
- (Optional) To categorize or uncategorize the columns, click Sort by and enable or disable the Group by Categories toggle.
- Search or scroll to select the columns you want to view. Note: You can also use keyboard navigation to choose the columns.
- Click Save. The selected columns appear on the screen. Note: The column selections appear only after saving the changes and do not apply to the table immediately.
To reorder the columns within the column picker:
- At the top right corner of the columns, click the Pick columns icon. The Add/Remove Column pane (column picker) appears.
- Click the Reorder columns tab.
- Click the grid icon
 of a column, and then drag and drop to reorder it within the column picker.
- Click to select the grid icon of the column to be reordered, and on the keyboard, press the Spacebar.
- To position the column, use the Up or Down arrow keys.
- Press the Spacebar. The chosen column is reordered.
To rearrange the columns outside the column picker, click a column header and drag it.
To reset a view to default column settings, click Reset view to defaults .
You can select up to 20 columns.
For more information about the metrics shown in the columns, see Metric definitions.
To filter by information about the interaction, click Filters , and then search or scroll to select the filter you want to use.
Interaction filters
| Filter | Description |
|---|---|
| Callback – Time to first connect | The amount of time between the start of the callback ACD and the start of the first interaction segment on the voice channel. |
| Callback – Time to first dial | The amount of time between the start of the callback ACD and the start of the first dialing segment on the voice channel. |
| ANI | Displays interactions with the selected ANIs.
|
| Direction | Displays information about interactions of the selected directions. |
| Initial Direction | Displays information about interactions with the selected initial direction. |
| DNIS | Displays information for interactions with the selected original DNIS number. This DNIS number was dialed at the beginning of the interaction.
|
| Session DNIS | Displays information for interactions with the selected DNIS number. The DNIS number could have been dialed any time during the interaction.
|
| Conversation Duration | Displays interactions of the selected durations. To search for interactions of a custom duration, select Custom duration and use the controls to set a custom duration:
|
| To | Displays information for interactions sent to the selected email addresses.
|
| From |
Displays information for interactions sent from the selected email addresses.
|
| Abandoned | Displays abandoned or not abandoned interactions. |
| Transferred | Displays interactions that an agent has blind transferred or consult transferred. |
| Blind Transferred | Displays interactions that an agent has blind transferred. |
| Consulted | Displays interactions that an agent answered and then consulted with another participant without fully transferring the interaction. |
| Consult Transferred | Displays interactions that an agent answered and then consult transferred to another participant. |
| Not Responding | Displays interactions where agents do not answer, and the agent may have transitioned to Not Responding. |
| Queue | Displays interactions associated with the selected queues. |
|
Has fax |
When selected, the filter only shows interactions associated with a fax. |
| User |
Displays information associated with the selected users. Filter for multiple users at one time by entering other users and searching again. To see and select inactive users in the User filter search, select Include inactive users. To see and select deleted users in the User filter search, select Include deleted users. |
| Wrap-up | Displays interactions that have the selected wrap-up codes. |
| Message Type | Displays interactions of the selected ACD message type. This filter only appears if you set the media type filter to All or Message. If you do not have any message types selected, the view displays information for all message types. Genesys Cloud currently supports the following message types: Apple Messages for Business, Facebook, Instagram, Line, Open, SMS, Web Messaging, WhatsApp, and X (Twitter). Note: Line message type is deprecated, but Genesys Cloud still supports display filtering. |
| Division | Filters interactions for a specific Division. See About access control. |
| Conversation ID | Filters for interactions matching the specific conversation ID. Like the other interaction filters, this filter returns interactions that occurred within the specified date range filter. |
| Skills | Displays interactions that have the selected skills. Filter for multiple skills at one time by entering other skills and searching again. |
| Languages | Displays interactions that have the selected languages. Filter for multiple languages at one time by entering other languages and searching again. |
| Ended | Displays interactions that have ended. |
| Limit Interactions | Displays interactions matching the selected parameters.
To display interactions that match all of the selected parameters, for example, to see interactions that are waiting and ACD routed, click the toggle to Match All. To display interactions that match any of the selected parameters, for example to see interactions that have a screen share or co-browse session, click to the toggle to Match Any. |
| Has Media | Only shows interactions that have multimedia content. This filter only appears if you set the media type filter to Message. |
| Provider | The source provider for the conversation. For example, Genesys Cloud EMAIL, Edge, and so on. |
| Time to Abandon | The duration of time until the conversation was abandoned. |
| Monitored | Whether the interaction was monitored. |
| Remote | Information on the remote party or external participant, such as name, phone number, and email address. |
| Flow-Out Type | Shows the type of flowout for a conversation that was a flowout from a queue. |
| Answered | Whether the interaction was answered. |
| Routing Used | Displays the routing method that was used to get to the agent who answered the interaction. The routing data is relevant beginning September 5, 2020. |
| Routing Requested | Displays the routing methods that were requested for the interaction. Gives insight into each of the routing methods the conversation went through prior to being answered, abandoned, or flow-out. The routing data is relevant beginning September 5, 2020. |
| MOS |
Displays interactions with the selected range of MOS scores. MOS scores range from 1 to 5.
For more information, see Mean Opinion Score (MOS) Overview. |
| Agent Assist |
Displays interactions with Agent Assist. |
| Work Team |
Displays metrics for interactions associated with the selected work team. Filter for multiple work teams at one time by entering other work teams and searching again. For more information, see Work teams overview. |
| SIP Call ID |
Displays information about interactions associated with the selected SIP Call ID. |
| External Tag |
Displays information for interactions that have the External Tag attached to the conversation record. Note: External tag data is not available for web chat interactions.
|
| Authenticated |
If Yes, displays web messaging interactions that are authenticated. If No, displays web messaging interactions that are not authenticated. |
| Recorded |
Displays interactions that were recorded. |
|
Screen Recorded |
Displays only interactions that were screen recorded. |
| Delivery Status | Displays interactions with the selected delivery statuses.
|
| Conversation Initiator |
Displays interactions started by a selected initiator (external, user, workflow, customer, or agent). |
| Conversation Participation |
Displays email and message interactions started by the customer. |
| Cleared by customer | Displays whether the conversation was cleared by the customer or not. |
| Parked | Show only interactions that have been parked. |
| Social Classification | Displays interactions based on one of the following options selected.
|
| Group Ring | Displays only the voice interactions that have alerted the selected group members via group ring. When multiple groups are selected, an OR operator is used to filter the interactions. |
To filter by information about the evaluations of the interaction:
- Click Filter .
- Click the Evaluations tab.
- Search or scroll to select the filter you want to use.
Evaluation filters
| Filter | Description |
|---|---|
| Evaluation Score | Displays interactions with the selected range of scores:
|
| Evaluation Critical Score | Displays interactions with the selected range of critical scores:
|
| Form | Displays interactions with evaluations that used the selected forms. |
| Agent |
Displays interactions with evaluations of the selected agents. To see and select inactive users in the Agent filter search, select Include inactive users. To see and select deleted users in the Agent filter search, select Include deleted users. |
| Evaluator |
Displays interactions evaluated by the selected evaluators. To see and select inactive users in the Evaluator filter search, select Include inactive users. To see and select deleted users in the Evaluator filter search, select Include deleted users. |
| Has Evaluation |
Displays interactions that have evaluation data associated with them. |
| Has Scored Evaluation |
Displays interactions that have completed evaluation data associated with them. |
To filter by information about the survey details of the interaction:
- Click Filter .
- Click the Surveys tab.
- Search or scroll to select the filter you want to use.
Surveys filters
| Filter | Description |
|---|---|
| Has Survey Data | Displays interactions that have survey data associated with them. |
| Survey Score | Displays interactions with the selected range of survey scores:
|
| Promoter Score | Displays the promoter score given by a survey respondent in a survey. Genesys Cloud uses the promoter score to calculate the survey's overall NPS. For more information about NPS, see Net Promoter Score web survey question overview.
One value listed for each survey associated with the interaction. |
| Survey Status |
Displays the status of the survey.
One value listed for each survey associated with the interaction. |
| Survey Form |
Displays the name of the survey form sent. One value listed for each survey associated with the interaction. |
| Survey Type |
|
To filter by information about the outbound details of the interaction:
- Click Filter .
- Click the Outbound tab.
- Search or scroll to select the filter you want to use.
Outbound filters
| Filter | Description |
|---|---|
| Campaign Name |
Displays interactions associated with the selected campaigns. When you type a campaign name, the suggested campaigns appear with their campaign types, Voice, Email, WhatsApp, or SMS. Email campaign type: Display interactions for multiple campaigns by entering other campaign names and searching again. |
| Contact List | Displays interactions associated with the selected contact lists. |
| Contact ID | Displays interactions associated with the selected contact IDs. |
| Campaign | Displays only interactions that are associated with campaigns. |
To filter by information about the journey details of the interaction:
- Click Filter .
- Click the Journey tab.
Journey filters
| Filter | Description |
|---|---|
| Has Customer Journey Data | Displays data for interactions with customer journey data. |
| Proactive | Displays data for interactions where Predictive Engagement offered a chat during a customer’s website visit based on the Predictive Engagement action map settings. |
To filter by information about the IVR flow details of the interaction:
- Click Filter .
- Click the Flows tab.
- Search or scroll to select the filter you want to use.
Flows filters
| Filter | Description |
|---|---|
| Flows | Displays interactions associated with the selected IVR flows. |
| Flows Outcomes | Displays interactions associated with the selected flow outcome. |
| Flow Outcome Value | Displays interactions that have the selected flow outcome values. |
| Flow Disconnect Reason |
Displays interactions with the selected flow disconnect reason. |
To filter by information about External Contact details of the interaction:
- Click Toggle filters panel .
- Click the External Contact tab.
External Contact filters
| Filter | Description |
|---|---|
| External Contact | Displays information about interactions associated with the selected external contact. You can filter for:
When you filter by external contact, the contact name appears with the associated organization name. Filter for multiple external contacts at one time by entering another contact and searching again. Enable Include merged contacts to search all the contacts that relate to the external contacts in the filter. Note: You can associate each merged contact with many individual contact IDs. When you enable the Include merged contacts, all merged contact IDs are automatically added to the search. The search filters are limited to 200 total search dimensions.
For example, if you merge one contact into five other contacts, the search, performed along with the merged contacts, filters a total of six contacts. If an organization heavily uses the merged contacts, a search for a few external contacts can hit the search filter limit. |
| External Organization | Displays information about interactions associated with the selected external organization. You can filter for:
Filter for multiple external organizations at one time by entering another organization and searching again. |