
Create a generic SIP phone
You can use generic SIP phones in any of Genesys Cloud’s telephony connection options: Genesys Cloud Voice, BYOC Cloud, or BYOC Premises.
After you create a generic SIP phone base settings profile, create the phone profile. The phone profile contains a group of settings on the Phone and Line Keys tabs that define the phone in Genesys Cloud. Most of the settings on the Phone and Line Keys tabs inherit the information from the base settings. However, you can customize the phone by altering any of the settings that it inherits from the base settings configuration without affecting the original base settings configuration. For more information, see Inherited settings.
Configure the phone
- Click Admin.
- Under Telephony, click Phone Management.
- Click Menu > Channels > Telephony > Phone Management.
- Click the Phones tab.
- Click Add.
Phone tab
Configure the settings on the Phone tab.
- Type a name in the Phone Name box.
- From the Base Settings list, select the generic phone base settings configuration you created.
- From the Site list, select your site. You can select either a cloud or premises site.
- Leave Standalone Features set to Off unless you are creating a conference room phone. See Enable standalone features.
- Choose one of the following steps:
- To use the default phone settings, click Save Phone and proceed to Configure the line keys in this article.
- To customize the phone settings, proceed to Customize the phone in this article.
Customize the phone
There are three expandable sections: General, Interface, and Custom. Each expandable section contains settings that customize the Generic SIP phone.
To customize the phone settings, follow these steps:
- Select the appropriate settings from each expandable section.
| Setting |
Description |
| Dynamic Reload |
Enabled (Default): Allow the dynamic reloading of the phone configuration. Disabled: Do not allow dynamic reloading. |
| Use Secondary Registration |
Configure the phone to use secondary registration. The default for this setting is Enabled. Genesys Cloud Voice – BYOC Cloud By default, Genesys Cloud provides the Phone Home service for provisioning information and to provide all the details for the primary generic sip registration. However, for phone redundancy, Genesys recommends that you use a secondary registration source. After you complete your phone configuration, you can use the How to Register feature, described later in this article, to retrieve the primary and secondary registration addresses, and other details that you must manually configure on your generic SIP phone. For more information about how to manually configure your generic SIP phone, see your phone documentation. BYOC Premises You have to manually configure the SIP phone to point the primary proxy to the primary Edge and secondary proxy to the secondary Edge. For information on how to configure the proxy settings, see your generic SIP phone documentation. |
| Setting |
Description |
| Message Waiting Indicator |
Use this setting to configure the Message Waiting Indicator (MWI), the light that blinks to indicate that the user has a new voicemail. To enable the feature, select the Message Waiting Indicator (MWI) check box. For more information, see Configure the Message Waiting Indicator setting. |
The Custom option is designed to allow Genesys Cloud Product Support personnel to alter a phone configuration for troubleshooting or special circumstances. Only enter custom property settings as directed by Genesys Cloud Product Support.
| Setting | Description |
|---|---|
| Property Name | The name to assign to the custom property. |
| Data Type | The data type for the custom property. |
| Value | The value to assign the custom property. |
- To use the custom phone settings, click Save Phone and proceed to Configure the line keys in this article.
Configure the line keys
- Click the Line Keys tab.
- Edit the default name in the Line Appearance Id box.Note: Even though Genesys Cloud assigns the Line Appearance Id field a default name based on the content of the Phone Name field on the Phone tab, create your own name. The Line Appearance Id name can only contain alphanumeric characters including the special characters: _ % + – ~. Spaces between characters are not allowed.
- If you are configuring your generic SIP phone for BYOC Premises, make note of the Line Appearance Id, you’ll need it later.
- To specify the callback number to be sent when a call is made to an emergency service, type a number in the Emergency Number box.
- Choose one of the following steps:
- To use the default line keys settings, click Save Phone.
- To customize the line keys settings, proceed to Customize the line keys in this article.
Customize the line keys
The line keys section of the phone includes four expandable sections: General, Signaling, Interface, and Custom. Each expandable section contains settings that customize the Generic SIP phone.
To customize the line keys settings, follow these steps:
- Select the appropriate settings from each expandable section.
| Setting | Description |
|---|---|
| Persistent Connection Settings |
When you enable the persistent connection feature and set a timeout value, you improve Genesys Cloud’s ability to process subsequent calls. Calls that arrive while the connection is active are immediately alerted via the UI or are auto-answered if the Auto Answer feature is configured for the user. When the persistent connection feature is disabled, Genesys Cloud must create a connection for every call. |
| Maintain a persistent connection |
To turn on the persistent connection feature, select the check box. The default setting is not to use the persistent connection feature. |
| Timeout | Sets the amount of time, in seconds, that the open connection can remain idle before Genesys Cloud automatically closes it. |
| Setting | Description |
| Digest Authentication | When outbound requests are challenged with digest authentication, Genesys Cloud uses these credentials. |
| User Name |
By default the user name is admin, but you can change it. Enter the user name that you want to assign to the phone. This user name is pushed down to the phone and becomes the user name for the administrative account on the physical phone. |
| Password |
The default the password is 1234, so you should change it. Genesys strongly recommends using the Generate random password feature. By default, the password is masked, but you can select the Show Password check box to see the password in plain-text. Genesys Cloud pushes this new password down to the phone where it becomes the password for the administrative account on the physical phone. Warning: Not changing the default password makes it easy for a bad actor to spoof the phone.
|
| Setting | Description |
| Auto-Conference Settings | When this setting is enabled and if a call is already connected or held at the station, a conference call is created between the new incoming call and the existing call. An announcement of the new call is played to the existing call before Genesys Cloud establishes the conference call. |
| Enable Auto-Conference |
Off (Default): Do not use auto-conference settings. On: Use the following fields to specify the auto-conference settings. |
| Auto-Conference PIN | Choose a Personal Identification Number (PIN) number to use to join the conference. |
| Language | Select a language to use for the conference voice menu. |
The Custom option allows Genesys Cloud Product Support personnel to alter a phone configuration for troubleshooting or special circumstances. Only enter custom property settings when directed by Genesys Cloud Product Support.
| Setting | Description |
|---|---|
| Property Name | The name to assign to the custom property. |
| Data Type | The data type for the custom property. |
| Value | The value to assign the custom property. |
| Setting | Description |
|---|---|
|
Recording Settings |
|
|
Record calls on this phone |
Use this check box to enable or disable recording. The default setting is disabled. |
|
Level the volume on both sides of the conversation |
Use this check box to enable or disable automatic level control for the recordings. The default setting is disabled. |
|
Audio Format/Codec |
Use this list to select the audio codec to use for recording. The available choices are:
|
|
Dual channel |
Use this check box to enable or disable dual channel recording. The Dual channel setting is only available if you select one of the following audio formats:
When you enable the Dual channel setting, the system saves each channel of the recording in a separate stream. The system uses audio channel 0 to save the recording connected to the phone and audio channel 1 to save the recording connected to the other party. The default setting is enabled. |
- To use the custom line key settings, click Save Phone.
Complete the generic SIP phone registration
To complete generic SIP phone configuration, you need to register the phone with Genesys Cloud. The method you use to retrieve the registration information will depend on the media model of the site ( Cloud or Premises) to which the phone is assigned.
Registration requirements
- Digest AuthenticationNote:
- For commercial organizations, use md5.
- For FedRAMP organizations use sha256.
- TLS 1.2 or later
- Port 5061
- SRTP – Required
- Registration interval: “minimum”: 10, “maximum”: 604800
- Minimum expires allowed: 600s
- You must reuse the same socket from the register for the invite
Note: When you select TLS as the transport protocol, the DigiCert Global Root G2 certificate is needed on the phone attempting to register as generic SIP.
Download the DigiCert Global Root G2 certificate in the file format that best suits your phone.
Retrieve registration information
As you retrieve this information, Genesys recommends copying and pasting the information in a text file, so you have it readily accessible when configuring your generic SIP phone.
- Click Admin.
- Under Telephony, click Phone Management.
- Click the Phones tab.
- Select your generic SIP phone.
- Click How to Register in the information panel. The Enter this information on the generic SIP phone dialog appears.
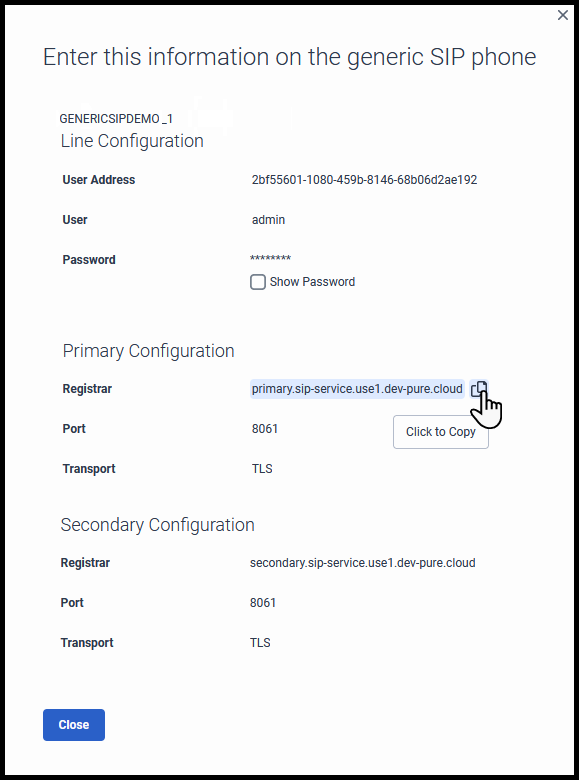
- Hover your mouse pointer over any item and click Click to Copy to copy that information to the clipboard. Then paste it into a text file
Using your generic SIP phone’s documentation as a guide, enter the required information in the phone’s configuration file.
Registration requirements
When you use TLS as the transport protocol, the organization level certification is needed on the phone attempting to register as generic SIP. For more information, see Configure certificate authorities.
Retrieve registration information
Retrieving the registration information for BYOC Premises is a manual procedure. Genesys recommends copying and pasting the information in a text file, so you have it readily accessible when configuring your generic SIP phone.
Retrieve the Line Appearance ID of the generic SIP phone.
- Click the Line Keys tab.
- Copy the Line Appearance ID.
Retrieve IP addresses of the primary and secondary edges.
- Click Admin.
- Under Telephony, click Edges.
- From the Edge Name column, select your edge.
- Click the Network tab.
- From the Interfaces list, select the network interface that you use for phone trunks.
- Copy the IP Address.
Retrieve the Listen port.
- Click Admin.
- Under Telephony, click Trunks.
- Click the Phone Trunks tab.
- From the Phone Trunk Name column, select your trunk.
- Copy the Listen Port number.
Using your generic SIP phone’s documentation as a guide, enter the line appearance ID, the IP addresses of the primary and secondary edges, and the listen port number in the phone’s configuration file.