
Series: Set up a call center in Salesforce
Configure call controls
By default, the client displays all call controls. The Call Controls section allows you to change the call controls that appear and their order.
After setting up a call center for the first time or after new call controls become available, configure the call controls.
- In Salesforce, click Setup.
- Search for Installed Packages.
- Under Build, click Installed Packages.
- On the Installed Packages page, click Configure next to the Genesys Cloud for Salesforce package.
- Under Choose a Call Center, select the version of the call center definition.
- Under Call Controls, click Arrow next to Call Controls.
A list of call controls appears under Available Controls.
Notes:- This list varies depending on the version of the managed package installed in your Salesforce organization.
- As new call controls become available, they will not automatically appear under Available Controls. For them to appear in the client, manually add them or upgrade your managed package.
- If no call controls appear under Selected Controls, then the client displays the default call controls and order. For more information, see the following table or Call controls.
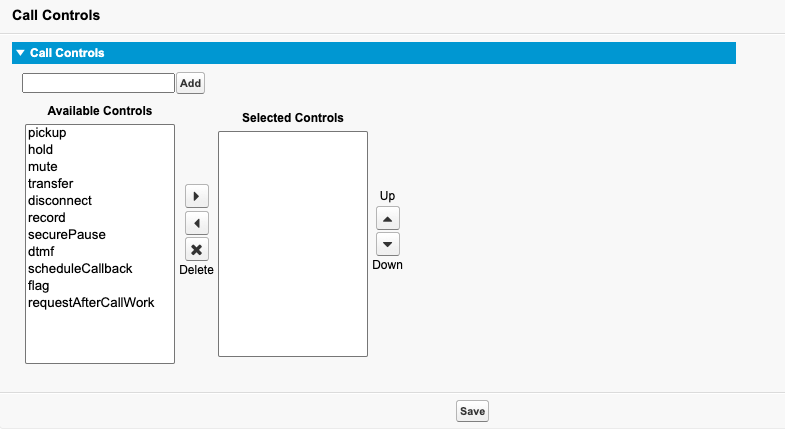
- To add new call controls not listed under Available Controls, type a call control name in the text box and click Add.Notes:
- For more information about new call controls, monitor the release notes or review the following table.
- If you added a mistyped a call control name, you can delete it by clicking X. Typically, you should not need to delete a call control from the Available Controls list.
Call control name Icon Action pickup 
Pick up an interaction. hold 
Place a call on hold. Click again to resume the call.
Note: Hold is unavailable for chat, email, message, and ACD voicemail interactions.
mute 
Mute a call. Click again to unmute the call.
Note: Mute is unavailable for chat, email, message, and ACD voicemail interactions.
transfer 
Transfer an interaction. The integration supports two types of transfers: blind transfer (all interaction types) and consult transfer (voice interactions). disconnect 
Disconnect an interaction. After disconnecting, the interaction is still visible but remains in a deallocated state for 2 minutes so agents can finish updating the interaction log.
park 
Park an email. The parked email is removed from the interaction roster.
record 
Record a call. Click again to stop the recording. Access call recordings from the global inbox in Genesys Cloud.
Note: Record is unavailable for ACD interactions (call, chat, email, message, and voicemail).
securePause 
Securely pause a recording. Secure pause prevents the client from recording sensitive information, such as a credit card number. Click again to resume the recording.
Note: Secure Pause is only available for callback and ACD call interactions.
dtmf 
Open the dialpad while on a call to send DTMF tones to the connected call, make IVR selections, or enter information such as an account number or credit card number.
Note: Dialpad is unavailable for chat, email, message, and ACD voicemail interactions. Agents can also use their keyboard for DTMF input.
scheduleCallback 
Schedule a callback for ACD voice interactions (call, callback, outbound dialing, and voicemail).
Note: Schedule a callback is unavailable for chat, email, and message interactions.
flag 
Flag voice interactions (call, callback, outbound dialing, and ACD voicemail) for quality issues such as deteriorated audio, unexpected disconnections, or failed transfers. Click again to remove the flag. The flag icon remains clickable for 2 minutes after the interaction disconnects.
Note: Flag voice quality issue is unavailable for chat, email, or message interactions.
requestAfterCallWork 
Request after-call work for ACD interactions (call, chat, email, message, and voicemail). Click again to cancel the request. The icon remains clickable until after the interaction disconnects.
Note: Administrators must configure queues to allow agents to request after-call work. For more information, see Create and configure queues.
The call control then appears under Available Controls.
- Select the call controls under Available Controls that you want to appear in the client and click Arrow .Note: If you do not select pickup or disconnect, the integration automatically adds these controls to the end of the call controls in the client.The selected call controls now appear under Selected Controls.
- To reorder the call controls, click Up and Down .
- When you finish modifying the call controls, click Save.
The configured call controls appear in the client when the integration rebuilds the page (upon page refresh, navigation to other pages, or login).
For information about all steps necessary to set up a call center, see Set up a call center.
For more information about the integration, see About Genesys Cloud for Salesforce.