
Blind transfer an interaction
Prerequisites
The following permission:
- Analytics > Queue Observation > View
The following appropriate blind transfer permissions:
- Conversation > Communication > All
- Conversation > Communication > blindTransfer
- Conversation > Communication > blindTransferAgent
- Conversation > Communication > blindTransferExternal
- Conversation > Communication > blindTransferQueue
For more information about managing permissions for transfer, see Manage transfer permissions for agents.
The client supports two types of transfers:
- Blind transfer: A blind transfer allows you to transfer an interaction immediately to a person or queue. This option is available for all types of interactions such as, voice, email, chat, message, voicemail, and callback.
- Consult transfer: A consult transfer allows you to connect with a person or queue before transferring a call. You transfer a call after speaking to the intended recipient. This option is available only for voice interaction.
For more information about how transfers function in Genesys Cloud, see:
- Transfer a call
- Transfer a call without speaking to the intended recipient
- Transfer a digital interaction
Also, see Transfer status to understand how the transfer proceeds for a digital interaction in the embedded client.
The following content applies to Genesys Cloud for Chrome and Genesys Cloud for Firefox.
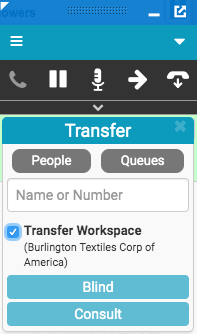
To perform a blind transfer, follow these steps:
- Click Transfer in the call controls.
When you have both transfer and consult permissions, both the Blind and Consult buttons appear. If you only have one permission, only the corresponding button, either Blind or Consult, appears.
Note: The Consult button does not appear for chat, email, message, and ACD voicemail interactions.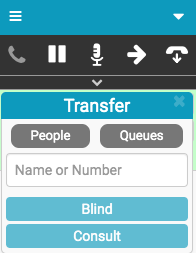
- The People and Queues options appear when you have selected:
- Either the blindTransfer permission or selected the blindTransferAgent, blindTransferExternal, and blindTransferQueue permissions together.
- A specific combination of permissions that encompass agent or external contact and queue. For example, blindTransferExternal and blindTransferQueue.
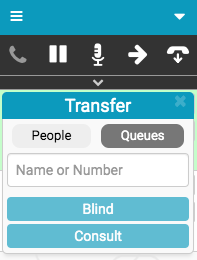
When both People and Queues filter options appear, they are active and appear with gray backgrounds. The integration searches for agents, external contacts, and queues for any name or number that you type in the Name or Number box.
Note: People filter option includes both agents and external contacts in your Genesys Cloud organization.You can apply the filter for the search in the following ways:
- To search only for Queues, click the People filter to clear the selection and ensure that the Queues filter is active and appears with a gray background.
- To search only for People, click the Queues filter to clear the selection and ensure that the People filter is active and appears with a gray background.
- To search for both People and Queues, click the filter that lacks a gray background and ensure that both the filter options are active and appear with gray backgrounds.
Your selection persists and appears the next time when you start a transfer.
- In the Name or Number box, type a queue name, a person’s name, or a phone number.
As you start to type a name, a list of people and queues appear. The content displayed in the search list depends on your transfer permissions and selection of the People or Queues filter option. For more information, see Manage transfer permissions for agents.
If you have all the blind transfer permissions, people in your Genesys Cloud organization appear first in the results, followed by queues, and then external contacts in your Genesys Cloud organization. The integration limits the results of each search type (people, queues, external contacts) to 25.
Note: External contacts in your Genesys Cloud organization appear in the results if there are phone numbers associated with them.The client shows the status of people. If they are handling interactions, the client shows the number of interactions that they are handling.
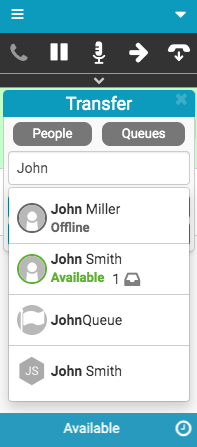
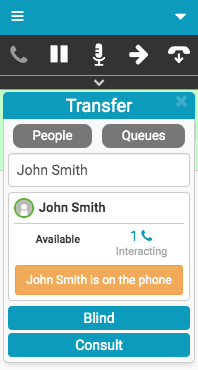
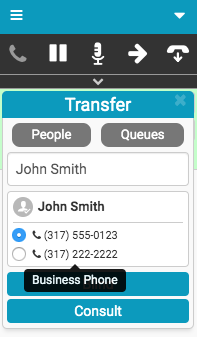
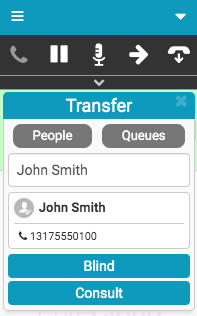
- Click the person or queue that you want to transfer the interaction to.
- People
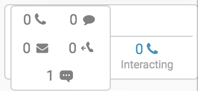
When you click a person in your Genesys Cloud organization, statistics for the person appear. The statistics include the following items:
- The person’s status.
- The number and type of interactions that the person is handling.
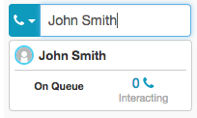
Hover over Interacting to see all media types.
When you click a person in your Genesys Cloud organization, the person’s current status appears and also indicates whether the person is engaged in an active interaction.
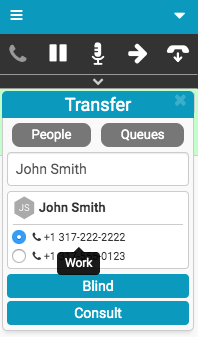
When you click an external contact with multiple phone numbers in your Genesys Cloud organization, a list of phone numbers appears. Hover over a phone number to see its type. Select the phone number that you want to call.
- Queues
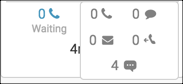
When you click a queue, statistics for the queue appear. The statistics include the following items:
- The number and type of interactions waiting in the queue.
- The number of active and total agents in the queue.
- The estimated wait time for an agent to answer.
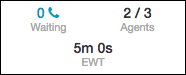
Hover over Waiting to see all media types.
- People
- Click Blind.
The following content applies to Genesys Cloud Embeddable Framework.
To perform a blind transfer, follow these steps:
- Click Transfer in the call controls.
Your administrator can configure the integration to transfer additional content with an interaction.
When you have both transfer and consult permissions, both the Blind and Consult buttons appear. If you only have one permission, only the corresponding button, either Blind or Consult, appears.
Note: The Consult button does not appear for chat, email, message, and ACD voicemail interactions. - The People and Queues options appear when you have selected:
- Either the blindTransfer permission or selected the blindTransferAgent, blindTransferExternal, and blindTransferQueue permissions together.
- A specific combination of permissions that encompass agent or external contact and queue. For example, blindTransferExternal and blindTransferQueue.
When both People and Queues filter options appear, they are active and appear with gray backgrounds. The integration searches for agents, external contacts, and queues for any name or number that you type in the Name or Number box.
Note: People filter option includes both agents and external contacts in your Genesys Cloud organization, and people in your system.You can apply the filter for the search in the following ways:
- To search only for Queues, click the People filter to clear the selection and ensure that the Queues filter is active and appears with a gray background.
- To search only for People, click the Queues filter to clear the selection and ensure that the People filter is active and appears with a gray background.
- To search for both People and Queues, click the filter that lacks a gray background and ensure that both the filter options are active and appear with gray backgrounds.
Your selection persists and appears the next time when you start a transfer.
- In the Name or Number box, type a queue name, a person’s name, or a phone number.
As you start to type a name, a list of people and queues appear. The content displayed in the search list depends on your transfer permissions and whether you have selected the People or Queues filter option. For more information, see Manage transfer permissions for agents.
If you have all the blind transfer permissions, people and queues in your Genesys Cloud organization appear first in the results, followed by people in your system, and then external contacts in your Genesys Cloud organization. The integration limits the results of each search type (people, queues, external contacts) to 25.
Note: External contacts in your Genesys Cloud organization appear in the results if there are phone numbers associated with them.The client shows the status of people. If they are handling interactions, the client shows the number of interactions that they are handling.
- Click the person or queue that you want to transfer the interaction to.
- People
When you click a person in your Genesys Cloud organization, statistics for the person appear. The statistics include the following items:
- The person’s status.
- The number and type of interactions that the person is handling.
Hover over Interacting to see all media types.
When you click a person in your Genesys Cloud organization, the person’s current status appears and also indicates whether the person is engaged in an active interaction.
When you click an external contact with multiple phone numbers in your Genesys Cloud organization, a list of phone numbers appears. Hover over a phone number to see its type. Select the phone number that you want to call.
- Queues
When you click a queue, statistics for the queue appear. The statistics include the following items:
- The number and type of interactions waiting in the queue.
- The number of active and total agents in the queue.
- The estimated wait time for an agent to answer.
Hover over Waiting to see all media types.
- People
- Click Blind.
The following content applies to Genesys Cloud for Salesforce.
To perform a blind transfer, follow these steps:
- Click Transfer in the call controls.
In Salesforce apps with console navigation, you can transfer the workspace with the call. For more information, see Workspace transfer.
When you have both transfer and consult permissions, both the Blind and Consult buttons appear. If you only have one permission, only the corresponding button, either Blind or Consult, appears.
Note: The Consult button does not appear for chat, email, message, and ACD voicemail interactions. - The People and Queues options appear when you have:
- Either the blindTransfer permission or selected the blindTransferAgent, blindTransferExternal, and blindTransferQueue permissions together.
- A specific combination of permissions that encompass agent or external contact and queue. For example, blindTransferExternal and blindTransferQueue.
When both People and Queues filter options appear, they are active and appear with gray backgrounds. The integration searches for agents, external contacts, and queues for any name or number that you type in the Name or Number box.
Note: People filter option includes agents and external contacts in your Genesys Cloud organization, and people in your Salesforce organization.You can apply the filter for the search in the following ways:
- To search only for Queues, click the People filter to clear the selection and ensure that the Queues filter is active and appears with a gray background.
- To search only for People, click the Queues filter to clear the selection and ensure that the People filter is active and appears with a gray background.
- To search for both People and Queues, click the filter that lacks a gray background and ensure that both the filter options are active and appear with gray backgrounds.
Your selection persists and appears the next time when you start a transfer.
- In the Name or Number box, type a queue name, a person’s name, or a phone number.
As you start to type a name, a list of people and queues appear. The content displayed in the search list depends on your transfer permissions and selection of the People or Queues filter option. For more information, see Manage transfer permissions for agents.
Note: External contacts in your Genesys Cloud organization appear in the results if there are phone numbers associated with them.If you have all the blind transfer permissions, people and queues in your Genesys Cloud organization appear first in the results, followed by people in your Salesforce organization.
The client shows the status of people. If they are handling interactions, the client shows the number of interactions that they are handling.
- Click the person or queue that you want to transfer the interaction to.
- People
When you click a person in your Genesys Cloud organization, statistics for the person appear. The statistics include the following items:
- The person’s status.
- The number and type of interactions that the person is handling.
Hover over Interacting to see all media types.
When you click a person in your Genesys Cloud organization, the person’s current status appears and also indicates whether the person is engaged in an active interaction.
When you click a person in your Salesforce organization or an external contact in your Genesys Cloud organization who has multiple phone numbers, a list of phone numbers appears. Hover over a phone number to see its type. Select the phone number that you want to call.
- Queues
When you click a queue, statistics for the queue appear. The statistics include the following items:
- The number and type of interactions waiting in the queue.
- The number of active and total agents in the queue.
- The estimated wait time for an agent to answer.
Hover over Waiting to see all media types.
- People
- Click Blind.
The following content applies to Genesys Cloud for Zendesk.
To perform a blind transfer, follow these steps:
- Click Transfer in the call controls.
When you have both transfer and consult permissions, both the Blind and Consult buttons appear. If you only have one permission, only the corresponding button, either Blind or Consult, appears.
Note: The Consult button does not appear for chat, email, message, and ACD voicemail interactions. - The People and Queues options appear when you have:
- Either the blindTransfer permission or selected the blindTransferAgent, blindTransferExternal, and blindTransferQueue permissions together.
- A specific combination of permissions that encompass agent or external contact and queue. For example, blindTransferExternal and blindTransferQueue.
When both People and Queues filter options appear, they are active and appear with gray backgrounds. The integration searches for agents, external contacts, and queues for any name or number that you type in the Name or Number box.
Note: People filter option includes people and external contacts in your Genesys Cloud organization.You can apply the filter for the search in the following ways:
- To search only for Queues, click the People filter to clear the selection and ensure that the Queues filter is active and appears with a gray background.
- To search only for People, click the Queues filter to clear the selection and ensure that the People filter is active and appears with a gray background.
- To search for both People and Queues, click the filter that lacks a gray background and ensure that both the filter options are active and appear with gray backgrounds.
Your selection persists and appears the next time when you start a transfer.
- In the Name or Number box, type a queue name, a person’s name, or a phone number.
As you start to type a name, a list of people and queues appear. The content displayed in the search list depends on your transfer permissions and selection of the People or Queues filter option. For more information, see Manage transfer permissions for agents. To return a list of users in your Zendesk organization, type complete words such as John or phone numbers that match the format in Zendesk. For example, 13175550123.
If you have all the blind transfer permissions, people and queues in your Genesys Cloud organization appear first in the results, followed by people in your Zendesk organization, and then external contacts in your Genesys Cloud organization. The integration limits the results of each search type (people, queues, external contacts) to 25.
Note: Users in your Zendesk organization and external contacts in your Genesys Cloud organization only appear in the results if there are phone numbers associated with them.The client shows the status of people. If they are handling interactions, the client shows the number of interactions that they are handling.
- Click the person or queue that you want to transfer the interaction to.
- People
When you click a person in your Genesys Cloud organization, statistics for the person appear. The statistics include the following items:
- The person’s status.
- The number and type of interactions that the person is handling.
Hover over Interacting to see all media types.
When you click a person in your Genesys Cloud organization, the person’s current status appears and also indicates whether the person is engaged in an active interaction.
When you click a person in your Zendesk organization, the person’s phone number appears.
When you click an external contact with multiple phone numbers in your Genesys Cloud organization, a list of phone numbers appears. Hover over a phone number to see its type. Select the phone number that you want to call.
- Queues
When you click a queue, statistics for the queue appear. The statistics include the following items:
- The number and type of interactions waiting in the queue.
- The number of active and total agents in the queue.
- The estimated wait time for an agent to answer.
Hover over Waiting to see all media types.
- People
- Click Blind.
Transfer status
Depending on the type of interaction and whether you select a person or a queue to transfer the interaction, the following table describes what to expect of a transfer outcome:
| Type of interaction | What happens | What’s Next |
|---|---|---|
| Voice | The call is immediately sent to the person or the queue selected. |
The initial interaction drops off the interaction list and the after call work opens. Note: If the recipient agent disconnects the transferred call, then the call is again pushed back to the queue. |
| Chat, email, message, callback, and voicemail |
The interaction is in the TRANSFERRING status until the recipient accepts the interaction. To cancel the transfer, click the Transfer icon again in the call controls and click Cancel Transfer. |
When the recipient accepts the interaction, the initial interaction drops off the interaction list and the after call work opens. If the recipient declines the interaction, the interaction goes back to CONNECTED status in the interaction list. |
For more information, see Transfers, Consult transfer a call, Workspace transfer, and Call controls.
For more information about the integrations, see About the Genesys Cloud browser extensions, About Genesys Cloud Embeddable Framework, About Genesys Cloud for Salesforce, and About Genesys Cloud for Zendesk.