
Place a call on behalf of a queue
The On Behalf of Queue option is for agents to place an outbound call, such as a follow-up call, on behalf of a queue without going On Queue. The On Behalf of Queue option allows an agent to place an outbound call related to a queue without receiving other interactions. The agent receives credit for the call because the call statistics are associated with the selected queue.
To place a call on behalf of a queue:
- Click Interactions.
- To start a call on behalf of a queue, depending on your permissions, at the top of the Interactions panel, do one of the following:
- Click Start a new call .
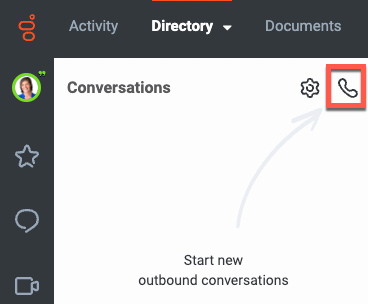
The Make Call window appears.
- Click Start a conversation .The Start a conversation icon appears when you have permission to start conversations on more than two different outgoing channels.
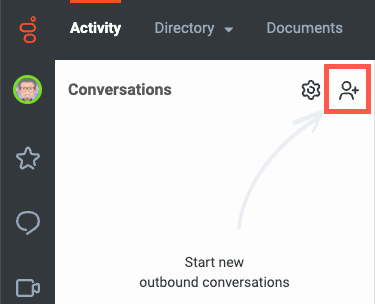
The Start a conversation window appears. Click the Make Call tab.
- Click Start a new call .
- To choose an available queue, begin to type the name of a queue in the On Behalf of Queue box. From the list of suggested queues, select the queue you want to call on behalf of.
Note: For more information about seeing which queues you are a member of, see Activate queues.
-
In the Enter Names and Numbers field, begin typing the name of the person you want to call. Select the person from the suggestions listed. Alternatively, type the phone number and press Enter.
Notes:- Use the full phone number. Genesys Cloud does not support extension-only numbers.
- Genesys Cloud supports click-to-dial on behalf of a queue for non -E.164 phone numbers stored in the External Contact's “Other” field.
- To start the call, click Call or press Enter.
Genesys Cloud displays the call in the Active Interactions list and in the Interaction panel. - To end the call, End Call .
- Complete any after call work needed for the call.Note: Interactions on behalf of queue inherit the ACW that your admin configures for the queue.