
My Schedule view
- To view schedules: Workforce Management > Agent Schedule > View permission
- To obtain a sharable link to the schedule: Workforce Management > Agent Schedule > Sync permission
- To submit time-off: Workforce Management > Agent Time Off Request > Submit permission
- To work with shift trades: Workforce Management > Agent Shift Trade Request > Participate permission
- To view agent possible shifts: Workforce Management > Agent Possible Shifts > View permission
You can access your schedule from the Activity > Schedule tab or the Performance > Workspace > My Schedule view. In the schedule view, you can see today’s schedule, tomorrow’s schedule, and schedules by week or month. You can view the full schedule, work with shift trades, manage and make time-off requests, exceptions, and copy a link to the schedule. Use the date picker to navigate to different weeks or months of the schedule. Schedules appear in the time zone selected by your web browser. For more information, see Agent activity view and Agents Schedule Detail view.
For more information about managing schedules, time-off requests, and settings in a mobile app, see:
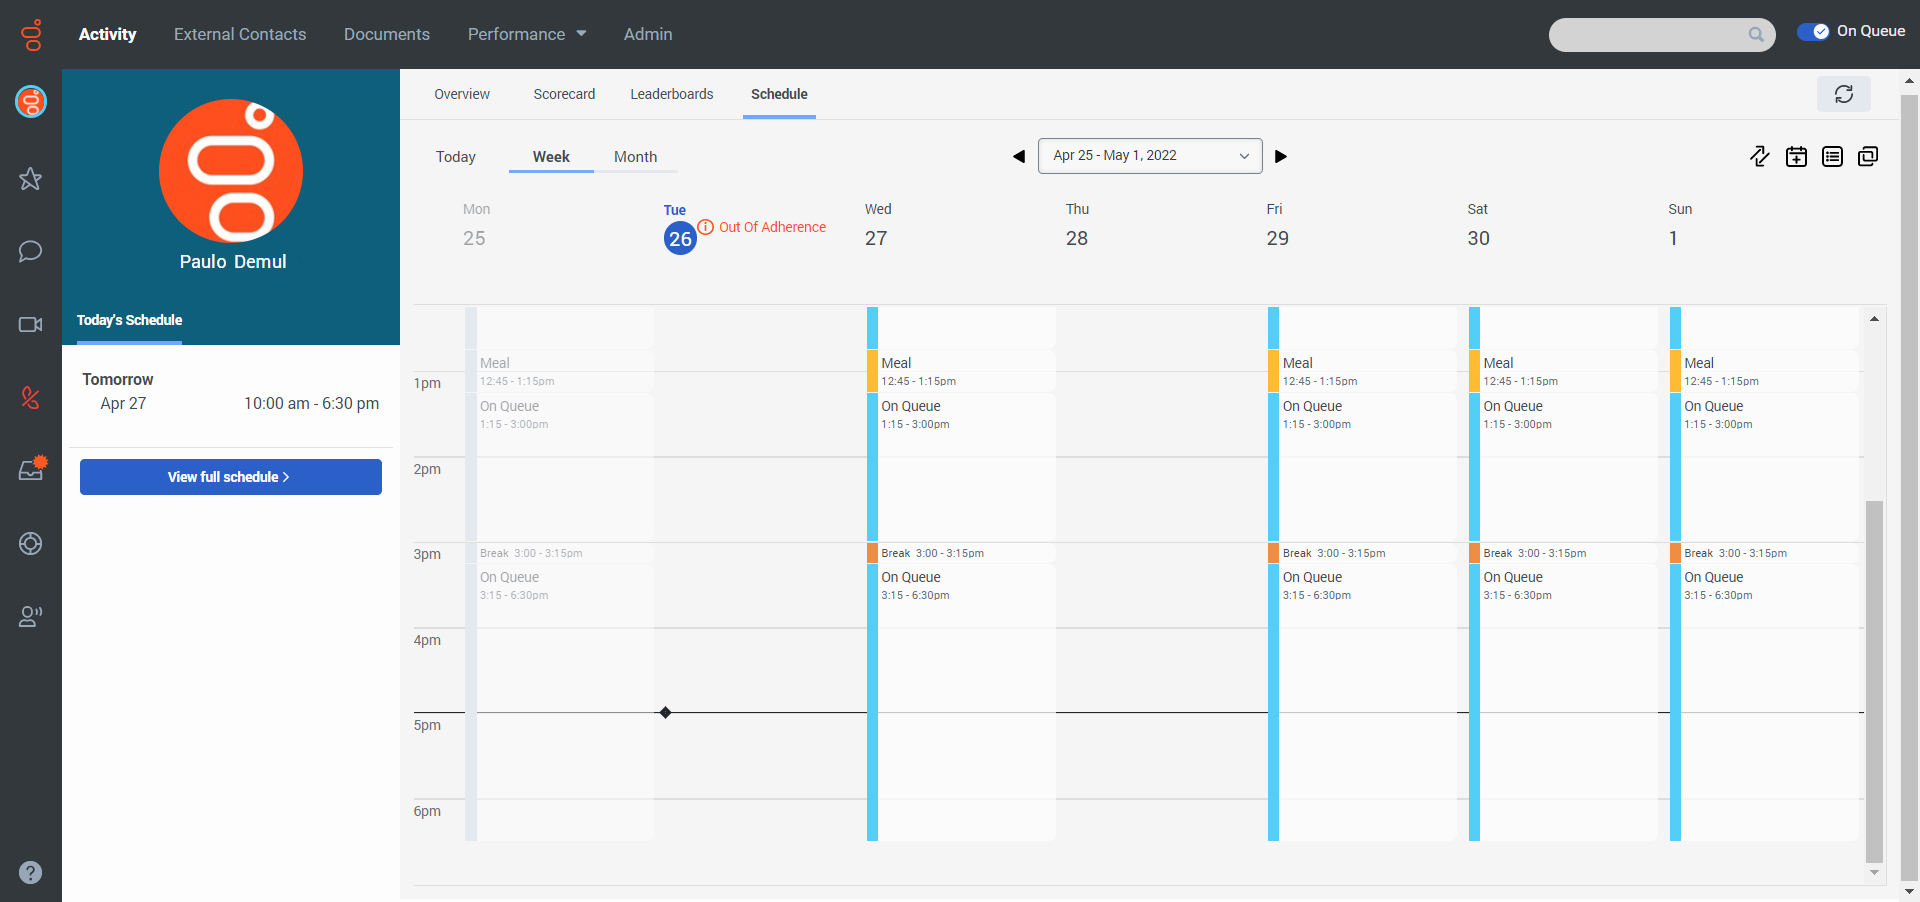
Access the schedule from the Activity > Schedule tab
Click the image to enlarge.
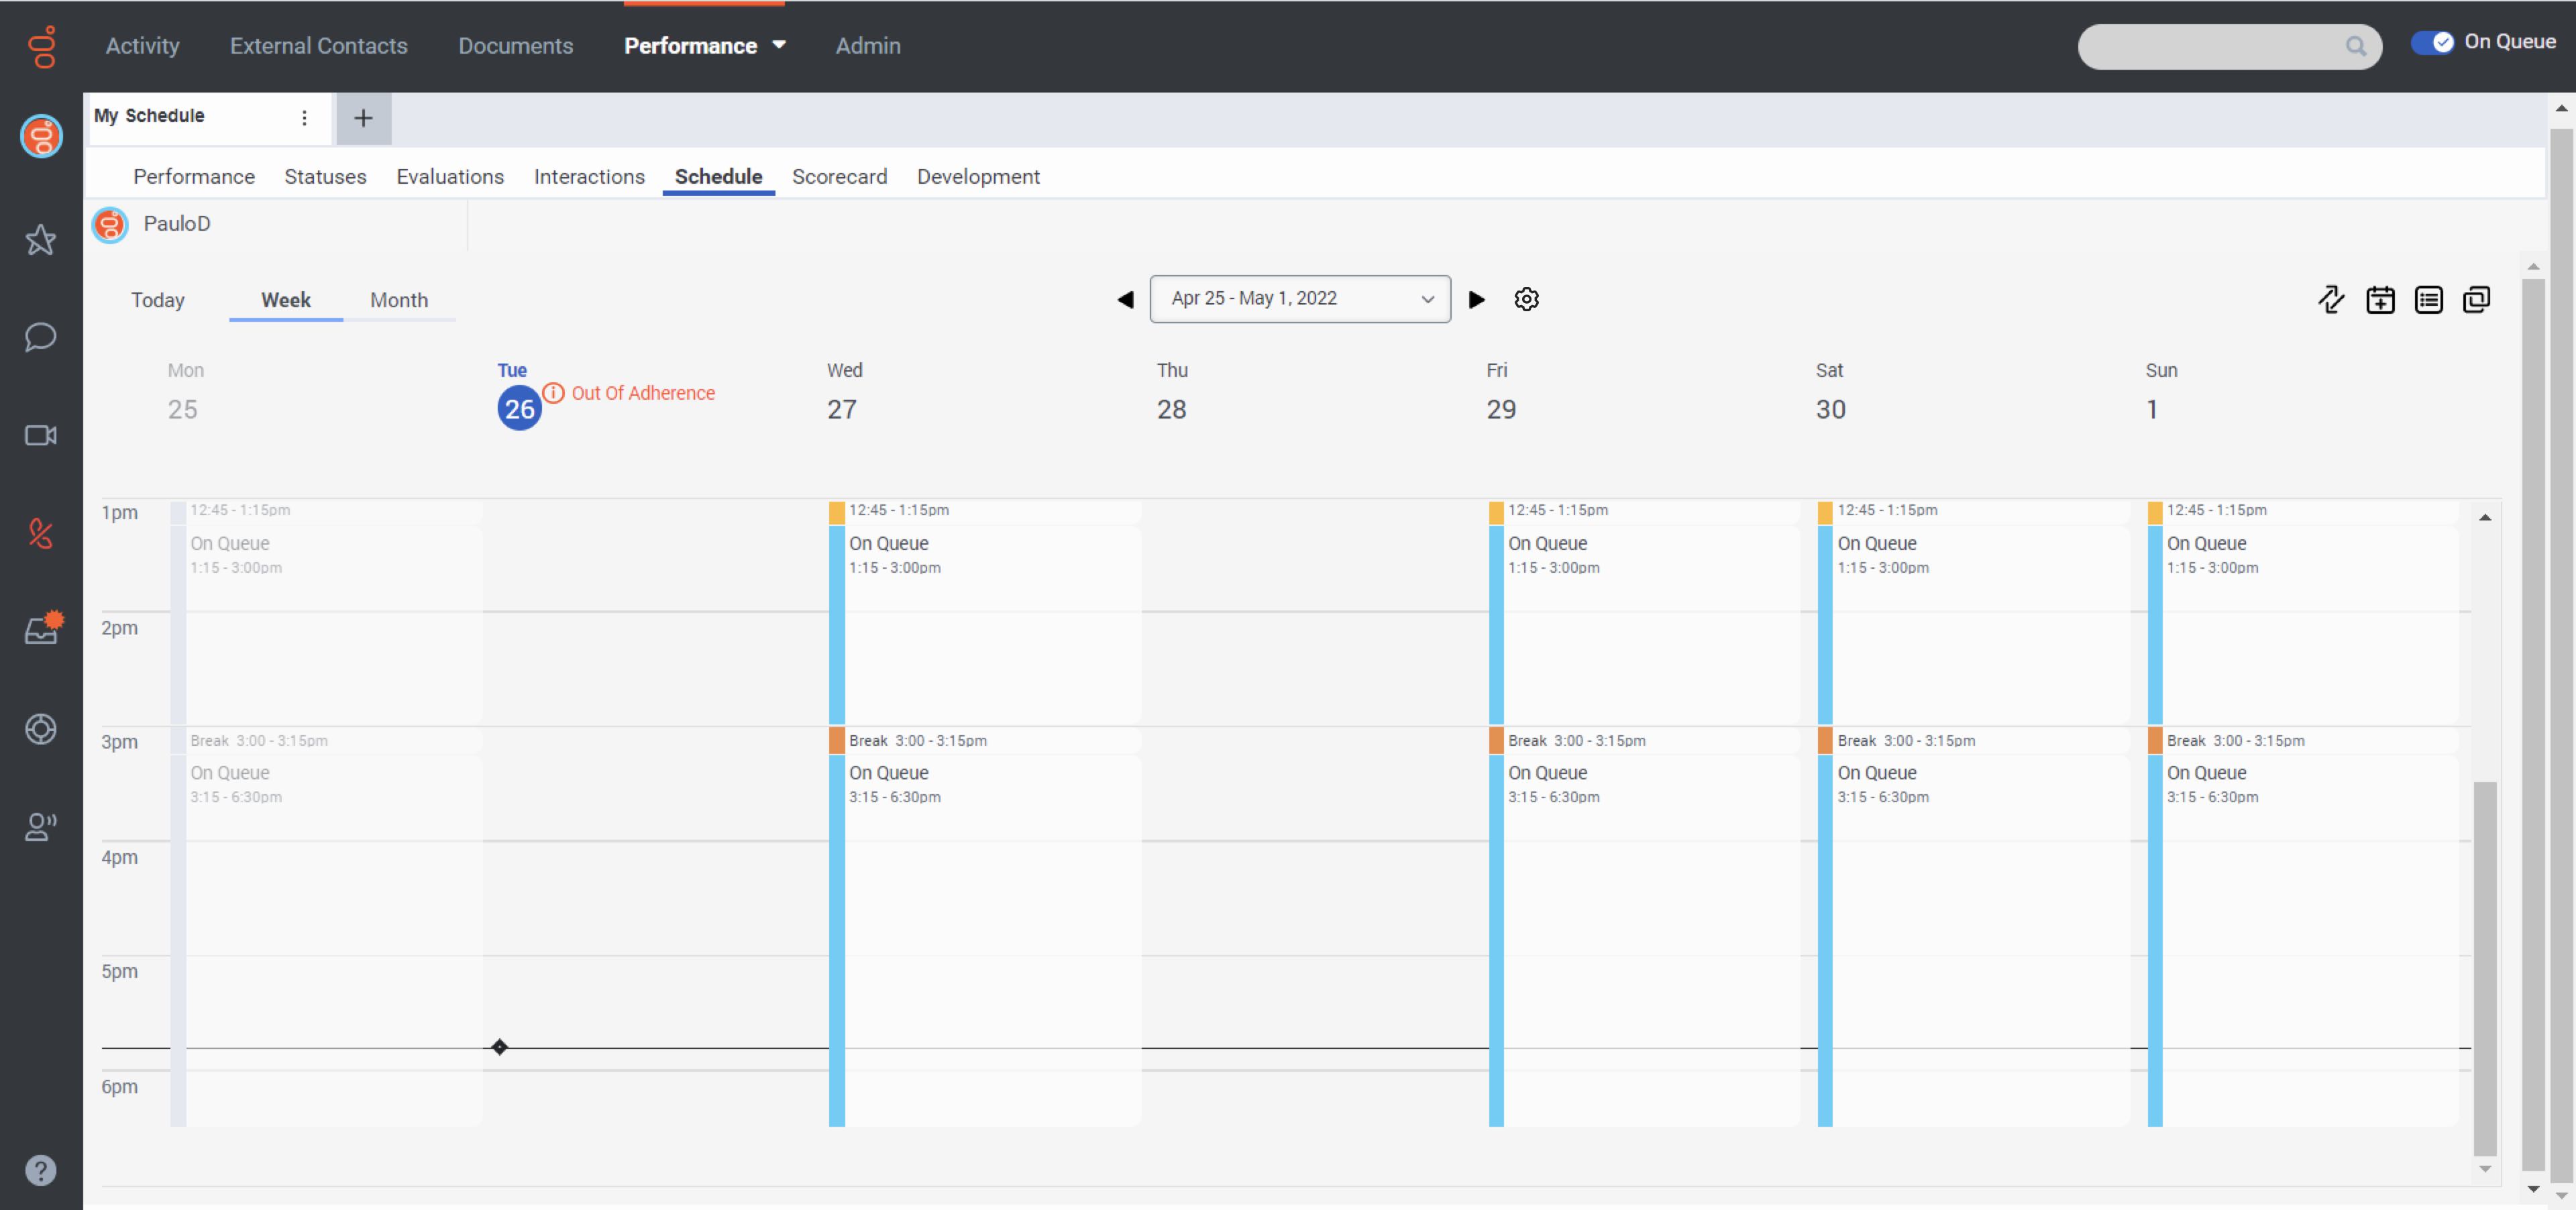
Access the schedule from Performance > Workspace > My Schedule view
Click the image to enlarge.
View your schedule
To access your schedule from the Agent Activity tab, perform the following steps:
- Click the Activity > Schedule tab.
- To see the most current data, click Refresh . This view does not update automatically.
To access your schedule from the Agent Dashboard, perform the following steps:
- Click Performance > Workspace > My Performance.
- Click the Schedule tab.
- To see the most current data, click Refresh . This view does not update automatically.
You can access your schedule either from the Agent Activity tab or from the Agent Dashboard.
- To view your schedule, do the following:
- For today’s schedule, click the Today tab.
- For a daily schedule, click the Day tab.
- For a weekly schedule, click the Week tab.
- For a monthly schedule, click the Month tab.
- Hover over the schedule for more information about it. The view highlights the current day in a contrasting background and indicates the current time with a horizontal bar. If you are out of adherence, the system displays a message at the top of your schedule and outlines the conflicting activity in red. For more information, see View out of adherence notifications.
- To see different dates, use the left triangle and right triangle and select the date range.
- To see different time zone in the Workspace view, use theGear icon and select the required time zone. You cannot change the time zones in the Activity view.
Set a default time zone in the workspace
You can set the default time zone in the analytics workspace before viewing any analytics view.
To set the default time zone in the workspace, follow these steps:
- Click Performance > Workspace.
- On the left side, from the Time zone drop-down menu, select the required time zone as the default time zone for the analytics workspace.
View and request time off
From the Time Off Requests pane, you can submit a time off request, view your approved and pending time off requests, and cancel eligible time off requests. To perform these tasks, click Time Off Requests .
To see a summary of your time off requests:
- From your schedule view, open the Time Off Requests pane. The panel displays pending requests, time off scheduled for the current week, and upcoming requests.
- To see more details about a request, click the request.
- Click the Show History icon in the upper right corner of the Time Off panel to view all requests. To get back to the summary list, click the Back button in the bottom left of the Time Off panel.
If your chosen time off has a wait list, when you hover over a date or make your selection, the system displays the current wait list time.
Click the image to enlarge.
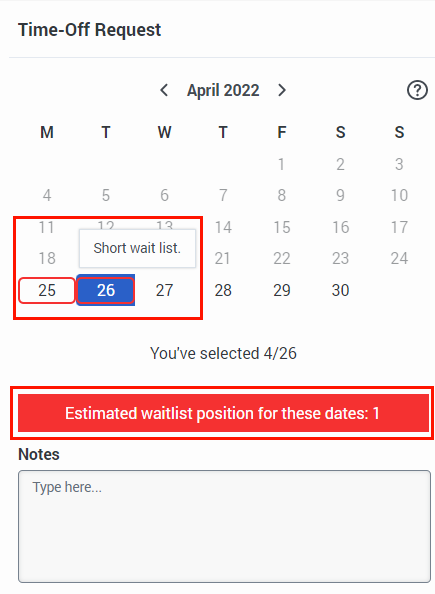
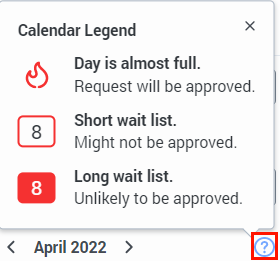
If there are potential conflicts with a date, an icon appears next to it in the calendar. To view icon descriptions, next to the calendar selector click Help .
To submit a time-off request, follow these steps:
- From your schedule view, open the Time Off Requests pane.
- Click the New Request button.
- From the Type list, select the appropriate type of time off.
- To select dates for your time off, click the date in the calendar.
- To submit a full day time off request, leave the Full Day option enabled.
- To submit a partial day time off request, do the following:
- Click to disable the Full Day option.
- In the Length box, adjust the daily time off.
- In the Start Time and End Time boxes, select when you want the time off to start and end. You can adjust the length or start time to modify every selected day of the request. Note: The balance of the available hours for the type of time off along with the estimated number of payable hours for the request is displayed, provided the selected time off type is part of an HRIS plan. Also, the agent can view the time off balances for each time off type by clicking the Show Balances (pie chart icon) button in the top right corner of the Time Off panel.
- Click Next.
- The system displays the list of each day of the request along with the estimated payable hours for that day. If it’s a Partial Day request then the agent can change each day’s start time and length individually. Click Back to make any changes to the time off type.
-
- (Optional) Under Notes, enter any details about the reason for the request.
- Click the appropriate beginning and ending dates, then click Submit .
You can cancel a time off request if:
- The request is pending.
- The request is approved but scheduled for a future date.
To cancel an eligible request:
- From your schedule view, open the Time Off Requests pane.
- Select the time off request that you want to cancel.
- From the time off configuration pane, select Cancel Request.
- To confirm the cancellation, click Yes, Cancel.
- To leave the request intact, click No, Keep.
You can edit only the notes of pending time off requests after you create it. You cannot edit the type, dates, or duration. You can, however, cancel the request and create a new one as long as the original request meets one of the following criteria:
- The request has not been approved.
- The request is approved but scheduled for a future date.
To edit the notes section of pending requests:
- From your schedule view, open the Time Off Requests pane.
- Select the time off request you want to edit.
- Update the Notes section.
- Click Update.
Work with shift trades
You can request to trade a shift with another agent, drop a shift to make it available for another agent to pick up, and add another shift to your schedule. To perform these tasks, click the Shift Trades icon. ![]()
For more information about shift trades, see the following articles:
- Request to trade a shift with anyone
- Request to trade a shift with a specific person
- Drop a shift
- Pick up an extra shift
View exceptions
The Exceptions section displays more infrequent activities in your schedule. These activities include Training, Meeting, and Time Off. To view exceptions, click Exceptions .
Add a schedule to an external calendar
You can obtain a shareable link to your workforce management schedule and synchronize it with Apple Calendar, Google Calendar, Microsoft Outlook, or other third-party calendars that support iCalendar subscriptions. For more information about synchronizing your schedule with other calendars, see Add your workforce management schedule to an external calendar. To obtain a link to your schedule, click Copy URL .
- Do not share this link with others unless you want them to see all details of your schedule.
- If the link is compromised, or you want to stop synchronization, click Disable Link. When you disable the link, schedule sharing from workforce management stops. However, you must manually delete the subscription from your external calendar.
To share your workforce management schedule with an external calendar, perform the following steps:
- From your schedule view, click the Copy URL .
- Open the external calendar of your choice and set up the workforce management subscription.
- To set up the calendar on your mobile device, scan the QR code to begin.
The schedule is synchronized using your preferred language and your verified location for on queue activity, which was set at the time that you created the link. To change this behavior and refresh the synchronization, set your preferred values and then click the Setup icon on the Sharable Link panel.