
Change your WebRTC phone settings
You can change your WebRTC phone settings in the client or in the WebRTC Phone window (Chrome browser users only). How you change the WebRTC phone settings and the items that you can change differ depending on the browser and product used, and the location of the settings (client or WebRTC Phone window).
When you use the Chrome browser to access your embedded client, you can access the WebRTC settings in one of the following ways.
- From the client access:
- Click Menu > More .
- Click Settings.
- Click WebRTC.
or
-
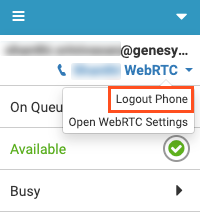
- Click Arrow .
- Click Open WebRTC Settings.
- From the WebRTC Phone window, click Settings.
Change phone
To change the phone, you must first log out from the current phone to select another phone associated with your user account.
- Click Arrow .
- Click Logout Phone.
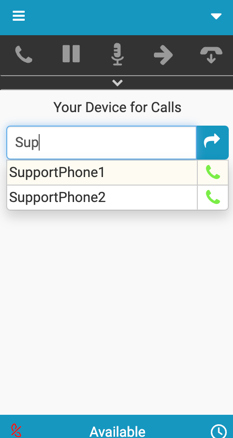
- Enter the name of the WebRTC phone that you want to use.
The search box automatically looks for a phone as you type. Phones currently associated with other users are not available. When you select the phone, the WebRTC Settings section appears.
Note: If you select the phone listed under Previous Station, then the WebRTC settings section is skipped and logs you directly in to the station. To view the WebRTC Settings section, select the phone from the search box.
Modify WebRTC settings
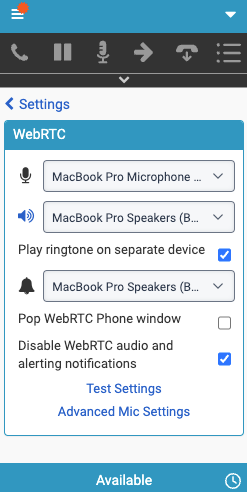
In the WebRTC Settings section, you can do the following:
- Stop a persistent connection.
Click Stop Persistent Connection. For more information, see Persistent connection and Stop a persistent connection.
- Select your microphone and speakers for WebRTC phones.
Click Refresh to verify your headset software is running or to restart it.
- Test your speakers.
Click Speaker . If you hear test tones, then your speakers are working properly. When you do not hear test tones or you encounter other problems, click Test Settings to check for issues.
Note: If you use the WebRTC Phone window, then test your speakers through the Settings on the WebRTC Phone window. For more information, see Browser window for WebRTC phones. - Select your speakers for the ringer.
When you select the Play ringtone on separate device setting, it defaults to your speakers for WebRTC phones. This setting is not selected by default.
- Change the behavior of the WebRTC Phone window (client access only).
The Pop WebRTC Phone window setting is selected by default.
Note: This setting does not appear in products where it is configured by default (for example, Sales Cloud in Genesys Cloud for Salesforce and some implementations that use Genesys Cloud Embeddable Framework). - WebRTC audio and alerting notifications
When you select the Disable WebRTC audio and alerting notifications setting, Genesys Cloud desktop or browser client is used as the primary client to answer the inbound voice calls. Alerts and notification sounds for all digital interactions are also muted in the embedded client. For more information, see Disable WebRTC audio and alerting notifications.
Test your settings
To test the settings for your WebRTC phone:
- Click Test Settings.
The test checks the microphone only.
- For other diagnostics, click Click here for additional troubleshooting.
The additional troubleshooting opens the Genesys Cloud WebRTC Diagnostics app. For more information about running the tests in the app, see Run the standalone Genesys Cloud WebRTC Diagnostics app.
Mic settings
To improve the audio experience, click Advanced Mic Settings. You can clear or select the following settings for optimal audio:
- Automatic Mic Gain
- Echo Cancellation
- Noise Suppression
For more information, see Configure advanced microphone settings for WebRTC phones.
The Firefox browser does not provide the option to select the WebRTC settings for the embedded clients. To change the phone or update the WebRTC settings such as the speaker and microphone, you must log out from the current phone and then select the phone again to view the WebRTC settings.
To access and change the WebRTC settings for the client in the Firefox browser:
- Click Arrow .
- Click the name of the phone.
- Click Logout Phone.

- Enter the name of the WebRTC phone that you want to use.
The search box automatically looks for a phone as you type. Phones currently associated with other users are not available.
- If you enter a name of a WebRTC phone, then the WebRTC Settings section appears. In the WebRTC Settings section, you can do the following:
- Select your microphone and speakers for WebRTC phones.
- Test your speakers.
Click Speaker . If you hear test tones, then your speakers are working properly. When you do not hear test tones or you encounter other problems, click Test Settings to check for issues.
Note: If you use the WebRTC Phone window, then test your speakers through Settings on the WebRTC Phone window. For more information, see Browser window for WebRTC phones. - Select your speakers for the ringer.
When you select the Play ringtone on separate device setting, it defaults to your speakers for WebRTC phones. This setting is not selected by default.
- Change the behavior of the WebRTC Phone window (client access only).
The Pop WebRTC Phone window setting is selected by default.
Note: This setting does not appear in products where the setting is configured by default (for example, Sales Cloud in Genesys Cloud for Salesforce and some implementations that use the Genesys Cloud Embeddable Framework). - WebRTC audio and alerting notifications
When you select the Disable WebRTC audio and alerting notifications setting, Genesys Cloud desktop or browser client is used as the primary client to answer the inbound voice calls. Alerts and notification sounds for all digital interactions are also muted in the embedded client. For more information, see Disable WebRTC audio and alerting notifications.
- Click Test Settings. The test checks only the microphone.
- For other diagnostics, click Click here for additional troubleshooting.
The additional troubleshooting opens the Genesys Cloud WebRTC Diagnostics app. For more information about running the tests in the app, see Run the standalone Genesys Cloud WebRTC Diagnostics app.
For more information, see About phones, Persistent connection, Settings in the client menu, Browser window for WebRTC phones, and Troubleshoot phone issues.
For more information about the integrations, see About Genesys Cloud Embeddable Framework, About Genesys Cloud for Salesforce, About Genesys Cloud for Microsoft Teams, and About Genesys Cloud for Zendesk.