
Team schedule view
- Genesys Cloud CX 3, Genesys Cloud CX 4, Genesys Cloud CX 3 Digital, Genesys Cloud CX 1 WEM Add-on II, Genesys Cloud CX 2 WEM Add-on I, or Genesys Cloud EX
- The following permissions:
- Workforce Management > Agent Schedule > View
- Workforce Management > Agent Management Unit Schedule > View
- For agents: If you do not have these permissions, you can view only your own schedule
- For administrators: Administrators control the agents’ access to management unit schedule view
As an agent, the Team Schedule view allows you to view the schedules of your colleagues in the same management unit as yourself. The Team Schedule view enables you to:
- Check who is covering after your shift ends.
- See if a teammate is available for a shift swap before submitting a trade request.
- Identify when colleagues are on vacation to plan coverage.
- Pin close coworkers so their schedules are always easy to find.
Team Schedule view includes agents that belong to the same management unit.
As an administrator, you control agents’ access to this feature to decide whether they can view schedules across their management unit. Shared schedules are always read-only and are limited to show only category-level information. For example, instead of Meeting – All Staff Meeting, agents can see the category – Meeting.
View the Team Schedule view on the schedule tab
To view the Team Schedule view on the schedule tab, click Activity > Schedule tab.click Menu > Activity. Then, click the Schedule tab. For more information, see My Schedule view. The default view that displays is your schedule view.
To view the teams’ schedule, perform the following steps:
- In the Schedule tab, locate the My Schedule drop-down next to the Day and Week view options.
- In the My Schedule drop-down, click to view the options.
- My Schedule: Displays the agent’s schedule. This is the default view.
- Management unit: Displays the schedule view of all agents in the management unit.
Once you select your management unit, the Schedule view displays as follows. Click the image to enlarge.
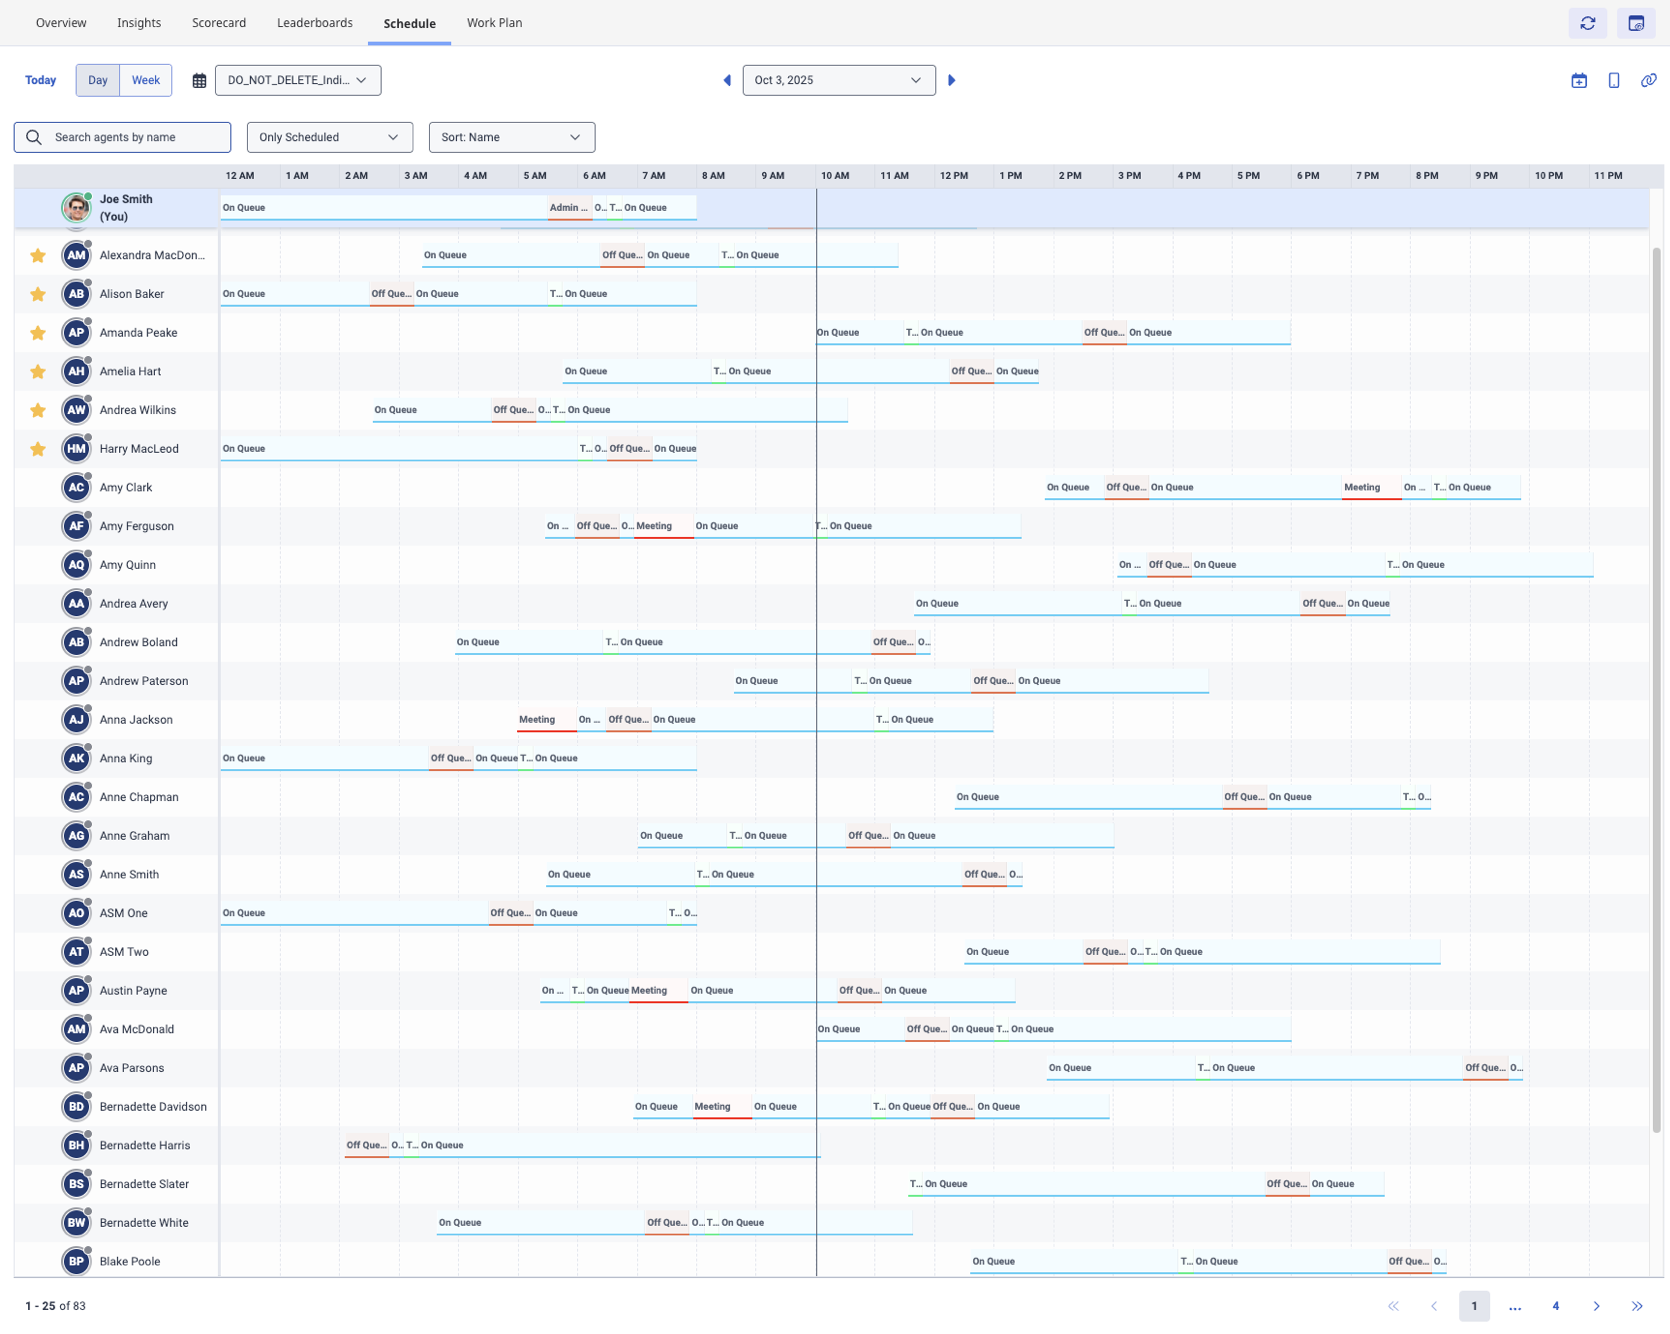
You can switch between your schedule and the schedule of other agents in your management unit.
You can perform various actions when on the Team Schedule view.
Manage the Team Schedule view
When viewing team schedules, you have several options to help you find and organize the information you need. Before you proceed to perform any of the following actions, ensure that you are in the team schedule view.
To search for agents in your team, perform the following steps:
- Locate the Search agents by name field available above the agent schedule.
- In the Search agents by name box, type the name of single or multiple agents.
The relevant search results are displayed.
To sort the schedules of agents, perform the following steps:
- Locate the Sort drop-down above the agent schedule.
- In the Sort drop-down, select the most applicable from the available options:
- Names: Displays the names in alphabetical order (Default).
- Earliest start: Displays the agents with the earliest start times first.
- Latest start: Displays the agents with the latest start times first.
- Earliest end: Displays agents whose shifts end earliest first.
- Latest end: Displays agents whose shifts end last first.
- The agent schedule is displayed based on the selection that you made.
You can select one or multiple agents as favorites. These agents’ details are displayed below your name on the team schedule. You can select up to 10 agents to your favorites. To select, view, or remove agents from favorites, perform the following steps:
- In the left panel, which lists the agents, locate the agent.
- Hover over the agent’s name or photo.
- Click the Star icon and mark them as a favorite.
- A solid star indicates that the agent is pinned as a favorite.
- An empty star indicates that they are not selected as favorite and appears only when you hover. You can click the star to select the agent as your favorite.
- To remove a favorite, click the filled star again.
Click the Keep favorites first checkbox to retain the name of the agents always on top regardless of the sorting actions you perform.
To filter team schedules, perform the following steps:
- Locate the All Schedules drop-down above the agent schedule.
- In the All Schedules drop-down, choose one of the following options:
- All schedules: Displays all the agents in your management unit (Default).
- Only scheduled: Displays only agents with shifts on the selected day/week.
- Only unscheduled: Displays only agents without a schedule.
- Only time off: Displays only agents who have time-off scheduled.
If your management unit has more than 25 agents, the schedule is split into pages. You can view details of 25 agents in each page and click the forward and back buttons at the bottom of the page to view additional agents’ details. The filters and search apply across all pages, not just the current page.
You can view agent profile information when you hover and click the agent’s profile picture or thumbnail. Upon clicking the profile picture or thumbnail, you can perform the following actions:
- Start a chat
- Make a call
- Send an email
- Start a video call
- Go to their profile
- Add/remove as favorite
The Schedule tab in the team schedule view displays the current day view by default. You can switch between Day and Week by clicking the relevant option.
- In Day view, hover over an agent’s shift to see activity information. For example, Meeting, break etc. Detailed information is available only for the logged in agent (You). For example: On Queue – Work, Break, Meeting – 1:1.
- In Week view, daily shift details appear as bars, with start and end times shown in each cell. Tooltips are not available in this view.
Use the Date picker field or the and arrows to move between days or weeks. To navigate to the current day view, click Today. When in Week view, click a date at the top of the column to open that day in Day view.
You can bookmark a schedule view and revisit it anytime later.
- To bookmark a team schedule view, copy the URL link from the browser and save it or share it with another agent. Each team schedule view has a unique URL that includes your date, filters, and sort order.
- To visit a bookmarked team schedule view, paste the saved URL link on the browser. When you open the link, you return to the same view.
Limitations
The following table lists the points that you must consider when you are using the team schedule view.
| Limitations | Description |
|---|---|
| Category-only details for teammates |
You can only view category-level schedule information for other agents. For example, Meeting, Break, Meal, Time Off. You cannot see detailed activity descriptions or any notes added to activities for other agents. For example, Meeting – Return to Work. You can view activity-level schedule information for yourself including activity codes, detailed activity descriptions, and any notes added. |
| Manually refresh schedule data to view updates |
Team schedules update in real time, but if you leave the view open for a long time, some information may not update real time and can become outdated if a colleague’s schedule is updated. In such cases:
|
| Error handling and loading behavior |
When the data does not load, Genesys Cloud displays:
|
| Management unit scope only |
You can view schedules for agents only when:
Inactive users are shown as Inactive and deleted users are removed entirely from Workforce Management (WFM). |
| Search and favorites |
In the team schedule view, you can:
|
| No month view | Currently, only day and week views are supported. |
| Agent display settings | The team schedule view displays up to 25 agents per page. |
| Limited available actions |
In the team schedule view, WFM supports the following other actions:
In your personal schedule view, WFM supports the following actions:
|