
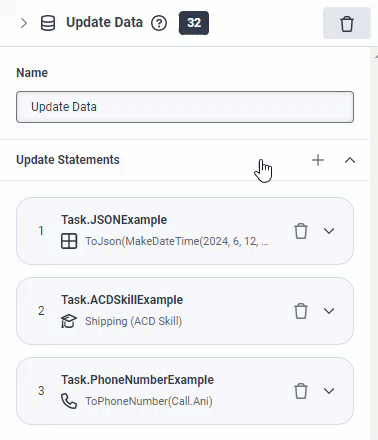
Update Data action
Use the Update Data data action to assign values to flow or task level variables. For example, you can create a value that recognizes Customer IDs beginning with 99 as preferred customers, or phone numbers with a specific area code belong to a designated regional office.
| Name | Description |
|---|---|
| Name field |
Type a distinctive name for the action. The label you enter here becomes the action’s name displayed in the flow structure. |
| Update Statements |
Click to open a window from which to choose one of these options:
The Value to Assign form can change, depending on the data type or collection type you choose. For more information about the available variables and how to build them, see the Suggested Articles. Architect lists the most recently used data types or collection types at the top. |
|
Delete |
Click to delete an update statement. |
|
Collapse |
Click to collapse an update statement. |
|
Expand |
Click to expand an update statement. |
|
Move |
Click and hold the Update statement card that you want to move up or down in the list. To move a card when it is expanded, click and hold the header of the card.
|
Add update statement variables
The actions available to you can depend on the flow type in which you are working. Choose from these variables:
ACD skills are arbitrary designations of tasks, expertise, or knowledge that someone must have to handle an interaction. A skill variable represents a Genesys Cloud ACD skill (such as a language or certification) possessed by an agent. In Architect, an ACD skill requirement routes a work item to an eligible recipient. ACD skills are established and configured by the Genesys Cloud administrator.
Add a skill variable to a task sequence
In a task sequence, you can add a skill variable to an Update Data action and then call it from a Transfer to ACD action. For example, to send the call to an agent with fluent Spanish-speaking skills or a higher level of proficiency in Windows OS.
- From the Toolbox, expand the Data category and drag an Update Data action to the desired location in the task.
- In the Update Data workspace, add a meaningful name to describe the item.
- Click next to Update Statements and select the ACD Skill data type.
- In the Variable Name field, type the label to identify the variable on tasks.
- In the Value To Assign field, perform one of these steps:
- To set the value from literal mode, click the list and select the desired ACD skill.
- To set the value using an expression, click the Expression modes button , select Expression, and do one of the following:
- Add the expression inline.
- Click the Large Expression Editor button to open the Edit Expression Editor and build your expression.
- (Optional) To add another variable, click next to Update Statements.
- Add a Transfer to ACD action to the task sequence and configure it to use the skill variables you created here.
Agent scores allow you to specify the priority of preferred agents. If for example, you have agents that you prefer most, set their scores higher, and set backup agents lower. If you don't have a preference, set the score to 100.
In Architect, to influence routing you can create an agent score pair collection that supports up to 20 agent/score pairs.
To create an individual agent score pair value, use the MakeAgentScorePair function. For example, the following expression in a Transfer to ACD action's Preferred Agent setting creates an agent score pair collection with two agent score pairs. The first user has a score of 100 and the second has a score of 90:
MakeList(
MakeAgentScorePair(
FindUserById("<put_user_guid_string_here>"),
100
),
MakeAgentScorePair(
FindUserById("<put_user2_guid_string_here>"),
90
)
)
You can use a MakeListAgentScorePair function that takes a collection of users along with an integer collection of scores to associate with the users. Following that method, this example generates the same value as the previous expression:
MakeListAgentScorePair(
MakeList(
FindUserById("<put_user_guid_string_here>"),
FindUserById("<put_user2_guid_string_here>")
),
MakeList(
100,
90
)
)
To find the user ID of a user, see Edit a user's profile.
You can also use an Update Data action to assign variables. Then, use those variables to supply individual user values or user collections, an individual integer score or integer collections, and agent score pairs or collections. For more information about the MakeAgentScorePair, MakeListAgentScorePair, MakeList, FindUserById, and other functions, see Architect's Expression Help feature. Each function provides more details and examples.
- If the action encounters an agent score pair collection supplied with more than 20 items, call flows take the Failure output at runtime. If you bind a variable to the
errorTypefailure output, the value contains the “TooManyPreferredAgents” string value. In email, chat, and message flows, Architect implements flow error handling. - The
MakeListAgentScorePairfunction does not support the NOT_SET value. If a user is removed from the system or no longer exists, and you do not update the preferred agent routing list, theFindUserByIdfunction returns the NOT_SET value. In this scenario, theMakeListAgentScorePairfunction fails and the entire flow follows error handling.
Add an agent/score pair variable to a task sequence
In a task sequence, you can add an agent/score pair variable to an Update Data action.
- From the Toolbox, expand the Data category and drag an Update Data action to the desired location in the task.
- In the Update Data workspace, add a meaningful name to describe the item.
- Click next to Update Statements and select the AgentScorePair data type.
- In the Variable Name field, type the label to identify the variable on tasks.
- In the Value To Assign field, do one of the following:
- To set the value using an expression add the expression inline.
- To set the value using the large expression editor, click to open the Edit Expression Editor and build your expression.
- To set the value using the Agent Score Pair builder, perform these steps:
- Click the Expression modes button to open the Agent Score Pair builder.
- Select AgentScorePair Builder.
- To use the MakeAgentScorePair Architect function to set the value, click AgentScorePair and click Make AgentScorePair.
- Under User, enter the agent. Note: If you select a literal user, system uses the
FindUserByIdfunction with the user's id at runtime. If the system does not find the user, it returns a NOT_SET AgentScorePair value. - Under Score, enter the numerical score.
- (Optional) To add another variable, click next to Update Statements.
A boolean expression can have only one of two values: true (yes) or false (no). For example, the expression "Date equal to 07/17/2014" has a value of yes (true) if the current variable's value is July 17, 2014; otherwise, it has a value of no (false). Use boolean values (or expressions that return boolean values) with If-Then-Else actions to tell Architect how to make decisions based on two clear alternatives.
Examples
- Call.Ani=="tel:+13175551212": In this Boolean expression, the result is true if the originating phone number is 1-317-555-1212; otherwise, false.
- ToAudioTTS(If(Hour(GetCurrentDateTimeUtc()) >= 12, "Good afternoon", "Good morning")): In this expression that includes boolean values, if the current time is on or after 12:00:00 p.m., the system plays "Good afternoon" audio. Otherwise, it plays "Good morning" audio. Note: In this example, the system runs the check against UTC datetime value.
You can test for only one condition with one variable, or you can test for multiple conditions with multiple variables. Each time you click Add update statement, Architect adds a variable row. If the table has more than one row, then:
- The process evaluates the conditions in top-to-bottom order as they appear in the table.
- The process uses "short-circuit evaluation." When an expression combines multiple conditions by using OR, then the whole expression is true if any of the conditions are true. Therefore, if the first condition is true, the process knows that the whole expression is true and doesn't need to evaluate any of the other conditions. As soon as the process hits a condition that is true, it stops evaluating an OR expression. On the other hand, if an expression combines multiple conditions by using AND, then the whole expression is false if even one of its conditions is false. Therefore, as soon as the process hits a condition that is false, it stops evaluating an AND expression because it knows that the whole expression is false. In either case, the process moves on to the next step.
Add a boolean expression to a task sequence
In a task sequence, you can add a boolean expression to an Update Data data action. For example,
- From the Toolbox, expand the Data category and drag an Update Data action to the desired location in the task.
- On the Update Data design form, in the Name field, add a meaningful name to describe the item.
- Click next to Update Statements and select the Boolean data type.
- In the Variable Name field, type the label to identify the variable on tasks.
- In the Value To Assign field, do one of the following:
- To set the value from literal mode, click the True or False radio button.
- To set the value using an expression, click the Expression modes button , select Expression, and do one of the following:
- Add the expression inline.
- Click the large expression editor button to open the editor and build your expression.
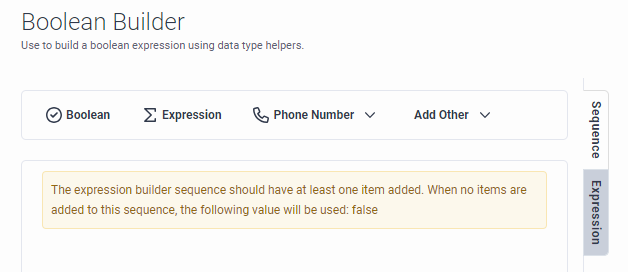
- To set the value using the Boolean Buider, click the Expression modes button , select Boolean Builder, and build your boolean expression using data type helpers:
- (Optional) To add another variable, click next to Update Statements.
You can use cards in Architect digital bot flows to display options to your customers in a visually appealing and responsive way. In a task sequence, you can add a card variable to an Update Data action and then call it from an Ask for Slot action. The card data type can be a useful tool in helping flow authors dynamically use cards in carousels.
- From the Toolbox, expand the Data category and drag an Update Data action to the desired location in the task.
- In the Update Data workspace, add a meaningful name to describe the item.
- click next to Update Statements and select the Card data type.
- In the Variable Name field, type the label to identify the variable on tasks.
- In the Value To Assign field, perform one of these steps:
- To set the value from literal mode, click the card and follow these steps:
- Click Select an Image and choose an existing image or import a new one.
- Add a required title that appears below the image.
- (Optional) Add a description to appear below the title.
- Click Button and enter the postback or URL value that Architect uses when the customer clicks it.
- (Optional) You can enter the postback or URL value using an expression. For example,
MakeChoice("url", "https://www.genesys.com", "Genesys")
- To set the value using an expression, click to enter expression mode, select Expression, and do one of the following:
- Add the expression inline.
- Click the Large Expression Editor button to open the Edit Expression Editor and build your expression. For example, to create a card that lets someone select a pizza size of small, medium or large, enter
MakeCard("Pizza Size", "Please select your pizza size.", MakeList(MakePostbackChoice("small", "Small"), MakePostbackChoice("medium", "Medium"), MakePostbackChoice("large", "Large")), FindImage("Pizza Size")).
- To set the value from literal mode, click the card and follow these steps:
- (Optional) To add another variable, click next to Update Statements.
- Add an Ask for Slot action to the task sequence and configure it to use the card variables you created here.
You can use carousels in Architect digital bot flows to display options to your customers and facilitate bot conversations. In a task sequence, you can add a carousel variable to an Update Data action and then call it from an Ask for Slot action. The carousel data type can be a useful tool in helping flow authors dynamically configure carousels.
- From the Toolbox, expand the Data category and drag an Update Data action to the desired location in the task.
- In the Update Data workspace, add a meaningful name to describe the item.
- Click next to Update Statements and select the Carousel data type.
- In the Variable Name field, type the label to identify the variable on tasks.
- In the Value To Assign field, perform one of these steps:
- To set the value from literal mode, click Card and follow these steps:
- To create the card using an expression, hover over the card under the Value to Assign field and click in the dialog box that appears to enter expression mode. You can add the expression inline or click the Large Expression Editor button to open the Edit Expression Editor and build your expression.
- To create the card from literal mode, click Select an Image in the Card dialog box that opens and choose an existing image or import a new one.
- Add a required title that appears below the image.
- (Optional) Add a description to appear below the title.
- Click Button.
- Under Button Action, select Postback or Open URL.
- Under value, enter the postback or URL value that Architect uses when the customer clicks it.
- (Optional) You can enter the postback or URL value using an expression. For example,
MakeChoice("url", "https://www.genesys.com", "Genesys")
- To set the value using an expression, click to enter expression mode, select Expression, and do one of the following:
- Add the expression inline.
- Click the Large Expression Editor button to open the Edit Expression Editor and build your expression. You can use the
MakeCarouselfunction to create a carousel.
- To set the value from literal mode, click Card and follow these steps:
- (Optional) To add another carousel variable, click next to Update Statements.
- Add an Ask for Slot action to the task sequence and configure it to use the carousel variables you created here.
In a task sequence, you can add a choice variable to an Update Data action and then call it from an Ask for Slot action. You can also use a choice variable within an expression that you use to create, for example, a carousel card. The choice data type can be a useful tool in helping flow authors dynamically configure choices.
- From the Toolbox, expand the Data category and drag an Update Data action to the desired location in the task.
- In the Update Data workspace, add a meaningful name to describe the item.
- Click next to Update Statements and select Choice.
- In the Variable Name field, type the label to identify the variable on tasks.
- In the Value To Assign field, perform one of these steps:
- To set the value from literal mode, click Button Name and follow these steps:
- Enter the postback or URL value that Architect uses when the customer clicks it.
- (Optional) You can enter the postback or URL value using an expression. For example, to create a choice with type "postback", value of "support" and label of "Help and Support", enter
MakePostbackChoice("support", "Help and Support").
- To set the value using an expression, click to enter expression mode, select Expression, and do one of the following:
- Add the expression inline.
- Click the Large Expression Editor button to open the Edit Expression Editor and build your expression.
- To set the value from literal mode, click Button Name and follow these steps:
- (Optional) To add another choice variable, click next to Update Statements.
In a task sequence, you can add a chooser variable to an Update Data action and then call it from an Ask for Slot action to specify whether to use quick replies or carousels. The chooser data type can be a useful tool in helping flow authors dynamically configure slot value choices to digital bot flow participants.
- From the Toolbox, expand the Data category and drag an Update Data action to the desired location in the task.
- In the Update Data workspace, add a meaningful name to describe the item.
- Click next to Update Statements and select Chooser.
- In the Variable Name field, type the label to identify the variable on tasks.
- In the Value To Assign field, perform one of these steps:
- To set the value from literal mode, select either Quick Replies or Carousel and follow these steps:
- If you selected Quick Replies, click Button. Under value, enter the postback or URL value that Architect sends to the bot when the customer clicks it. You can also enter the postback or URL value using an expression. Repeat these steps for each additional button that you want to add.
- If you selected Carousel, click Card and then add the carousel card. For more information about how to configure a carousel, see the Carousel section in this article.
- To set the value using an expression, click to enter expression mode, select Expression, and do one of the following:
- Add the expression inline.
- Click the Large Expression Editor button to open the Edit Expression Editor and build your expression.
- To set the value from literal mode, select either Quick Replies or Carousel and follow these steps:
- (Optional) To add another choice variable, click next to Update Statements.
Use the Communication variable to interact, via one-way communication, with a customer. The caller or chat recipient does not reply to the message.
Add a communication variable to a task sequence
In a task sequence, you can add a communication variable to an Update Data action.
- From the Toolbox, expand the Data category and drag an Update Data action to the desired location in the task.
- In the Update Data workspace, add a meaningful name to describe the item.
- Click next to Update Statements and select Communication.
- In the Variable Name field, type the label to identify the variable on tasks.
- In the Value To Assign field, do one of the following:
- To set the value using an expression add the expression inline.
- To set the value using the large expression editor, click to open the Edit Expression Editor and build your expression.
- To set the value using the Communication Sequence Builder, perform these steps:
- Click the Expression modes button to open the Communication Sequence Builder.
- Select Communication Sequence Builder and build a custom communication sequence or enter a custom expression.
- To set the value using the Rich Text Builder, perform these steps:
- Click the Expression modes button to open the Rich Text Builder.
- Select Rich Text Builder and build a communication in the editor or enter a custom expression.
- (Optional) To add another communication variable, click next to Update Statements.
A currency value represents monetary values. It has two properties:
- The currency property is a decimal value or the value NOT_SET
- The string property is a string that holds either a 3-character ISO 4217 code
For example, the following expression is valid at runtime:
MakeCurrency(10.50,"USD")
This expression evaluates to a currency value with an amount of 10.50 and currency code of 'USD'.
Obtaining the symbol for a currency
There is no "Symbol" property for a currency. However, you can use an expression to return the correct currency symbol:
GetCurrencySymbol(MakeCurrency(5.0,”USD”))
This expression returns $.
Add a currency variable to a task sequence
In a task sequence, you can add a currency variable to an Update Data data action. For example,
- From the Toolbox, expand the Data category and drag an Update Data action to the desired location in the task.
- On the Update Data design form, in the Name field, add a meaningful name to describe the item.
- Click next to Update Statements and select Currency.
- In the Variable Name field, type the label to identify the variable on tasks.
- To set the values in literal mode, in the Value To Assign field, do the following:
- Click the + or - buttons to set the desired value.
- Click the arrow at the end of the currency symbol drop-down list and select the appropriate 3-character currency value.
- To set the value using an expression, in the Value To Assign field, click the expression button and do one of the following:
- Add the expression inline.
- Click the Edit Expression button to open the Edit Expression Editor and build your expression.
- (Optional) To add another currency variable, click next to Update Statements.
In a task sequence, you can add a custom JSON variable to an Update Data action.
- From the Toolbox, expand the Data menu and drag an Update Data action to the wanted location in the task.
- In the Name field, add a meaningful name to describe the item.
- Click next to Update Statements and select custom JSON data type. For example, a Call Decision Table action makes the input and output schema available for the Update Data action also.
- In the Enter variable name field, type the label to identify the variable on tasks.
- In the Value To Assign field, select from the following options.
- Select Standard or JSON to toggle between the standard and JSON editing modes.
- Standard: Allows you to define the input values in the provided input fields. The fields that appear come from the input schema created for the decision table.
- JSON: Allows you to define the input values directly using JSON properties. In this mode, you can access Architect’s custom JSON editor and its tools to define the input values. The custom JSON schema shown in the editor comes from the selected decision table. For more information about using the custom JSON editor, see Architect custom JSON editor.
- To set the value using an expression, click Expression Modes next to Click to add a JSON literal value and do one of the following steps:
- Add the expression inline.
- Click the Large Expression Editor button to open the Edit Expression Editor and build your expression.
- Select Standard or JSON to toggle between the standard and JSON editing modes.
- (Optional) To add another custom JSON variable, click next to Update Statements.
A Date value is a string in the format prescribed by the XML standard for date data, similar to ISO 8601.
Add a Date variable to a task sequence
In a task sequence, you can add a date variable to an Update Data action.
- From the Toolbox, expand the Data category and drag an Update Data action to the desired location in the task.
- In the Update Data workspace, in the Name field, add a meaningful name to describe the item.
- Click next to Update Statements and select Date.
- In the Variable Name field, type the label to identify the variable on tasks.
- To set the values in literal mode, in the Value To Assign field, click the date field to display a calendar dialog box and select the appropriate date, month, and year.
- To set the value using an expression, in the Value To Assign field, click the Expression button , select Expression, and do one of the following:
- Add the expression inline.
- To add the expression using the large expression editor, click to open the Edit Expression Editor and build your expression.
- (Optional) To add another date variable, click next to Update Statements.
A DateTime value is a string in the format prescribed by the XML standard for date data, similar to ISO 8601.
Add a DateTime variable to a task sequence
In a task sequence, you can add a date | time variable to an Update Data action.
- From the Toolbox, expand the Data category and drag an Update Data action to the desired location in the task.
- In the Update Data workspace, in the Name field, add a meaningful name to describe the item.
- Click next to Update Statements and select DateTime.
- In the Variable Name field, type the label to identify the variable on tasks.
- To set the values in literal mode, in the Value To Assign field, do the following:
- Click the date field to display a calendar dialog box and select the appropriate date, month, and year.
- Click the time field and select the appropriate time value, including AM and PM.
- To set the value using an expression, click the Expression modes button , and do one of the following:
- Select Expression and add the expression inline.
- Select Expression and click to open the large expression editor and build your expression.
- Select DateTime Builder to build a DateTime value with the builder.
- (Optional) To add another DateTime variable, click next to Update Statements.
A decimal number is a value consisting only of digits (0 to 9) and a decimal point. The number of display decimal places is configurable.
Add a decimal variable to a task sequence
In a task sequence, you can add a decimal variable to an Update Data data action. For example,
- From the Toolbox, expand the Data category and drag an Update Data action to the desired location in the task.
- On the Update Data design form, in the Name field, add a meaningful name to describe the item.
- Click next to Update Statements and select Decimal.
- In the Variable Name field, type the label to identify the variable on tasks.
- In the Value To Assign field, do one of the following:
- To set the value from literal mode, click the + or - buttons to select the desired value.
- To set the value using an expression, click the Expression modes button , and do one of the following:
- Select Expression and add the expression inline.
- Select Expression and click to open the large expression editor and build your expression.
- (Optional) To add another decimal variable, click next to Update Statements.
A duration is a representation of time expressed as a string in a subset of the format prescribed by the XML date data standard. Durations have a composite value of days, hours, minutes, and seconds. The length of the duration is the sum total of days, hours, minutes, and seconds values. You can use a duration value to determine how long a "portion" of a process should wait before proceeding.
Add a duration variable to a task sequence
In a task sequence, you can add a duration variable to an Update Data data action. For example,
- From the Toolbox, expand the Data category and drag an Update Data action to the desired location in the task.
- On the Update Data design form, in the Name field, add a meaningful name to describe the item.
- Click next to Update Statements and select Duration.
- In the Variable Name field, type the label to identify the variable on tasks.
- To set the values in literal mode, in the Value To Assign field, do the following:
- Select the time unit (days, hours, minutes, seconds, milliseconds) in which you want to specify the duration value.
- Use the + or - buttons to set the desired duration value, or type it inline.
- To set the value using an expression, in the Value To Assign field, click the expression modes button and do one of the following:
- Select Expression and add the expression inline. Use the
MakeDurationfunction to specify the duration value. - Select Expression and click to open the large expression editor and build your expression.
- Select Expression and add the expression inline. Use the
- (Optional) To add another duration variable, click next to Update Statements.
An emergency group that you associate with a call flow quickly and efficiently modifies call routing behavior during unplanned or semi-planned critical events, such as fire, natural disasters, and power outages. For more information, see Emergencies.
- Search behavior is not case-sensitive.
- The emergency group string name must be a minimum of one character and maximum of 256 characters.
- The dynamic lookup limit for a unique type is 25.
- Each lookup is unique, so multiple lookups for the same object in the flow only count as 1.
- The total lookup limit per flow is 100.
- If the supplied emergency group value is NOT_SET, then the flow takes the not found path.
Add an emergency group variable to a task sequence
In a task sequence, you can add an emergency group variable to an Update Data action
- From the Toolbox, expand the Data category and drag an Update Data action to the desired location in the task.
- In the Update Data workspace, add a meaningful name to describe the item.
- Click next to Update Statements and select Emergency Group.
- In the Variable Name field, type the label to identify the variable on tasks.
- In the Value To Assign field, perform one of these steps:
- To set the value from literal mode, click the list and select the desired emergency group.
- To set the value using an expression, click the Expression modes button , select Expression, and do one of the following:
- Add the expression inline.
- Click to open the large expression editor and build your expression.
- (Optional) To add another Emergency Group variable, click next to Update Statements.
External contacts are individuals such as employees of companies you do business with or direct customers. These people request help from your agents. For more information about Genesys Cloud's External Contacts feature, see About External Contacts and About creating a repository of customer data.
Add an external contact variable to a task sequence
In a task sequence, you can add an external contact variable to an Update Data action.
- From the Toolbox, expand the Data category and drag an Update Data action to the desired location in the task.
- In the Update Data workspace, add a meaningful name to describe the item.
- Click next to Update Statements and select External Contact.
- In the Variable Name field, type the label to identify the variable on tasks.
- In the Value To Assign field, perform one of these steps:
- Add the expression inline.
- Click the Edit Expression button to open the Edit Expression Editor and build your expression.
- In the Value To Assign field, perform one of these steps:
- Add the expression inline.
- Click to open the large expression editor and build your expression.
- (Optional) To add another External Contact variable, click next to Update Statements.
External organizations are your customers, partners, and other businesses that you interact with. These organizations are sometimes called accounts. External Contacts is the comprehensive repository of data about your external organizations and contacts. For more information about Genesys Cloud's External Contacts feature, see About External Contacts and About creating a repository of customer data.
Add an external organization variable to a task sequence
In a task sequence, you can add an external organization variable to an Update Data action.
- From the Toolbox, expand the Data category and drag an Update Data action to the desired location in the task.
- In the Update Data workspace, add a meaningful name to describe the item.
- Click next to Update Statements and select External Organization.
- In the Variable Name field, type the label to identify the variable on tasks.
- In the Value To Assign field, perform one of these steps:
- To set the value from literal mode, click the list and select the desired ACD skill.
- To set the value using an expression, click the Expression button , select Expression, and do one of the following:
- Add the expression inline.
- Click to open the large expression editor and build your expression.
- (Optional) To add another External Organization variable, click next to Update Statements.
In bot flows, a Grammar value is a string in the format that you can use to search for a grammar and receive a grammar value, if found. Use the Update Data action to add a grammar variable to a task sequence.
Add a Grammar variable to a task sequence
In a task sequence, you can add a grammar variable to an Update Data action.
- From the Toolbox, expand the Data category and drag an Update Data action to the desired location in the task.
- In the Update Data workspace, in the Name field, add a meaningful name to describe the item.
- Click next to Update Statements and select Grammar.
- In the Variable Name field, type the label to identify the variable on tasks.
- To set the values in literal mode, in the Value To Assign field, click Select a grammar and choose the appropriate grammar from the list.
- In the Value To Assign field, to set the value using an expression, click Expression Modes , select Expression, and do one of the following:
- Add the expression inline.
- Click to open the large expression editor and build your expression.
- (Optional) To add another Grammar variable, click next to Update Statements.
Groups are communities within your organization based on common skills, relationships, location, or other information. Groups are useful for creating categories of knowledge or contact within your enterprise. In Architect, a group expression routes a work item to an eligible group. Groups are established and configured by the Genesys Cloud administrator.
Add a group variable to a task sequence
In a task sequence, you can add a group variable to an Update Data data action. For example, to send a call to agents with specialized subject matter knowledge.
- From the Toolbox, expand the Data category and drag an Update Data action to the desired location in the task.
- On the Update Data design form, in the Name field add a meaningful name to describe the item.
- Click next to Update Statements and select Group.
- In the Variable Name field, type the label to identify the variable on tasks.
- In the Value To Assign field, do one of the following:
- To set the value from literal mode, select the appropriate group from the drop-down list.
- To set the appropriate group using an expression, click the expression button and do one of the following:
- Add the expression inline.
- Click to open the large expression editor and build your expression.
- (Optional) To add another Group variable, click next to Update Statements.
You can add an image to an Update Data action in any of three ways:
- From a URL
- From your computer or network
- From your assets library
- For Canned Responses, Genesys Cloud supports .jpeg, .jpg, .gif, and .png images for email interactions and for MMS messages.
- The maximum size for an image is 25 MB.
- The maximum number of assets that can be uploaded to the asset library of an organization is 20,000.
You can add an image with the internet address for the image:
- From the Toolbox, expand the Data category and drag an Update Data action to the desired location in the task.
- In the Update Data workspace, add a meaningful name to describe the item.
- Click next to Update Statements and select Image.
- In the Variable Name field, type the label to identify the variable on tasks.
- To add the image URL from the Image Builder, follow these steps:
- In the Value To Assign field, click the Expression button and select Image Builder .
- Click Image URL .
- Enter the fully formed URL string to use for the image.
- Click Save.
- To manually add an expression, follow these steps:
- In the Value To Assign field, click the Expression button and select Expression .
- Add the expression inline or click to open the large expression editor and build your expression.
- (Optional) To add another Image variable, click next to Update Statements.
You can add an image that resides on your computer or network:
- From the Toolbox, expand the Data category and drag an Update Data action to the desired location in the task.
- In the Update Data workspace, add a meaningful name to describe the item.
- Click next to Update Statements and select Image.
- In the Variable Name field, type the label to identify the variable on tasks.
- In the Value To Assign field, click Select an image.
- Click Upload.
- Find the image you want to use, and click Open. Genesys Cloud opens the Upload New Asset window and shows a preview of the image.
- Optionally, change the name of the image file.
- Under the image, click Upload. Architect adds the image to your Response Assets library.
- Click Use Image.
- (Optional) To add another Image variable, click next to Update Statements.
You can add an image from your Genesys Cloud Response Assets:
- From the Toolbox, expand the Data category and drag an Update Data action to the desired location in the task.
- In the Update Data workspace, add a meaningful name to describe the item.
- Click next to Update Statements and select Image.
- In the Variable Name field, type the label to identify the variable on tasks.
- In the Value To Assign field, click Select an image.
- Search for or select the image that you want to use.
- Click Use Image.
- (Optional) To add another Image variable, click next to Update Statements.
An integer is a whole number such as 987 or 5. Use integer values to represent complete objects and processes that cannot be subdivided, such as the number of calls waiting or the number of agents on duty. An integer is an eight-byte value, which means that it can hold positive or negative numbers of practically any size. Flow runtime supports values from -999999999999999 to +999999999999999 for an Architect integer value. An integer variable has an integer value at runtime, but an expression of 999999999999999 + 1 will cause an error because the result is >999999999999999.
Add an integer variable to a task sequence
In a task sequence, you can add an integer variable to an Update Data data action. For example,
- From the Toolbox, expand the Data category and drag an Update Data action to the desired location in the task.
- In the Name field, add a meaningful name to describe the item.
- Click next to Update Statements and select Integer.
- In the Variable Name field, type the label to identify the variable on tasks.
- In the Value To Assign field, do one of the following:
- To set the value from literal mode, click the or button to select the desired value. Hold shift and click the corresponding button to increase or decrease the value by five.
- To set the value using an expression, click the Expression modes button and do one of the following:
- Add the expression inline.
- Click to open the large expression editor and build your expression.
- (Optional) To add another Integer variable, click next to Update Statements.
Predictive Engagement allows you to track users as they interact with your website. You can use action maps to design engagements that enhance each user's personal experience and help you achieve your business outcomes. Genesys Predictive Engagement uses AI to predict whether a visitor will achieve a particular business objective. These business objectives are called outcomes. For more information, see Prepare Architect components.
Add a journey outcome variable to a task sequence
You can add a journey outcome to an Update Data action to obtain the Predictive Engagement Journey Outcome ID in a task.
- From the Toolbox, expand the Data category and drag an Update Data action to the desired location in the task.
- In the Update Data workspace, add a meaningful name to describe the item.
- Click next to Update Statements and select JourneyOutcome.
- In the Variable Name field, type the label to identify the variable on tasks.
- In the Value To Assign field, perform one of these steps:
- Add the expression inline.
- Click to open the large expression editor and build your expression.
- (Optional) To add another Journey Outcome variable, click next to Update Statements.
Genesys Predictive Engagement uses AI to predict whether a visitor will achieve a particular business objective. These business objectives are called outcomes. For each outcome you define, there is a machine learning model that evaluates a visitor's behavior against the behavior of other visitors on your website to determine the visitor's outcome score. Your organization's models are unique to you.
Each outcome score represents the likelihood that the visitor will achieve the particular business outcome, based on the actions the visitor has taken so far during the session or on other activities related to the visitor that are included in the appropriate events (for example, geolocation).
The model updates a visitor's score for each outcome in real-time, and a visitor's scores can change as they navigate your website.
If a visitor communicates with an agent, the agent can see the visitor's outcome scores while viewing the visitor's complete set of journey context data. Also, the outcome scores can trigger action maps that enhance a visitor's engagement on your site.
Add a journey outcome score variable to a task sequence
You can add a journey outcome to an Update Data action to obtain the Predictive Engagement Journey Outcome score in a task.
- From the Toolbox, expand the Data category and drag an Update Data action to the desired location in the task.
- In the Update Data workspace, add a meaningful name to describe the item.
- Click next to Update Statements and select JourneyOutcomeScore.
- In the Variable Name field, type the label to identify the variable on tasks.
- In the Value To Assign field, perform one of these steps:
- Add the expression inline.
- Click to open the large expression editor and build your expression.
- (Optional) To add another Journey Outcome Score variable, click next to Update Statements.
Predictive Engagement allows you to track users as they interact with your website. Segments identify and classify visitors based on their shared behavior and characteristics.
Add a journey segment variable to a task sequence
You can add a journey segment to an Update Data action to obtain the Predictive Engagement Journey Outcome score in a task.
- From the Toolbox, expand the Data category and drag an Update Data action to the desired location in the task.
- In the Update Data workspace, add a meaningful name to describe the item.
- Click next to Update Statements and select JourneySegment.
- In the Variable Name field, type the label to identify the variable on tasks.
- In the Value To Assign field, perform one of these steps:
- Add the expression inline.
- Click to open the large expression editor and build your expression.
- (Optional) To add another Journey Segment variable, click next to Update Statements.
Predictive Engagement allows you to track users as they interact with your website. You can use action maps to design engagements that enhance each user's personal experience and help you achieve your business outcomes. For more information, see Prepare Architect components.
Add a journey session variable to a task sequence
You can add a journey session variable to an Update Data action to obtain the Predictive Engagement Journey Session ID in a task.
- From the Toolbox, expand the Data category and drag an Update Data action to the desired location in the task.
- In the Update Data workspace, add a meaningful name to describe the item.
- Click next to Update Statements and select JourneySegment.
- In the Variable Name field, type the label to identify the variable on tasks.
- In the Value To Assign field, perform one of these steps:
- Add the expression inline.
- Click to open the large expression editor and build your expression.
- (Optional) To add another Journey Session variable, click next to Update Statements.
In a task sequence, you can add a JSON variable to an Update Data action.
- From the Toolbox, expand the Data menu and drag an Update Data action to the wanted location in the task.
- In the Name field, add a meaningful name to describe the item.
- Click next to Update Statements and select JSON.
- In the Enter variable name field, type the label to identify the variable on tasks.
- In the Value To Assign field, select from the following options.
- To set the value from literal mode, click Click to add a JSON literal value. The JSON literal editor opens, and you can create and edit formatted JSON. For more information, see JSON values in Architect.
- To set the value using an expression, click Expression Modes next to Click to add a JSON literal value and do one of the following steps:
- Add the expression inline.
- Click the Large Expression Editor button to open the Edit Expression Editor and build your expression.
- (Optional) To add another JSON variable, click next to Update Statements.
Genesys knowledge workbench is an authoring tool that enables you to create and manage knowledge, view knowledge performance, and test knowledge services. Use the knowledge workbench to create knowledge that you can intelligently surface during bot conversations. The knowledge workbench enhances and accelerates the effectiveness of bots by managing the source for the answers to customer questions.
Add a knowledge base document variable to a task sequence
You can select a knowledge base to associate with the flow, add an Update Data action to a task, and select a knowledge base article to use in the task.
- From the Toolbox, expand the Data category and drag an Update Data action to the desired location in the task.
- In the Update Data workspace, add a meaningful name to describe the item.
- Click next to Update Statements and select KnowledgeBaseDocument.
- In the Variable Name field, type the label to identify the variable on tasks.
- In the Value To Assign field, perform one of these steps:
- To set the value from literal mode, click the list and select the desired knowledge base article.
- To set the value using an expression, click the Expression modes button , select Expression, and do one of the following:
- Add the expression inline.
- Click to open the large expression editor and build your expression.
- (Optional) To add another Knowledge Base Document variable, click next to Update Statements.
ACD skills are arbitrary designations of tasks, expertise, or knowledge that someone must have to handle an interaction. A skill variable represents a Genesys Cloud ACD skill (such as a language or certification) possessed by an agent. In Architect, an ACD skill requirement routes a work item to an eligible recipient. ACD skills are established and configured by the Genesys Cloud administrator.
Add a skill variable to a task sequence
In a task sequence, you can add a skill variable to an Update Data action and then call it from a Transfer to ACD action. For example, to send the call to an agent with fluent Spanish-speaking skills or a higher level of proficiency in Windows OS.
- From the Toolbox, expand the Data category and drag an Update Data action to the desired location in the task.
- In the Update Data workspace, add a meaningful name to describe the item.
- Click next to Update Statements and select Language Skill.
- In the Variable Name field, type the label to identify the variable on tasks.
- In the Value To Assign field, perform one of these steps:
- To set the value from literal mode, click the list and select the desired language skill.
- To set the value using an expression, click the Expression modes button , select Expression, and do one of the following:
- Add the expression inline.
- Click to open the large expression editor and build your expression.
- (Optional) To add another Language Skill variable, click next to Update Statements.
- Add a Transfer to ACD action to the task sequence and configure it to use the skill variables you created here.
Create a phone number type variable in an Update Data action sequence when you want to specify a phone number whose properties can be accessed in other flow locations. For more information, see About the phone number data type.
Example
A typical use case for phone number update statement is to create a phone number from Call.Ani. Because Call.Ani is a string, converting it to a phone number and accessing the properties gives flow authors easy access to information about the phone number via properties. This alleviates the need to write your own string parsing code to retrieve the information:
- Variable name: Flow.ClientPhoneNumber
- Value to assign: ToPhoneNumber(Call.Ani)
| Property | Description |
|---|---|
| Flow.ClientPhoneNumber.uri | Returns the URI for the tel scheme phone number, otherwise a NOT_SET string. |
| Flow.ClientPhoneNumber.e164 | Returns the E.164 formatted string for the tel scheme phone number with a valid E.164 phone number, including dialing code and subscriber number, otherwise a NOT_SET string. |
| Flow.ClientPhoneNumber.subscriberNumber | Returns the E.164 formatted subscriber number for a tel scheme phone number with a valid E.164 phone number, otherwise a NOT_SET string. |
| Flow.ClientPhoneNumber.dialingCode | Returns theE.164 formatted dialing code string for a tel: scheme phone number, otherwise a NOT_SET string. |
| Flow.ClientPhoneNumber.isSip | Returns false. |
| Flow.ClientPhoneNumber.isTel | Returns true. |
| Flow.ClientPhoneNumber.isGlobal | Returns true. |
| Flow.ClientPhoneNumber.scheme | Returns tel. |
| Flow.ClientPhoneNumber.raw | Returns the Call.Ani. |
Example
The following example illustrate the property data you can extract and the ouput returned when you create a phone number type in a task sequence:
- Variable name: Flow.ClientPhoneNumber
- Value to assign: ToPhoneNumber(+13175550116)
| Property | Output |
|---|---|
| Flow.ClientPhoneNumber.uri | "tel:+13175550116" |
| Flow.ClientPhoneNumber.e164 | "+13175550116" |
| Flow.ClientPhoneNumber.subscriberNumber | "3175550116" |
| Flow.ClientPhoneNumber.dialingCode | "1" |
| Flow.ClientPhoneNumber.isSip | false |
| Flow.ClientPhoneNumber.isTel | true |
| Flow.ClientPhoneNumber.isGlobal | true |
| Flow.ClientPhoneNumber.scheme | tel |
| Flow.ClientPhoneNumber.raw | "+13175550116" |
Add a phone number update statement to a task sequence
In a task sequence, you can add a phone number expression to an Update Data data action. For example,
- From the Toolbox, expand the Data category and drag an Update Data action to the desired location in the task.
- On the Update Data design form, in the Name field, add a meaningful name to describe the item.
- Click next to Update Statements and select Phone Number.
- In the Variable Name field, type the label to store the data and identify the variable on tasks.
- To assign a telephone number, complete one of the following steps:
- In the Value To Assign field, leave the default tel: data type unchanged.
- Click the arrow at the end of the Dialing Code drop-down list and choose the dialing code for the telephone number to ensure the phone number has global dialing information.
- In the Enter phone number box, add the subscriber number for the phone number.
- To assign a SIP URI to the phone number, follow these steps:
- In the Value To Assign field, click the arrow at the end of the tel: drop-down list and select sip:.
- In the Enter SIP URI box, add the SIP URI phone number string.
- To assign a secure SIP URI to the phone number, follow these steps:
- In the Value To Assign field, click the arrow at the end of the tel: drop-down list and select sips:.
- In the Enter SIP URI box, add the secure SIPS URI phone number string.
- Add the expression inline.
- Click to open the large expression editor and build your expression.
- (Optional) To add another Phone Number variable, click next to Update Statements.
Queues are the “waiting line” of interactions. In Architect, a queue expression routes a work item to an eligible queue. Queues are established and configured by the Genesys Cloud administrator.
Add a queue variable to a task sequence
In a task sequence, you can add a queue variable to an Update Data data action. For example, to send a call to senior technical support or a specialized marketing team. If you set an Update Data action with a queue variable named Flow.QueueName, for example, then you can use Flow.QueueName.id inside the Call Data action to obtain the queue id.
- From the Toolbox, expand the Data category and drag an Update Data action to the desired location in the task.
- On the Update Data design form, in the Name field add a meaningful name to describe the item.
- Click next to Update Statements and select Queue.
- In the Variable Name field, type the label to identify the variable on tasks.
- In the Value To Assign field, do one of the following:
- To set the queue from literal mode, select the appropriate queue from the drop-down list.
- To set the queue using an expression, click the expression modes button and perform one of the following steps:
- Add the expression inline.
- Click to open the large expression editor and build your expression.
- (Optional) To add another Queue variable, click next to Update Statements.
You can use quick replies in Architect digital bot flows to display options to your customers in the form of responses that they can select as a reply during a message interaction. In a task sequence, you can add a quick replies variable to an Update Data action and then call it from an Ask for Slot action. The quick replies data type can be a useful tool in helping flow authors dynamically configure quick replies.
- From the Toolbox, expand the Data category and drag an Update Data action to the desired location in the task.
- In the Update Data workspace, add a meaningful name to describe the item.
- Click next to Update Statements and select QuickReplies.
- In the Variable Name field, type the label to identify the variable on tasks.
- To create your quick replies from literal mode, click Button and follow these steps:
- Under value, enter the postback or URL string value that Architect sends to the bot when the customer clicks it.
- To add a button label that differs from the postback or URL string value that you entered, click Add alternative label and enter the button’s display label.
- Repeat the previous steps if you want to add more quick replies.
- To create your quick replies using an expression, follow these steps:
- Click next to Value to Assign and select Expression to enter expression mode.
- Add the expression inline.
- Click the Large Expression Editor button to open the Edit Expression Editor and build your expression. For example, to create two postback button choices with the values "small" and "medium", enter
MakeQuickReplies(MakeList(MakePostbackChoice("small"), MakePostbackChoice("medium"))).
- To create a single quick reply choice using an expression, click Button and follow these steps:
- Hover over the Button Name button and click in the dialog box that appears to enter expression mode.
- Add the expression inline.
- Click the Large Expression Editor button to open the Edit Expression Editor and build your expression.
- To create your quick replies from literal mode, click Button and follow these steps:
- (Optional) To add another Quick Replies variable, click next to Update Statements.
- Add an Ask for Slot action to the task sequence and configure it to use the quick replies variables you created here.
A schedule stipulates when a flow runs and is based on the date, time, or event. You can define schedules to handle recurring events, holidays, or special situations; for example, your regular business hours or after–hours support. For more information about schedule creation in Genesys Cloud, see Schedules.
In a task sequence, you can add a schedule variable to an Update Data data action. For example, to use in a Find Schedule action.
- From the Toolbox, expand the Data category and drag an Update Data action to the desired location in the task.
- On the Update Data design form, in the Name field, add a meaningful name to describe the item.
- Click next to Update Statements and select Schedule.
- In the Variable Name field, type the label to identify the variable on tasks.
- In the Value To Assign field, complete one of the following steps:
- To set the schedule from literal mode, select the appropriate schedule from the drop-down list.
- To set the schedule using an expression, click the expression modes button and perform one of the following steps:
- Add the expression inline.
- Click the Large Expression Editor button to open the Edit Expression Editor and build your expression.
- (Optional) To add another Schedule variable, click next to Update Statements.
Schedule Groups allow you to combine multiple schedules and associate them to a singular routing definition. You can assign the schedules into a designated time zone and group them by type. Types are limited to Open Hours, Closed Hours, or Holiday. For more information, see Schedule Groups.
In a task sequence, you can add a schedule group variable to an Update Data data action. For example, to use in a Find Schedule Group action.
- From the Toolbox, expand the Data category and drag an Update Data action to the desired location in the task.
- On the Update Data design form, in the Name field, add a meaningful name to describe the item.
- Click next to Update Statements and select Schedule Group.
- In the Variable Name field, type the label to identify the variable on tasks.
- In the Value To Assign field, complete one of the following steps:
- To set the schedule group from literal mode, select the appropriate schedule group from the drop-down list.
- To set the schedule group using an expression, click the expression modes button and perform one of the following steps:
- Add the expression inline.
- Click the Large Expression Editor button to open the Edit Expression Editor and build your expression.
- (Optional) To add another Schedule Group variable, click next to Update Statements.
This is a standard text string or a custom series of alphabetical, numerical, and symbolic characters. In Architect, the limit for string variables is 32,000 characters. However, the size can be limited by available system resources.
Add a string variable to a task sequence
In a task sequence, you can add a string variable to an Update Data data action. For example,
- From the Toolbox, expand the Data category and drag an Update Data action to the desired location in the task.
- On the Update Data design form, in the Name field, add a meaningful name to describe the item.
- Click next to Update Statements and select String.
- In the Variable Name field, type the label to identify the variable on tasks.
- In the Value To Assign field, do one of the following:
- To set the value from literal mode, type the string inline.
- To set the value using an expression, click the expression modes button and perform one of the following steps:
- Add the expression inline.
- Click to open the large expression editor and build your expression.
- (Optional) To add another String variable, click next to Update Statements.
A Time value is a string in the format prescribed by the XML standard for date data, similar to ISO 8601.
Add a Time variable to a task sequence
In a task sequence, you can add a time variable to an Update Data action.
- From the Toolbox, expand the Data category and drag an Update Data action to the desired location in the task.
- In the Update Data workspace, in the Name field, add a meaningful name to describe the item.
- Click next to Update Statements and select Time.
- In the Variable Name field, type the label to identify the variable on tasks.
- To set the values in literal mode, in the Value To Assign field, enter the appropriate time value, including AM and PM.
- To set the value using an expression, click the Expression modes button , select Expression, and perform one of the following steps:
- Add the expression inline.
- Click the Large Expression Editor button to open the Edit Expression Editor and build your expression.
- (Optional) To add another Time variable, click next to Update Statements.
This variable is a user type that Architect associates with configured users. In Architect, choose this type from a list box. From the user value, you can retrieve user-related information such as ID or username string values.
In a task sequence, you can add a user variable to an Update Data data action. For example, to an agent assigned to a specific account.
- From the Toolbox, expand the Data category and drag an Update Data action to the desired location in the task.
- On the Update Data design form, in the Name field, add a meaningful name to describe the item.
- Click next to Update Statements and select User.
- In the Variable Name field, type the label to identify the variable on tasks.
- In the Value To Assign field, complete one of the following steps:
- To set the user from literal mode, select the appropriate user from the drop-down list.
- To set the user using an expression, click the expression modes button and perform one of the following steps:
- Add the expression inline.
- Click the Large Expression Editor button to open the Edit Expression Editor and build your expression.
- (Optional) To add another User variable, click next to Update Statements.
Genesys Cloud allows you to apply utilization labels to interactions to control more finely how many interactions Genesys Cloud ACD can assign to an agent. For more information, see Overview of utilization labels. In a task sequence, you can add a utilization label variable to an Update Data action and then call it from a Find Utilization Label action or Set Utilization Label action. The utilization label data type can be a useful tool in helping flow authors dynamically configure agent utilization labels.
Add a UtilizationLabel variable to a task sequence
You can add a utilization label to an Update Data action to obtain a utilization label in a task.
- From the Toolbox, expand the Data category and drag an Update Data action to the desired location in the task editor.
- In the Update Data workspace, add a meaningful name to describe the item.
- Click next to Update Statements and select UtilizationLabel.
- In the Variable Name field, type the label to identify the variable on tasks.
- In the Value To Assign field, perform one of the following steps:
- Select the utilization label.
- Click and perform one of these steps:
- To enter expression mode, and add the expression inline, click the Expression modes button.
- To open the Edit Expression Editor and build your expression, click the Large Expression Editor button.
- (Optional) To add another Utilization Label variable, click next to Update Statements.
To indicate the nature of an interaction, agents specify wrap-up codes; for example, a completed sale, a customer dissatisfied with service, or a billing problem. In Architect, a wrap-up code expression assigns a specific code to a variable, which can then be used throughout the flow. Wrap-up codes are established and configured by the Genesys Cloud administrator.
This action is available from the Architect toolbox, located in the task editor.
Add a wrap-up code variable to a task sequence
In a task sequence, you can add a wrap-up code variable to an Update Data data action.
- From the Toolbox, expand the Data category and drag an Update Data action to the desired location in the task.
- On the Update Data design form, in the Name field add a meaningful name to describe the item.
- Click next to Update Statements and select Wrapupcode.
- In the Variable Name field, type the label to identify the variable on tasks.
- In the Value To Assign field, complete one of the following steps:
- To set the wrap-up code from literal mode, select the appropriate code from the drop-down list.
- To set the wrap-up code using an expression, click the expression modes button and perform one of the following steps:
- Add the expression inline.
- Click the Large Expression Editor button.
- (Optional) To add another Wrap-up Code variable, click next to Update Statements.
In a task sequence of a workitem flow, you can add a worktype status variable to an Update Data action.
- From the Toolbox, expand the Data category and drag an Update Data action to the desired location in the task.
- On the Update Data design form, in the Name field, add a meaningful name to describe the item.
- Click next to Update Statements and select WorktypeStatus.
- In the Variable Name field, type the label to identify the variable on tasks.
- In the Value To Assign field, complete one of the following steps:
- To set the status from literal mode, select the appropriate status from the drop-down list.
- To set the status using an expression, click the expression modes button and perform one of the following steps:
- Add the expression inline.
- Click the Large Expression Editor button to open the Edit Expression Editor and build your expression.
- (Optional) To add another worktype status variable, click next to Update Statements.