Navigate the time-off requests page
This article describes the areas of the administrator’s Requests page and how to customize the view.

Customize the view
To customize this view, follow these steps:
- Click More .
- From the menu, click Show/Hide Columns.
- To add all available columns, click Add All.
- To remove all columns, click Remove All.
- To add individual columns, click the Add next to the column that you want to display.
- To arrange the columns, in the Visible Columns list, click and drag the column title to the preferred location.
- Click OK.
Area definitions
The following table describes the elements of the Requests page.
| Area | Definition | ||||||||||||||||||||||||
|---|---|---|---|---|---|---|---|---|---|---|---|---|---|---|---|---|---|---|---|---|---|---|---|---|---|
| View by list |
Click the list and choose to view time-off requests by:
|
||||||||||||||||||||||||
| Filter by date or agent | Depending on your selection from the View by list, the options listed here changes from date filter or agent filter. Use the calendar button or agent list to narrow your time-off request search by day, week, month, or agent. | ||||||||||||||||||||||||
| Time-off management toolbar |
Filter the time-off requests that you want to manage and use the toolbar to edit, approve, deny, or add time-off requests. Note: Administrators cannot cancel a time-off request. Only an agent can cancel their time-off request. To consider a request canceled, administrators can deny the request. |
||||||||||||||||||||||||
| Number of time-off requests |
Displays the number of time-off requests for each category:
To display the requests for a specific category only, click the category. |
||||||||||||||||||||||||
| Agent |
Lists the agents who have pending, approved, denied, or canceled time-off requests. |
||||||||||||||||||||||||
|
Type |
Lists full, partial, or all time-off requests. |
||||||||||||||||||||||||
| Start date and end date |
Lists the beginning and ending dates and times for each displayed time-off request. |
||||||||||||||||||||||||
|
Status |
Lists all, pending, approved, denied, or canceled time-off requests.
|
||||||||||||||||||||||||
| Activity code name |
Lists the Time Off activity code. |
||||||||||||||||||||||||
| Hours per day |
Lists the total number of hours per day for each displayed time-off request. |
||||||||||||||||||||||||
| Total hours |
Lists the total number of hours per time-off request for all displayed time-off requests for the agent. |
||||||||||||||||||||||||
| Waitlist position |
Agent’s position on the waitlist for pending requests that are waiting for an available opening. |
||||||||||||||||||||||||
| Selected dates |
Dates that the agent selected to log the time-off request. |
||||||||||||||||||||||||
| Submitted by |
Name of the person who submitted the time-off request. |
||||||||||||||||||||||||
| Submitted on |
Date and time that the person submitted the time-off request. |
||||||||||||||||||||||||
| Reviewed by |
Name of the person who reviewed the time-off request. If this value is “System,” the auto-approval engine approved the time-off request automatically. |
||||||||||||||||||||||||
| Reviewed on |
Date and time that the person reviewed the time-off request. |
||||||||||||||||||||||||
| Notes |
Notes that the admin included regarding the time-off request. |
||||||||||||||||||||||||
| Hire Date |
Displays the agent’s hiring date. You can view this field only when you add this column manually from the Show/Hide Columns page. |
||||||||||||||||||||||||
| Sync Status |
Displays the sync status to the external HR system for the agents’ time-off request. This column displays one of the following statuses:
|
||||||||||||||||||||||||
| Is Paid |
Lists all, paid only, or unpaid only time-off requests. |
Customize the view
The following options are available for customizing the view.
Sort the view
To sort time-off limits in ascending or descending order by a specific column, click the column heading. An arrow to the left of a column heading indicates that the view is sorted by that column.
Filter the view
To view time-off limits that match specific criteria only:
- Click the arrow next to the column heading by which to filter the view.
- Click the operator icon and then click the operator to use.
- In the filter box, type the value to use to filter the view. If you are filtering on a date column, you can click the date in the calendar.
Change column placement
To switch places between two columns:
- Click the arrows next to the column heading where you want another column to appear.
- Click Change Column and then click the name of the column to move to the current position. The columns switch places in the view.
Hide a column
To hide a column from the view, click the arrow next to the column heading and then click Hide Column.
Unhide a column
To unhide a column:
- Click the three dots in the column header row and then click Show/Hide Columns.
- In the Show/Hide Columns dialog box:
- To add all columns in the Available Columns list to the Visible Columns list, click Add All.
- To remove all columns in the Visible Columns list to the Available Columns list, click Remove All.
- To move an individual column from one list to the other, click the column name.
Reset view
To reset the view to its default state, click the three dots in the column header row and then click Reset Defaults.
View from a different time zone
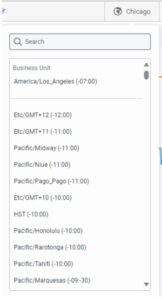
By default, this view uses the business unit’s time zone. Users with administrator permissions can change the displayed time zone by selecting from the list in the upper right corner of the view. The time zone of the business unit is listed at the top of the list of time zones for reference. This option is helpful for administrators who access the view from a different time zone. Click the image to enlarge. 

