
Create an SMS campaign
- Genesys Cloud CX 1 Digital Add-on II, Genesys Cloud CX 2, Genesys Cloud CX 2 Digital, Genesys Cloud CX 3 or Genesys Cloud CX 3 Digital license
The following permissions are required for all campaign types:
- Outbound > messagingCampaign > Add, Delete, Edit, View
- Outbound > Contactlist > Search
The following permissions are optional for all campaign types:
- Outbound > Dnclist > Search
- Outbound > Contactabletimeset > View
- sms > phoneNumber > View
Before you set up a digital campaign, make sure that you perform these tasks:
- SMS number – Use either a long or short code to send and receive SMS messages to and from mobile phones. The type of code you need is largely based on specific regulations within the messaging country. Genesys customers are ultimately responsible for understanding and complying with country-specific regulations. Once configured, your long or short code populates when you set up a campaign.
- Long code – A long code is a standard phone number (10-digit number in many countries) used to send messages. For more information, see Regulations for long codes in outbound SMS campaigns.
- Toll free numbers – Toll free numbers for North American Numbering Plan (NANP).
- Short code – A short code is a five or six digit number. It can take several weeks to obtain an SMS short code, so it is important to obtain the short code well before setting up an SMS campaign. For more information, see Set up an SMS short code.
Note: For more information about regulations for countries that support MMS, see Create an SMS campaign with MMS.
- Inbound flow – If you expect responses to messages sent, then configure an inbound flow for your SMS number. For more information, see About ACD and SMS messages. To create an inbound message flow, see Create a flow.
- SMS content – Message content can come from a message body column in the contact list or SMS Campaign template. You are responsible for adding standard opt-out language and options to your SMS content.
Note: MMS campaigns cannot use a message body column in the contact list. To use MMS images in your campaign, the message body must come from an SMS Campaign template.
Before you implement an SMS campaign, review these limitations:
- Short code: 1,200 messages per minute (the limit can be increased up to 6,000 messages per minute upon request by contacting Genesys Cloud Customer Care).
- Toll-free: 180 messages per minute (increase in limit is not possible).
- International long codes: 700 messages per minute (increase in limit is not possible).
- NANP Long codes: 70 messages per minute (increase in limit is not possible).
- Total SMS per minute across all campaigns: 1,200 messages per minute (to request a limit increase of up to 6,000 messages per minute, contact Genesys Cloud Customer Care).
Note: Campaigns send messages that are within the 160 character limit at the rate of messages per minute configured in the campaign. If a message exceeds 160 characters, the campaign then counts message segments per minute, and it does not count messages per minute. The character limit can also be as low as 70 if the message body includes characters that are not in the standard ASCII character set.
Now add the resources required for this campaign mode, or identify existing resources to reuse.
| Resource | Required? | Description |
|---|---|---|
|
Contact List |
Yes |
Define the list of persons that you want to contact or know which existing list to use. Notes:
|
|
Do Not Contact List |
Optional |
Define a list of numbers that this campaign never messages, even if they are in the contact list. See Create a new internal DNC list. |
|
Contactable Time Set |
Optional |
Define when the campaign can send messages to specific time zones. See Create a Contactable Times entry. Note: Automatic time zone mapping can be applied for SMS campaigns. For more on time zone management, see the Outbound dialing time zone management overview.
|
|
Division |
Yes |
Know which division to associate with this campaign, or whether to use the Home division by default. See Divisions overview. |
When your setup is complete, create your SMS campaign by following these steps:
- Click Admin.
- Under Outbound, click Campaign Management.
- Click the Digital Campaigns tab.
- Click Create New.
- Type a name in the Campaign Name box. The name of a campaign can contain spaces and special characters, but must be unique.
- Select a Division or accept the default Home division.
See also Work with Divisions in About access control.
- Use the Contact List box to select a list of contacts for this campaign to message. To filter the list, type all or part of a name. If you select an unassignable list, an error message indicates why. A contact list is invalid if:
- No defined phone number types exist for the list.
- The list has no records.
- The list failed to import.
- An import that created the list is still running.
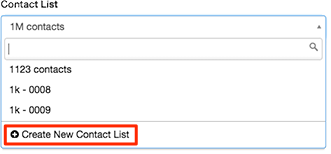
Tip: If you have not created a contact list, you can do so without leaving the current page:
-
Click the Contact List box and then click Create a New Contact List.
A dialog box prompts for the contact list name and a .csv file to upload:
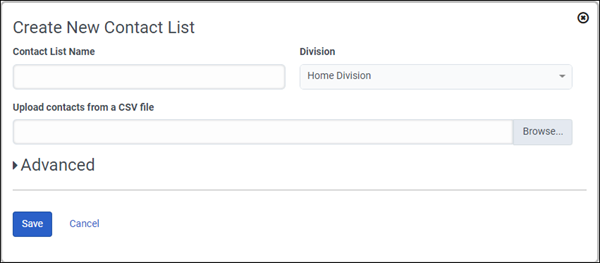
-
Type a name in the Contact List Name box and click Browse to select a contact file to upload. For more information, see Create a new contact list.
Ignore the Attempt Control option in the Advanced section. Attempt controls only apply to voice campaigns and are not applicable to digital campaigns. -
Click Save.
Note: Wrap-up code mapping is not applicable to digital campaigns. - Optional. From the Contact List Filter box, select the contact list filter relevant to this campaign to limit the messages to contacts that match the filter.
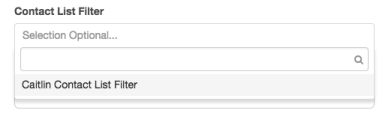 For more information, see Contact list filters view.
 -
From the Messages per Minute box, enter the number of messages to be sent each minute during the campaign. Refer to the Rate Limits in this article for a list of allowed limits for each phone number type. If you set the value to anything greater than the maximum message limit, an error occurs. For short codes, you can request an increase in the message per minute limit by contacting Genesys Cloud Customer Care.
Notes:- If a digital campaign has data action conditions in its rulesets, the maximum messages per minute can be set up to 1200.
Additionally, 1200 is the maximum number of messages per minute that can be running across all digital campaigns with data action conditions. - Data actions that are configured for the campaign can impact (slow down) the message sending speed.
- If the code used for a campaign uses the max messages per minute, do not use this code for any other type of outbound interaction, such as agentless API notifications or messages on behalf of a queue.
- If a digital campaign has data action conditions in its rulesets, the maximum messages per minute can be set up to 1200.
- Optional. From the DNC Lists box, select a table of phone numbers that this campaign should never message. To filter the list, type all or part of a name. When this campaign selects records to message from its contact list, it excludes numbers that match entries in this DNC list. If you select an unassignable list, an error message appears. A Do Not Contact list is invalid if:
- All or part of the list contains no records.
- All or part of the list failed to import.
- The Contact Method for the list is not Phone.
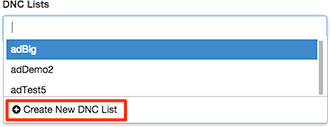
Tip: If you have not created a DNC list, you can do so without leaving the current page:
-
Click the Do Not Contact Lists box and then click Create a New DNC List.
A dialog box prompts for the DNC list name and for a .csv file to upload.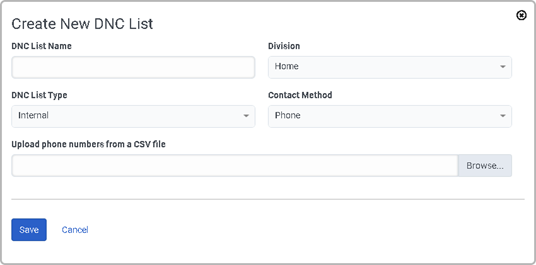
-
Type a name in the DNC List Name box and to select a DNC file, click Browse. At minimum, the .csv file can contain a single column of telephone numbers. A DNC file contains multiple phone number columns and redundant information, such as contact names.
Example:
Last Name, First Name,DNC_Home,DNC_Cell,DNC_Work
Smith,Bill,317-153-4777,317-981-6233,317-333-2174
Thomas,Terry,424-999-2334,424-384-9993,424-973-8828
As a best practice, put only phone number columns in your .csv file.
-
Click Save.
-
Optionally select sets of rules from the Digital Rule Sets filtered box. Rule sets apply automation to campaign records processing. To filter rule set choices, type all or part of a rule set name and view case-sensitive matched selections. To accept a matched item, select it from the list. For more information, see Rule sets view.
 Tip: If you assign multiple rule sets, change rule set evaluation order by dragging items to new positions in the Digital Rule Sets box. The system evaluates rule sets in left-to-right order.Note: If your SMS campaign is using a phone number that is not MMS-enabled and you have a rule that swaps to an SMS Campaign template that contains an image, the message is not sent. This is an error condition, and the contact is wrapped up as OUTBOUND-RULE-ERROR-SKIPPED.
 - (Optional) Select a Contactable Time Set containing time zone names and when email can be sent for each time zone. For more information, see Contactable time sets overview.
Note: To use the contactable times feature, the contact list assigned to the campaign must contain at least one time zone column. If it does not, and you assign a set of contactable times to the campaign, the configuration is invalid and you cannot save changes to the campaign.
- From the Type box, select SMS as the type of messages used in this campaign.
- From the Phone Column box, select the contact list column that contains the customer’s phone number.
- From the Messaging Options box, select either SMS Campaign Template or Contact List Column.
Note: If your campaign includes an MMS image, you must select SMS Campaign Template.
- If you select the SMS Campaign Template messaging option, from the SMS Campaign Template box, select the template that you want to use. If you are including an image in your campaign, be sure to select the SMS template with your MMS image.
- The character limit per message is 765.
- An MMS image plus text in an SMS campaign template cannot exceed 5 MB.
- For more information about adding an MMS image to an SMS campaign template, see Add an SMS campaign template message.
- Make sure to verify the substitutions used in your template with the corresponding headings in your contact list. If a substitution does not match a contact list heading and no default is provided, the system sends a default substitution or the name of the column heading. The missing substitutions display in the event viewer. For more information, see Add an SMS campaign template message.
- If you select the Contact List Column messaging option, from the Contact List Column list select the column in the contact list that contains the message to be delivered to the customer. The character limit per message is 512.
- If you select the SMS Campaign Template messaging option, from the SMS Campaign Template box, select the template that you want to use. If you are including an image in your campaign, be sure to select the SMS template with your MMS image.
- From the Sender SMS Phone Number box, select the phone number you provisioned for this campaign. If you include an MMS image in your campaign, the sender SMS phone number must be MMS-enabled.
- Optional. Enable Always Running if you want the campaign to continue running even if there are currently no contacts in the contact list. The campaign does not complete when it runs out of records, and instead sits idle waiting for more records to be added. This option is useful if the contact list is dynamically updated from another source.
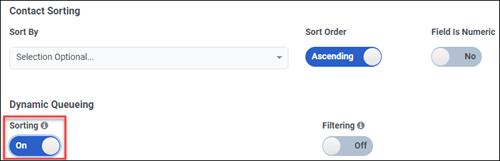
- Optional. Sort the contact list by column before messaging begins. For example, if your contact list has an Amount_Owed column, you could sort the list to message people who owe the highest amount first. Under Advanced > Contact Sorting, select a contact list column in Sort by. Select a Sort order: ascending (default) or descending. If the sort column contains numeric information such as a telephone number or monetary amount, enable Field is Numeric. Contact list sorting takes place at campaign start. If you add a contact while a campaign is running, the new contact is messaged but it is not included in contact list sorting. To sort by extra columns, click the plus sign. You can sort up to four contact list columns, with the first sort taking the highest precedence.

Note: Special considerations apply when sorting a date column. The system does not sort a contact column that represents a date formatted mm/dd/yy as a date. It sorts the column as a string since the system does not recognize that format as a date. To work around this limitation, format dates using ISO 8601 format (yyyy-mm-dd). That format sorts in the same order whether considered a string or a date. To denote Christmas Day for example, enter 2017-12-25 instead of 12/25/17.
To add a new contact to a running campaign and re-sort the contact list while the campaign runs, turn on Dynamic Queueing sorting. Be sure to select a Sort By column by which to re-sort the contact list when the new contact is added to the running campaign.
Before you configure dynamic sorting, consider these actions:
- If you do not configure Contact Sorting, contacts sort in the order that they appear in the contact list.
- If you configure Contact Sorting, contacts sort when you run a campaign based on campaign configuration settings.
- When you enable Dynamic Queueing Sorting, contacts re-sort at the time of the contact attempt during a running campaign.
Configure Dynamic Queueing sorting for a campaign:
- When you configure a campaign, the Contact Sorting Sort By column data type Field is Numeric must match the Column Data Type Specifications Data Type, in the contact list.

- When you enable Dynamic Queueing sorting for a campaign, you must also define the selected Sort By column in the campaign's contact list Column Data Type Specifications.
Notes:- If you receive more than two contact list validation errors when you create or edit a campaign with Dynamic Queueing, you must select a new contact list without errors.
- You can have up to five active Dynamic Queueing sorting campaigns per organization that run concurrently.
- You can have a total of 10 active and inactive Dynamic Queueing sorting campaigns per organization. Make sure to delete your inactive campaigns.
- You cannot enable the Dynamic Queueing Sorting feature after you create a campaign. Create a new campaign and a new contact list to enable the Dynamic Queueing sorting toggle.
- The Dynamic Queueing sorting option is not currently available in the Salesforce UI and thus for the Salesforce integration.
To ensure that your campaign honors Contact List Filters changes at any time, for example, while a campaign is running, then when you create the campaign, switch the Dynamic Queueing Filtering toggle to On.

If you did not create the campaign with Filtering switched to On, you cannot enable the Dynamic Queueing Filtering feature. To enable the Dynamic Queueing Filtering feature, create a new campaign.
When you complete your SMS campaign configuration, click Save. The new campaign is available on the Campaign Management page.
- A message appears if the new campaign exceeds the maximum limit count of 1,000 campaigns. Delete old or obsolete campaigns as needed and click Save again to complete the new campaign configuration.
- You can see and export digital campaign reporting from the interaction view, and not in the call detail report. For digital campaigns, you can see the dispositions OUTBOUND-MESSAGE-SENT or OUTBOUND-MESSAGE-FAILED.
- To view the delivery status of your SMS campaign interactions, click Performance > Workspace > Interactions. The data is contained in the Delivery Status column. For more information, see Interactions view.