
Convert BYOC Cloud/Genesys Cloud Voice to hybrid media
When you are ready to completely convert your BYOC Cloud or Genesys Cloud Voice organization into a hybrid media organization, you perform the following operations.
Create a location for your BYOC Premises Edges
To prepare for setting up your BYOC Premises Edges, you must create a location.
- Click Admin.
- Under Directory, click Locations.
- Click Add Location. The Add Locations window appears.
- In the Name box, type the location name that you want to appear in the system.
- In the Address box, type the location’s street address.
- Continue specifying the location address by filling in the City, State/Province/Region, and Zip/Postal Code boxes.
- In the Country list, select your country.
- In the Notes box, type any additional information about this location.
- Click Save. The Location Details tab appears.
- Select Make this location available for use on sites.
- In the Emergency Number box, type the appropriate phone number.
- Select one of the following:
- Use as the ANI only if the phone or user doesn’t have a phone number — Only use this number if no other identifying information is available.
- Always use as the ANI — Always use this number, even if other information is available. When you select this option, any call from a phone associated with the location’s site sends this ANI to emergency services.
- Click Save.
Create a premises core site
After you create a new location, you create a premises core site. When you configure a site, you must choose a Media Model setting. Since you are creating a new site for your Edges, you select Premises as your media model.
For more information, see Create a site under BYOC Premises.
Pair your BYOC Premises Edges
After you have your Location and premises core site configured, you are ready to pair your BYOC Premises Edges to Genesys cloud. The process that you use to pair your BYOC Premises Edges with Genesys Cloud depends on which hardware solution you chose to use.
Genesys Hardware Solution
If you are using the Genesys Hardware Solution, you can pair your BYOC Premises Edges to Genesys Cloud using just a USB flash drive or you can use a USB flash drive along with the external LCD monitor. Every Edge that ships from Genesys/Arrow Electronics includes a Setup Quick Reference Guide that visually depicts the pairing process. For more information, see About BYOC Premises – Genesys Hardware Solution.
Customer Hardware Solution
If you are using the Customer Hardware Solution, you pair your BYOC Premises Edges to Genesys Cloud during the setup operation. For more information, see About BYOC Premises – Customer Hardware Solution.
Put your Edges into the Genesys Cloud Hybrid Media Group
After you have paired your Edges, you must put them into the Genesys Cloud Hybrid Media Group. However, you must understand that you can only put one premises Edge into the group at a time.
- Click Admin.
- Under Telephony, click Edges.
- From the Edge Name column, click the name of your premises Edge to open the Edit Edge page.
- From the Edge Group list, select Genesys Cloud Hybrid Media Group to assign it to the Edge.
- Click Save Edge.
Select the Site interconnects
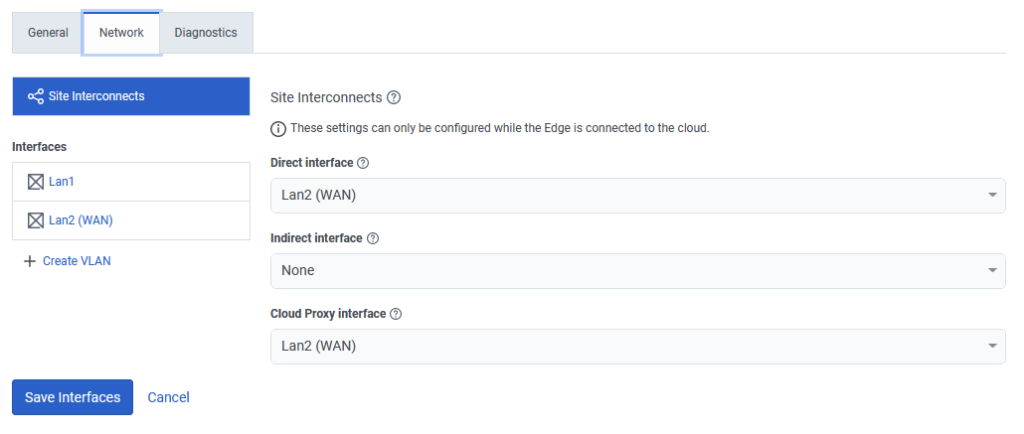
After you put your premises Edge into the Genesys Cloud Hybrid Media Group, you must make sure that the Site interconnects are configured. Under hybrid media, site interconnects allow Edges in various sites to communicate with each other. For each type of Site Interconnect that you want to enable, you select the interface that you want to use. There are three types of Site Interconnects as described in the table.
| Site Interconnects | Description |
|---|---|
| Direct interface |
This is a connection where each Edge has a private IP address that they use to communicate with each other. A Direct interface allows Edges on the same LAN to communicate with each other. |
| Indirect interface | This is a connection between Edges that uses NAT traversal via a 1:1, public to private IP address mapping on the Edge interface. An Indirect interface allows an Edge to communicate with other Edges outside the NAT, |
| Cloud Proxy interface | This is a connection that uses WebRTC technology in the cloud to broker connectivity between Edge devices and the cloud. The main use case for Edge devices to communicate with the cloud media services. Essentially they reach out from the Edge through the firewall, just like a WebRTC client does and media is negotiated just like a WebRTC client. This makes this connection incredibly resilient. If there is no direct or indirect path between Edges, you can use the Cloud-Proxy interface. |
- Click the Network tab.
- Under the Site Interconnects heading. select the appropriate port from each of the interface lists.
- Click Save Interfaces.
Put the Edges in service
After you move a premises Edge into the Genesys Cloud Hybrid Media Group, you can put it into service.
- From the Edge Name column, click the name of your premises Edge to open the Edit Edge page.
- In the Edge information panel that appears on the right side of the General tab, locate the Edge State.
- Click Put In-Service.
- When the Put In-Service dialog appears, Click Yes.
You’ll then see that the Edge state changes to In-Service.
Enable and configure Site Links
After you create a premises core site, you can create a connection between your cloud site and your new premises site by enabling the Site Links feature.
- Click Admin.
- Under Telephony, click Sites.
- From the Site Name column, click your premises core site to open the Edit Site page.
- Click the Site Links tab.
When you select the Site Links tab, you see a list of the sites in your organization. This list includes the PureCloud Voice – AWS cloud core site and any branch sites that you have in your organization. You’ll also see an error message that indicates the connections between your default premises site and the PureCloud Voice – AWS site are disabled.
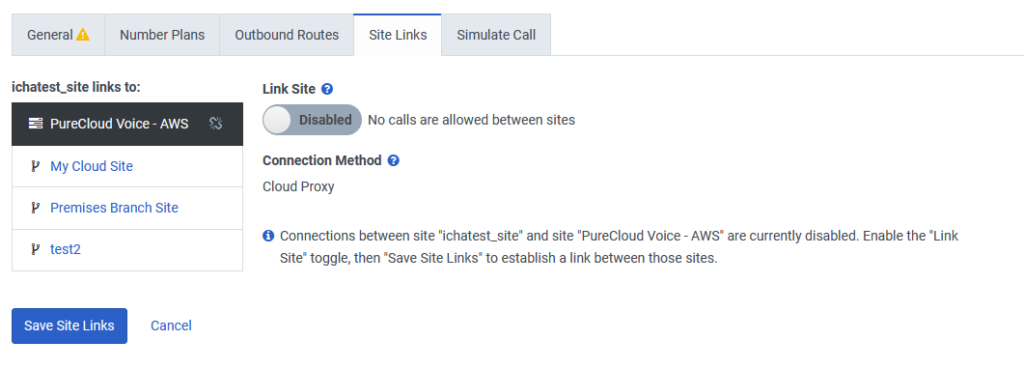
- Enable the Link Site toggle.
- Click Save Site Links.
Configure the rest of your hybrid telephony connection
After you enable Site links and create your premises core site, you can configure the rest of your hybrid telephony connection. The options you choose, will depend on what your goals are for your hybrid media organization.
For example, if you plan to connect a separate carrier to your BYOC Premises Edges, you need to create an external SIP trunk. Alternatively, you can continue to use your existing cloud trunk.
Regardless of which type of trunk you choose, you need to create an outbound route on your premises core site. You’ll then must add a number plan for that site.
Create new/move existing phones
You can create new phones and add them to the premises core site or you can move existing phones from a cloud site to your premises core site.
Create phones
To create a new phone, see:
To create a new WebRTC phone, see:
Move phones
To move existing phones:
- Click Admin.
- Under Telephony, click Phone Management.
- Click the Phones tab.
- Select the phone you want to move.
- From the Site list, select your premises core site.
- Click Save Phone.