
Work with agents in a management unit
Prerequisites
The following permissions:
- Workforce Management > Management Unit > Add, Delete, Edit, and Search
- Workforce Management > Agent > Edit and View
You can organize agents within the contact center into management units based on common planning period settings, adherence rules, time-off rules, and shift-trading rules. Agents that handle the same set of interactions should belong to the same business unit and can be spread across up to 10 different management units, if different management rules or permissions are required. If there are more than 1500 agents that require similar planning period, adherence, time-off, and shift trading rules, then they can be split across management units.
- When you move an agent from one management unit to another within the same business unit, the agent will still be visible within the same business unit schedule. After the agent moves to another management unit, any new adherence information exists under the new management unit. Historical adherence data will be visible in the new management unit historical adherence view. After the agent moves to another management unit, any new schedule and adherence information exists under the new management unit.
- When you move an agent from one management unit to another management unit in a different business unit, the schedule and adherence information remains with the original management unit and business unit. However, historical adherence is no longer visible in the original management unit. This process allows the supervisor to view the agent in the same spot on the schedule before they moved business and management units, for historical purposes. After the agent moves to another management unit, any new schedule and adherence information exist under the new management unit.
- When you move an agent from one management unit to another management unit, the schedulable value will be the value that was updated last.
- Time-off requests move with the agent to the new management unit. Time-off requests are specific to agents, not management units, and should follow the agent with the move.
Before you begin, make sure that you select the appropriate management unit from the list, located in the upper right corner.
- Click Admin.
- Under Workforce Management, click Agents.
Before you begin, make sure that you select the appropriate management unit from the list, located in the upper right corner. Click Menu > Workforce Management > Workforce Management Configuration > Agents.
The following table describes the icons and columns in this page:
| Icon or column | Description |
|---|---|
| Remove All Selected |
Removes the selected agent from the Agents list. This field appears disabled by default. Select an agent to enable this field. |
| Add | Open the Add Agents dialog box and add one or more agents to a management unit. |
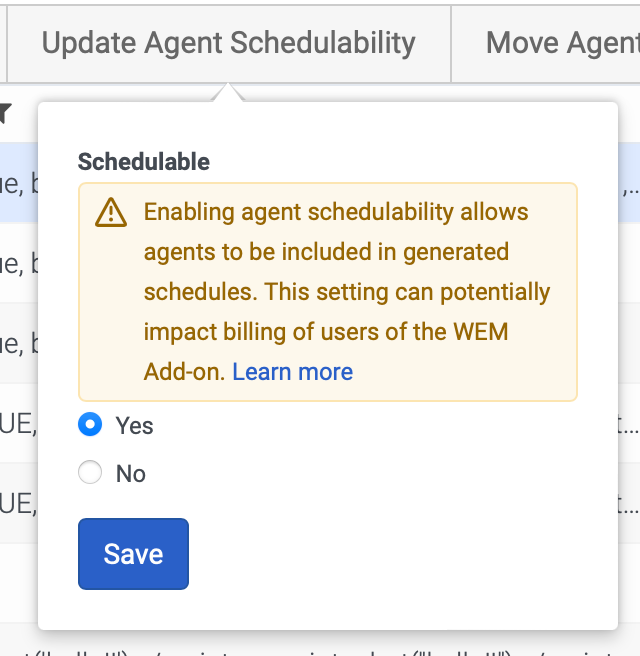
| Update Agent Schedulability |
Click to select whether the agent is schedulable. This field appears only when an agent is selected. Upon clicking this field, the Schedulable section displays with Yes or No options, which you can select as desired. Click the image to enlarge.
Note: This setting can impact your billing if you are an addon user.
|
| Move Agents |
Moves the selected agent to another work plan or staffing group. Select the required option to move the agent and use the search field to type out the name of the work plan or staffing group. |
| Sync Changes |
Syncing Changes updates the currently associated Queue, Skill, language associated to the agents. |
|
Export |
Export the list of agents into a .csv file. |
|
Refresh |
Reload the page with the most updated version of the agent list. |
| Agent column | Lists agents currently part of the selected management unit. |
| Planning Groups | Lists the planning groups to which the agent belongs. |
| Staffing Group | Indicates the staffing group to which the agent is mapped. |
| Queues | Lists the queues in which the agent belongs. |
| Languages | Lists the language skills, if any, assigned to the agent. |
| Skills | Lists the ACD skills, if any, assigned to the agent. |
| Work Plan | Lists the work plan to which the agent belongs. |
| Work Plan Rotation | Lists the work plan rotations, if any, assigned to the agent. |
| Work Team |
Lists the work teams, if any, to which the agent belongs. Note: This column appears only if you have Work Teams permission.
|
| HRIS |
Indicates the HRIS integration of the agent. Agents are automatically mapped to an HRIS integration. This mapping updates automatically every 24 hours. If the agent is not assigned to any integration, then it is displayed as None. The linked HRIS integration can be manually changed by clicking the existing integration link by using the Override agent ID option. This is done when the automated process is unable to link or map the agent to the HRIS integration automatically. If the Do not override ID automatically option is selected, the change of HRIS integration will not be executed as part of the auto mapping process. If an agent is misconfigured or is found in more than one integration, then the Needs Attention message will be displayed. |
| More | To remove an agent from the management unit, click this button and from the menu that appears, select Delete. |
Customize the view
The following options are available for customizing the view.
Sort the view
To sort items in ascending or descending order by a specific column, click the column heading. An arrow to the left of a column heading indicates that the view is sorted by that column.
Filter the view
To view items that match specific criteria only:
- Click the arrow next to the column heading by which to filter the view.
- Click the operator icon and then click the operator to use.
- In the filter box, type the value to use to filter the view. If you are filtering on a date column, you can click the date in the calendar.
Change column placement
To switch places between two columns:
- Click the arrows next to the column heading where you want another column to appear.
- Click Change Column and then click the name of the column to move to the current position. The columns switch places in the view.
Hide a column
To hide a column from the view, click the arrow next to the column heading and then click Hide Column.
Unhide a column
To unhide a column:
- Click the three dots in the column header row and then click Show/Hide Columns.
- In the Show/Hide Columns dialog box:
- To add all columns in the Available Columns list to the Visible Columns list, click Add All.
- To remove all columns in the Visible Columns list to the Available Columns list, click Remove All.
- To move an individual column from one list to the other, click the column name.
Reset view
To reset the view to its default state, click the three dots in the column header row and then click Reset Defaults.