
Convert BYOC Premises to hybrid media
When you are ready to completely convert your BYOC Premises organization into a hybrid media organization, you will move your existing Edges into the Genesys Cloud Hybrid Media Group and enable the Site Links.
Move your Edges into the Genesys Cloud Hybrid Media Group
You need to move all of your Edges from your existing Edge Groups into the Genesys Cloud Hybrid Media Group. However, if you have multiple Edges, you need to understand that you can only move one premises Edge at a time.
Note: Before you decide to begin moving your Edges into the Hybrid Media Group, you must be sure that you are able to complete the entire operation from start to finish. Furthermore, if you have multiple sites, each containing Edges, you will need to move all of the Edges in one site before you begin moving the Edges in your other sites.
The reason is twofold. First, if you have multiple premises Edges, the operation may take a while to complete. Second, once you begin the move, your organization will be segmented, which essentially means that the part that you move to the hybrid media group will not be able to communicate with the part that remains in your existing Edge group. Therefore, it will be to your benefit to begin the move during off hours to ensure that you can perform the operation from start to finish without disrupting business operations.
The basic steps for this part of the operation are as follows.
-
- Take an Edge out of service.
- Select the Hybrid Edge Group.
- Put the Edge back in service.
- Select the Site Interconnects.
To learn more click each tab.
Take an Edge out of service
The first thing that you must do is take your premises Edge out of service.
- Click Admin.
- Under Telephony, click Edges.
- Click Menu > Digital and Telephony > Telephony > Edges.
- Select the Edge Name check box next to the Edge you want to take out of service.
- Click Take Out-of-Service on the toolbar.
- When the Take Out-of-Service dialog appears, determine how you want to handle call draining.
- By default, the Wait for the Edge to drain calls first check box is selected.
- If you clear the Wait for the Edge to drain calls first check box, you will see a warning that informs you that all calls will be dropped immediately.
- Click Yes.
If you enabled the call draining feature, you’ll see the Edge state change to Draining calls along with the number of calls remaining. After the calls are drained or the timeout period elapses, you’ll see the Edge state change to Out-of-Service.
If you disabled the call draining feature, you’ll immediately see the Edge state change to Out-of-Service.
Select the Hybrid Edge Group
After your premises Edge is out of service, you can move it into the Genesys Cloud Hybrid Media Group.
- From the Edge Name column, click the name of your premises Edge to open the Edit Edge page.
- From the Edge Group list, select Genesys Cloud Hybrid Media Group to assign it to the Edge.
- Click Save Edge.
Put the Edge back in service
After you move a premises Edge into the Genesys Cloud Hybrid Media Group, you can put it back into service.
- From the Edge Name column, click the name of your premises Edge to open the Edit Edge page.
- In the Edge information panel that appears on the right side of the General tab, locate the Edge State.
- Click Put In-Service.
- When the Put In-Service dialog appears, Click Yes.
The Edge state changes to In-Service.
Select the Site interconnects
After you put a premises Edge in service, you must make sure that the Site interconnects are configured. Under hybrid media, site interconnects allow Edges in various sites to communicate with each other. For each type of Site Interconnect that you want to enable, you select the interface that you want to use. There are three types of Site Interconnects as described in the table.
| Site Interconnects | Description |
|---|---|
| Direct interface |
This is a connection where each Edge has a private IP address that they use to communicate with each other. The Direct interface allows Edges on the same LAN to communicate with each other. |
| Indirect interface | This is a connection between Edges that uses NAT traversal via a 1:1, public to private IP address mapping on the Edge interface. The Indirect interface allows an Edge to communicate with other Edges outside the NAT, |
| Cloud Proxy interface | This is a connection that uses WebRTC technology in the cloud to broker connectivity between Edge devices and the cloud. The main use case for Edge devices to communicate with the cloud media services. Essentially they reach out from the Edge through the firewall, just like a WebRTC client does and media is negotiated just like a WebRTC client. This makes this connection incredibly resilient. If there is no direct or indirect path between Edges, you can use the Cloud-Proxy interface. |
- Click the Network tab.
- Under the Site Interconnects heading, take note of the port selected in the Direct Interface list.
- Select that same port from the Indirect interface list and the Cloud Proxy interface list.
- Click Save Interfaces.
Enable and configure Site Links
After you move your premises Edges into the Genesys Cloud Hybrid Media Group, you can create a connection between your premises site and the new cloud site by enabling the Site Links feature. You’ll then create a new location and a cloud branch site.
The basic steps for this part of the operation are as follows.
- Enable Site links.
- Create a Location.
- Create a branch site.
To learn more, click each tab.
Enable Site Links
- Click Admin.
- Under Telephony, click Sites.
- Click Menu > Digital and Telephony > Telephony > Sites.
- From the Site Name column, click your premises core site to open the Edit Site page.
- Click the Site Links tab.
When you select the Site Links tab, you’ll see a list of the sites in your organization. This list includes the new PureCloud Voice – AWS cloud core site and any branch sites that you have in your premises organization. You’ll also see an error message that indicates the connections between your default premises site and the PureCloud Voice – AWS site are disabled.
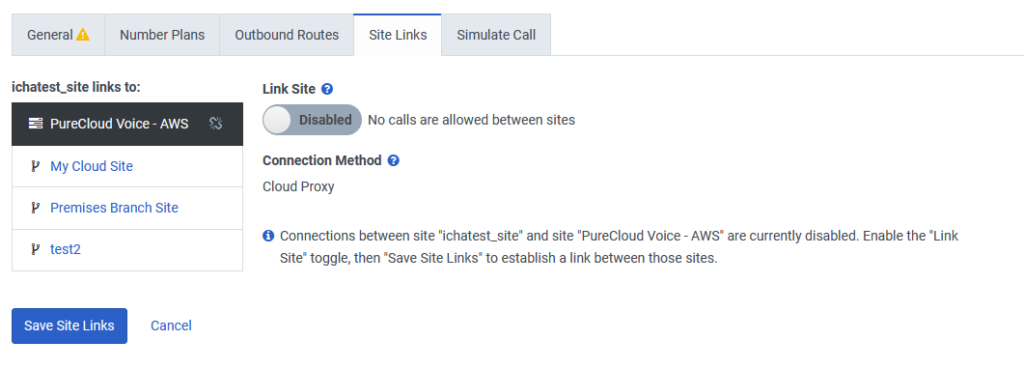
- Enable the Link Site toggle.
- Click Save Site Links.
When you enable the Link site, you’ll now have a connection between your core premises site and the core cloud site (PureCloud Voice – AWS). Once the link is enabled, your core premises site has access to all the resources in the core cloud site. Likewise, the core cloud site has access to all the resources in the core premises site.
Create a Location
After you enable hybrid media, the process creates a placeholder location called Default PCV Location. This placeholder location is tied to the PureCloud Voice – AWS cloud site, which is a managed site that you cannot view or modify. As such, you need to create a new Location.
- Click Admin.
- Under Directory, click Locations.
- Click Menu > User Management > Locations.
- Click Add Location. The Add Location window appears.
- In the Name box, type the location name that you want to appear in the system.
- In the Address box, type the location’s street address.
- Continue specifying the location address by filling in the City, State/Province/Region, and Zip/Postal Code boxes.
- In the Country list, select your country.
- In the Notes box, type any additional information about this location.
- Click Save. The Location Details tab appears.
- Select Make this location available for use on sites.
- In the Emergency Number box, type the appropriate phone number.
- Select one of the following:
- Use as the ANI only if the phone or user doesn’t have a phone number — Only use this number if no other identifying information is available.
- Always use as the ANI — Always use this number, even if other information is available. When you select this option, any call from a phone associated with the location’s site sends this ANI to emergency services.
There are several other boxes on this page that you can fill in later.
- Click Save.
Create a branch site
After you create a new location, you must create a cloud branch site and connect it to your new location. You then select your new cloud branch site as the default site.
- Click Admin.
- Under Telephony, click Sites.
- Click Menu > Digital and Telephony > Telephony > Sites.
- Click Create New.
- Type a name in the Site Name box.
- From the Location list, select the location you just created.
- From the Time Zone list, select your time zone.
- Under Media Model, select Cloud.
- Click Create Site. The Edit Site page appears.
You’ll see that the Edit Edge page contains five tabs titled General, Number Plans, Outbound Routes, Site Links, and Simulate Call. You continue the branch site configuration on the General and Site Links tabs. You’ll configure the settings on the Number Plans and Outbound Routes tabs later.
General
You continue the initial site configuration on the General tab.
- Enter a Description for your site.
- If you are using WebRTC, you need to select a set of media regions and specify a Relay/TURN Behavior. For more information, see Configure your site for Global Media Fabric.
- Click Save Site.
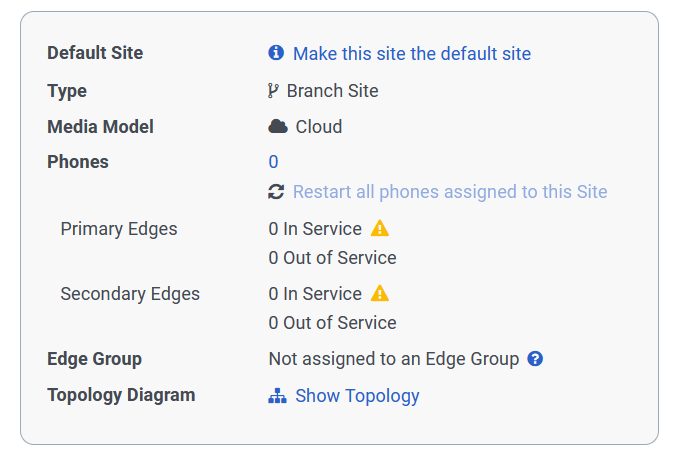
In the Site information panel, you’ll see that the Site Type is identified as a Branch Site and that the Media Model is Cloud. Next to the Default Site, click Make this Site my default Site.
For more information, see Sites overview.
Site Links
If you click the Site Links tab, a message appears that indicates that Site links can only be configured between core sites.

If you return to the General tab and click the Show Topology in the Site information panel, you see a graphical representation of the links between your core site and branch site.
Configure the hybrid telephony connection
After you enable Site links, create a new location, and create a branch site, you can configure the rest of your hybrid telephony connection.
The basic steps for this part of the operation are as follows.
- Create a BYOC Cloud trunk.
- Add the new phone trunks.
- Create an Outbound Route.
- Add a Number Plan.
- Create/move phones.
Create a BYOC Cloud trunk
The Create External Trunks page has two sections. The upper section contains the base settings needed for an External Trunk. The lower section, which consists of a series of collapsible sections, contains other settings that you can use to refine your external trunk configuration.
Genesys Cloud recommends that you rely on the base BYOC Cloud trunk settings described in this article. However, if your carrier has other requirements, you can use the additional settings to refine your external trunk configuration. For more information, see Configure advanced external trunk settings.
There are two types of BYOC Cloud trunks (BYOC Carrier or BYOC PBX) that you can select depending on how your telephony system is set up. Each trunk type also has a subtype that is designed to narrow down the settings that are required for that type of trunk. For the BYOC PBX trunk type, there is only one subtype. For the BYOC Carrier trunk type, there are two subtypes: One is a generic subtype that you can use for most carrier configurations. The other is a Verizon-specific subtype that you use if Verizon is your carrier.
If you need more information about any of the settings on the External trunk page, see External trunk settings.
Configure an external trunk
- Click Menu > Digital and Telephony > Telephony > Trunks.
- Click the External Trunks tab.
- Click Create New.
- In External Trunk Name, enter a trunk name.
- From the Type lists, select the type and subtype for the BYOC Cloud trunk you want to create.
- Under Type:
- Select BYOC Carrier from the first list.
- Select either Generic BYOC Carrier or Genesys Cloud BYOC Verizon from the second list.
- Under Type:
- Select BYOC PBX from the first list.
- Select Generic BYOC PBX from the second list.
- Set Trunk State to In-Service.
- Select the appropriate trunk transport protocol from the Protocol list. Note: Genesys Cloud selects the recommended protocol by default. In most situations, this protocol is best protocol for the selected trunk type. For more information, see Choose a trunk transport protocol.
- Under Inbound select your Number Plan Site. This setting allows you to identify the site with the number plan that you want to use. For more information, see Improve inbound call handling with the Number Plan Site feature.
- Configure the appropriate SIP routing settings for your trunk subtype:
- Enter an identifier in the Inbound SIP Termination Identifier box.
- The Inbound SIP Termination Identifier is a static configuration that populates with a regionally unique identifier. This identifier directs traffic from third-party PBXs to the organization.
- Enter a header in the Inbound SIP Termination Header box.
- The Inbound SIP Termination Header is a custom field that contains the Termination Identifier value for inbound calls to Genesys Cloud.
- Enter an identifier in the Inbound SIP Termination Identifier box.
- The Inbound SIP Termination Identifier is a static configuration that populates with a regionally unique identifier. This identifier directs traffic from external Carriers to the organization.
- Enter a header in the Inbound SIP Termination Header box.
- The Inbound SIP Termination Header is a custom field that contains the Termination Identifier value for inbound calls to Genesys Cloud.
- Enter an identifier in the Inbound SIP Termination Identifier box.
- The Inbound SIP Termination Identifier is a static configuration that should be populated with a regionally unique identifier. This identifier is used to direct traffic from Verizon to the organization.
- The Inbound SIP Termination Header box is preconfigured with a Verizon-specific header.
- If you cannot use either the FQDN or the TGRP format for the inbound SIP termination identifier, enable DNIS Replacement Routing.
For more information about the Inbound settings, see Configure SIP routing for a BYOC Cloud trunk.
- Under Outbound, enter the appropriate identifiers in the Outbound SIP Termination FQDN, Outbound SIP TGRP Attribute, and Outbound SIP DNIS boxes to configure your outbound request URI.
For more information about the Outbound settings, see Configure SIP routing for a BYOC Cloud trunk.
- To specify any SIP Servers or Proxies enter a value in the Hostname or IP Address box, a port number in the Port box, and then click Add .
- Choose the appropriate Digest Authentication setting.
- If you enable Digest Authentication, you must specify the associated Realm, and the User Name, and Password to use as the authentication credentials.
- Under Caller ID, specify the Caller Address and Caller Name for the trunk and then use the Prioritized Caller Selection to specify the location from which and order in which you want to display caller ID information to the call recipient.
For more information, see Use the Prioritized Caller Selection feature to configure caller ID information.
- Under SIP Access Control, you can build a list of IP or CIDR addresses to which you want to permit SIP access. To do so, enter an address and click Add .
- If you are configuring a BYOC PBX trunk, the PBX Passthrough setting appears.
- Enable this setting if you want to allow your PBX to pass calls intended for the PSTN directly through Genesys Cloud.
For more information, see Configure PBX passthrough for a BYOC trunk.
- If you are configuring a Verizon BYOC Carrier trunk subtype, you must configure a few Verizon-specific settings in the Custom SIP headers section.
- Under External Trunk Configuration, expand the Protocol section.
- Under Outbound, in the Custom SIP headers section, there are three Verizon-specific Headers:
- X-VZ-CSP-Domain
- X-VZ-CSP-Customer-Identifier
- X-VZ-CSP-Leg-Type
- Work with your Verizon representative to find the correct values to enter into the Value boxes for X-VZ-CSP-Domain and X-VZ-CSP-Customer-Identifier headers.
- The Value box for the X-VZ-CSP-Leg-Type header is automatically filled in with the value of "agent." Leave this box unchanged.
For more information, see Configure Custom SIP headers.
- Click Save External Trunk.
For more information about any of the settings on the Create/Edit External Trunk page, see External trunk settings.
Add the new phone trunks
After you create your BYOC Cloud trunk, you can add the two new phone trunks (Genesys Cloud – CDM SIP Phone Trunk and Genesys Cloud – CDM WebRTC Phone Trunk) to the Genesys Cloud Hybrid Media Group.
- Click Admin.
- Under Telephony, click Edge groups.
- Click Menu > Digital and Telephony > Telephony > Edge Groups.
- Select the Genesys Cloud Hybrid Media Group.
- Under Phone Trunks, click Select Phone Trunk and select the Genesys Cloud – CDM SIP Phone Trunk.
- Repeat step 4 and select the Genesys Cloud – CDM WebRTC Phone Trunk.
- Click Save Edge Group.
Create an Outbound Route
After you create a BYOC Cloud trunk and add the new phone trunks to the Genesys Cloud Hybrid Media Group, you can add an outbound route to your new cloud branch site.
- Click Admin.
- Under Telephony, click Sites.
- Click Menu > Digital and Telephony > Telephony > Sites.
- Locate and click your site on the Site Name list.
- Click the Outbound Routes tab.
- Click New Outbound Route.
- Enter an outbound route Name and a Description.
- From the Classifications list, select a classification.
- From the Select an External Trunk list, select the appropriate trunks.
- If you select more than one external trunk, you can specify a Distribution Pattern to define how outgoing calls are routed to available trunks.
-
- Sequential - If you select Sequential, then all outgoing calls are routed to the first trunk in the list. If the first trunk reaches its capacity, then outgoing calls are routed to the second trunk and so on.
- Random - If you select Random, then all outgoing calls are randomly distributed across multiple trunks to ensure that no single trunk is overloaded.
- To enable the outbound route, enable the State setting.
- Click Save Outbound Routes.
Add a Number Plan
- Click Admin.
- Under Telephony, click Sites.
- Click Menu > Digital and Telephony > Telephony > Sites.
- Select your site from the Site Name list.
- Click the Number Plans tab.
- Click New Number Plan.
- Enter a name in the Number Plan Name box.
- Select one of the available match types from the Match Type list.
- Depending on what match type you select, enter the required information.
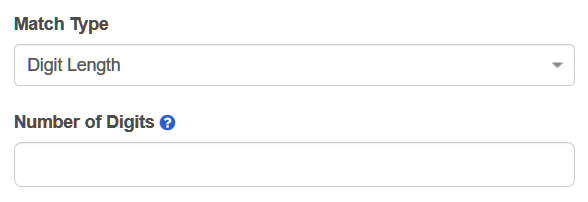
- Enter a number or a range of numbers in Number of Digits.

- Enter a range of numbers in E.164 format in the boxes.
- Click + to add the range to the Numbers box.
For example, you might enter +13177151000 in the first box and +13177152000 in the second box.
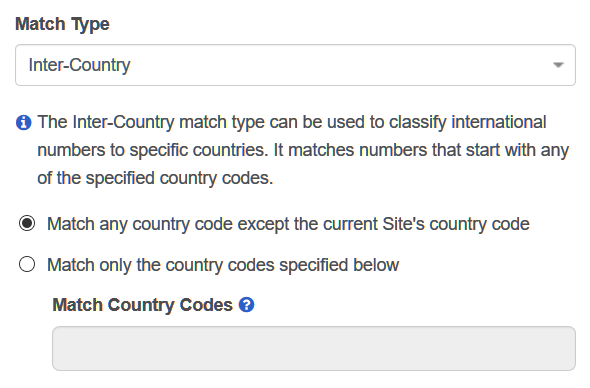 Select one of the options:
- Match any country code except the current Site's country code
- Match only the country codes specified below
- Enter the appropriate digits in the Match Country Codes box.
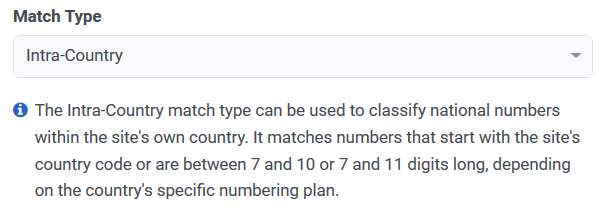
- There is nothing to configure when you select the Intra-Country match type.
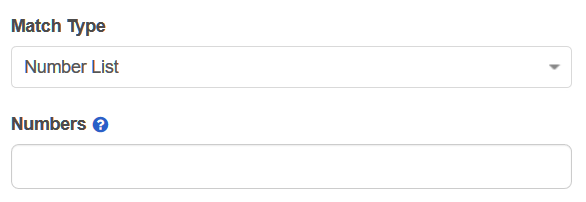
- Enter comma delimited numbers or a range of numbers in the Numbers box.
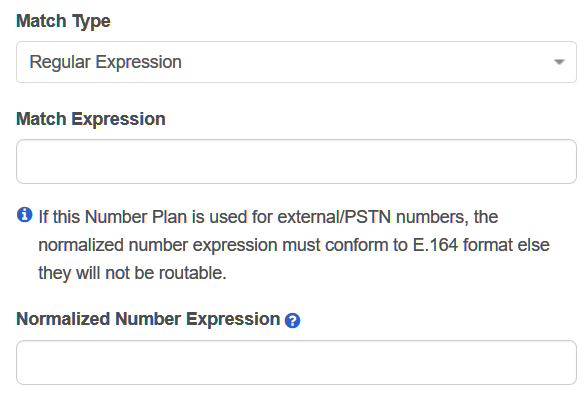
- Enter a regular expression in the Match Expression box.
- Enter a normalized number expression in the Normalized Number Expression box.
- Select the correct classification or enter a new classification in the Classification list.
- Click Save Number Plans.

Create new/move existing phones
You can create new phones and add them to the cloud branch site or you can move existing phones from the premises site to the cloud branch site. Either way, you must keep phone compatibility in mind. AudioCodes phones, Genesys branded phones, and the PureCloud Softphone are not compatible with BYOC Cloud.
This means that if you are creating new phones for your cloud branch site, you can only create Polycom or WebRTC phones. If you are moving phones from the premises site to the cloud branch site, you can only move Polycom or WebRTC phones.
Create phones
To create a new Polycom phone, see:
To create a new WebRTC phone, see:
Move phones
To move existing phones:
- Click Admin.
- Under Telephony, click Phone Management.
- Click Menu > Digital and Telephony > Telephony > Phone Management.
- Click the Phones tab.
- Select the phone you want to move.
- From the Site list, select your cloud branch site.
- Click Save Phone.