
Edit a call analysis response
Prerequisites
The following permissions:
- Outbound > Responseset > Add, Delete, Edit, and View
- Architect > Flow > Search
- Click Admin.
- Under Outbound, click Call Analysis Responses.
- Click Menu > Digital and Telephony > Outbound > Call Analysis Responses.
- Click a link in the Name column to display its values.
- (Optional) Rename the entry using the Call Analysis Response Name box. This name can contain spaces and special characters, but must be unique.
- (Optional) If you do not want the system to enable call analysis after the call connects, click Disable Post-Connect Call Analysis. When the call connects, the system disables all call analysis after the call connects and also disables Answering Machine Detection (AMD).
- (Optional) If you do not want the system to distinguish between a live voice and an answering machine, click Disable Answering Machine Detection. When the call connects, the system transfers it without evaluating for a machine. Note: If AMD is disabled, the system still accurately prevents around two-thirds of voicemail/answering machines from going to the live voice response action since many known default carrier messages can be identified almost immediately by way of spotting the “voiceprint”. Busy carrier announcements and tones, which typically account for about 3 percent of all calls, and faxes, are also detected and prevented from taking the live voice response action.
- If you selected a transfer option and want the system to delay the response until after a voicemail beep, click Enable Beep Detection.Notes:
- Enable Beep Detection is an option to enable when voicemail or an answering machine is not being detected by AMD.
- You may want to extend your no answer timeout on the campaign to 60 seconds due to the default ring settings on mobile phones to wait 60 seconds to detect the beep.
- In Architect, use the Detect Silence and Play Audio on Silence actions in your call flows to detect live or voicemail speech, and then determine how the flow proceeds.
- For each of the call analysis results, Answering Machine and Live Voice, select one of the following actions for the system to take:
- Hangup disconnects the call.
- Transfer returns the call to the campaign’s queue so that the next available agent can answer it.
- Transfer to Outbound Flow transfers to the outbound flow you select. Create outbound flows beforehand using Architect.
Note: Sending live voice calls to an architect flow impacts pacing, as compliance abandons are not possible due to every connect being answered by the flow.
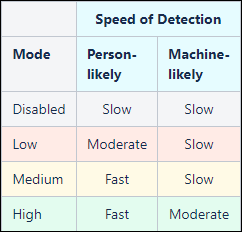
- To select a different mode for improved call analysis performance, use Adjustable Live Speaker Detection Level.
- To select a live speaker detection level, Post-Connect Call Analysis and Answering Machine Detection must be enabled. To enable Post-Connect Call Analysis, make sure the check box Disable Post-Connect Call Analysis is not selected. To enable Answering Machine Detection, make sure the check box Disable Answering Machine Detection is not selected.
The speed of detection for a person most likely detected or a machine most likely detected can be selected for the following modes.
- Click Save.