Series: Perform an intraday reschedule
Initiate an intraday reschedule
- Workforce Management > Schedule > Generate permission
You can perform an automated intraday rescheduling operation to incorporate manual changes made to the short-term forecast associated with the schedule. This option reoptimizes the shift start and length times, and the activity start times.
- For an intraday reschedule, Genesys Cloud attempts to use the work plan that exists when you initially generate a schedule and honor any changes to that work plan. If the agent’s current work plan is a different work plan than the one in place when you first create the schedule, then Genesys Cloud does not use it.
- Save any manual schedule modifications before you run a reschedule operation.
- You can only have one active reschedule per management unit. If a reschedule task exists, you must cancel it before you start a new one.
- An active reschedule that remains in the Ready to be applied state prevents any additional reschedule attempts. Apply or cancel the active reschedule before creating a new one.
To initiate an intraday schedule, perform the following steps:
- Click Admin.
- Under Workforce Management, click Schedules.
- Click Menu > Workforce Management > Scheduling > Schedules.
- In the upper right corner, click the Business Unit list and select the appropriate business unit.
- Search for the appropriate schedule and select it from the list. The schedule editor is displayed.
- Click Reschedule. The Reschedule Wizard is displayed. The Reschedule Wizard comprises four steps, which you can view and modify as required.
- The Reschedule Wizard (Step 1 of 4) screen displays the Add new agents to schedule section. You can add new agents to the schedule.
- Click Next.
- The Reschedule Wizard (Step 2 of 4) screen is displayed. In the Select agents to reschedule section, select the agents whose schedules you want to reschedule. The wizard indicates the number of new agents that you include at the top of the screen.
- Click Next.
- The Reschedule Wizard (Step 3 of 4) screen is displayed. In the Select activity codes to reschedule section, select the activity codes to include in the agents’ schedule. To select all activity codes, enable the Remember selected activities checkbox available below the list of available activity codes. The wizard indicates the number of new agents that you include at the top of the screen.
- Click Next.
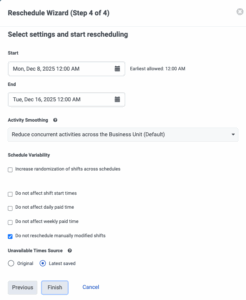
- The Reschedule Wizard (Step 4 of 4) screen is displayed. In the Select settings and start rescheduling section, perform any of the following actions:
- (Optional) In the Start field, click the Calendar icon and select the start date.
- (Optional) In the End field, click the Calendar icon and select the end date.
- (Optional) In the Activity Smoothing field, the value configured at the business unit is displayed. You can change the value to indicate how you want the concurrent activities to be distributed through the schedule. For more information about how to configure schedules, see Add a business unit.
- (Optional) In the Schedule Variability field, the value configured at the business unit is displayed. Enable the checkbox to indicate that you want to use additional randomization to schedules so that the same agent does not always receive the same combination of shifts for each schedule run.
- (Optional) In the Do not affect shift start times field, indicate whether the new schedule to be generated can be created without affecting shift start times.
- (Optional) In the Do not affect daily paid time field, indicate whether the new schedule to be generated can be created without affecting the daily paid time.
- (Optional) In the Do not affect weekly paid time field, indicate whether the new schedule to be generated can be created without affecting the weekly paid time.
- (Optional) In the Do not reschedule manually modified shifts field, indicate whether the new schedule to be generated can be created without including manually modified shifts.
- In the Unavailable Times Source field, select Latest Saved to include any changes made by agents after the scheduler generated the original schedules. If agents modify their unavailable times after you regenerate the schedule, return to this field and select Original to use the initial data instead. Click the image to enlarge.

- Click Finish. Workforce management confirms the completion of rescheduling and also indicates the number of management units to which the new schedule applies.
To apply the updated unavailable time changes, click Reschedule on the toolbar. The agent’s shift reverts to the original shift time, allowing the agent to work according to the original schedule. The agent’s schedule is updated with the changes and the details of the updated schedule is displayed in the Schedules page.

