
Create a contact list template
Prerequisites
- Outbound > Contact List > Add, Delete, Edit, View permissions
- Outbound > Contact List Template > Add, Delete, Edit, View permissions
- Outbound > Attempt Limits > View to add an attempt limit to the contact list
A file to upload in .csv format that is encoded in UTF-8 format
Create a contact list template to configure the columns required for building contact lists with an Import template. Use the contact list template and a contact list filter to create a reusable import template for building contact lists. Create a contact list template from the column information in a comma-separated values .csv formatted file.
To create a contact list template, follow these steps:
- Click Admin.
- Under Outbound, click List Management.
- Click the Contact List Templates tab.
- Click Create New.
- In the Contact List Template Name box, type a unique name. Names can contain spaces, numbers, and special characters, but must be unique.
- In Add columns to Contact List Template with CSV file box, click Browse.
- Select a .csv file and click Open. The Contact List Template Headers display. Note: When you use this contact list template to create contacts lists, the leading and trailing white space is removed from the contact field in the contact lists. If you do not want to remove the white space from your contact lists, switch the Trim leading/trailing white space toggle to No.
- In Contact List Columns, select the appropriate contact list columns to use by your contact list template when you create your contact lists. Contact lists can contain either or both phone numbers and email addresses. When you select phone numbers or email addresses, placeholders update and display as optional.
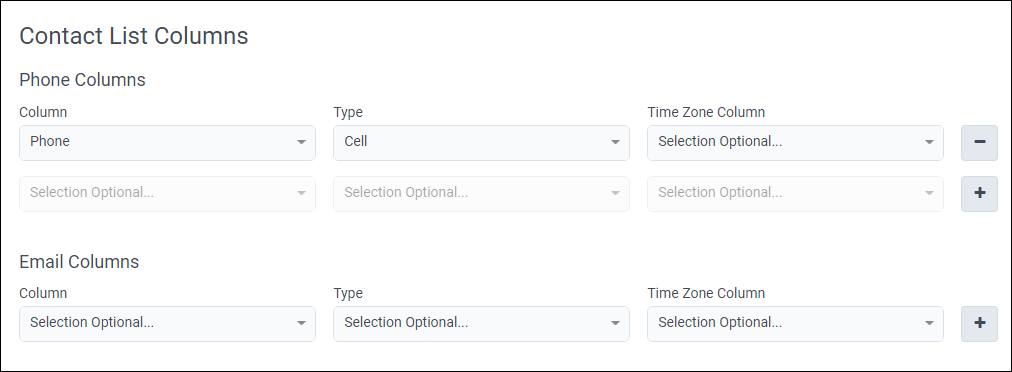
- To select phone numbers, follow these steps:
- In Phone Columns, in the Column box, select a column that contains phone numbers. Note: The maximum number of phone number columns allowed per list is 10.
- In the Phone Type box, select the type of number, for example, Home, Work, or Cell.
- If your contact list contains a column that contains the time zone of a phone number, select that column from the Time Zone Column box. This step is a prerequisite for configuring Contactable time sets. If you plan to use automatic time zone mapping, skip this step.
- To select another phone number column, repeat these steps.
- In Phone Columns, in the Column box, select a column that contains phone numbers.
- To select email addresses, follow these steps:
- In Email Columns, in the Column box, select a column that contains email addresses.Note: The maximum number of email address columns allowed per list is 10.
- From the Email Type box, select the type of email address, for example, Personal or Work.
- To select another email address column, repeat these steps.
- In Email Columns, in the Column box, select a column that contains email addresses.
- To select phone numbers, follow these steps:
- If you want the system to determine compliant dialing times for the phone numbers in the contact list, set Automatic Time Zone Mapping to Yes.Note: Automatic time zone mapping is supported only for phone numbers, not email addresses. Automatic time zone mapping is supported for United States, Canadian, and Caribbean area codes and United States zip codes only. For more information, see Automatic time zone mapping overview.
- If you set Automatic Time Zone Mapping to Yes and your contact list has a column that contains the zip code, from the Zip Code Column box, select Zip. Zip codes can be blank. For best results with automatic time zone mapping, use both phone numbers and zip codes.

- To use dynamic sorting in a campaign, specify the data type for the columns to use for sorting.
- Select Advanced, and for Column Data Type Specifications, in the Column box, select the columns to sort.
- Select the Data Type and properties for a selected column.
Data Type Properties Numeric Min Max
Specify the minimum and maximum acceptable values for the selected column.Text Max Length
Specify the maximum character length for the selected column.
The maximum length of all text columns combined cannot be greater than 750 characters.Timestamp Requires the standard ISO format YYYY-MM-dd'T'HH:mm'Z'
Acceptable formats are:
2017-07-15T15:45Z for minutes precision

2017-07-15T15:00Z for hour precision

2017-07-15T00:00Z for day precisionNote: You can go back and edit a saved contact list template.
- To create the new Contact List template, click Save.
To work with your contact list templates, from the Outbound > List Management > Contact List Templates tab, select a Contact list template. You can Edit, Copy, or Delete your templates.