
Change Windows desktop app preferences
Change notification, general, chat, password, voicemail PIN, and language settings in the Windows desktop app in Preferences. See Download the desktop app to get the free application.
To access Preferences, from the sidebar, click your profile picture. Then click Preferences.
From the list select the preference that you would like to update.
Genesys Cloud alerts you to events including new direct and group chat messages and incoming calls. You can control these notifications.
From Preferences, click Notifications. Customize your notification preferences:
| Setting | Description |
|---|---|
| Allow Pop-up Notifications |
Choose whether you receive notifications on your desktop.
To see how and where notifications appear, click Send test notification. |
| Disable Device Profile Notifications |
Choose whether to receive notifications about connecting or reconnecting audio devices. |
| Show Pop-up Notifications for Group Chats. |
Choose whether you receive notifications about new group chat messages. Direct messages and mentions in group chat rooms always create a notification, even if you hide all group chat notifications.
Note: To see the Show Pop-up Notifications for Group Chats option, first select the Allow Pop-up Notifications check box. If you do not Allow Pop-up Notifications, then you do not receive group chat notifications. |
| Play Sound | Choose whether notifications make a sound. If you do not have desktop notifications enabled, sounds do not play for messages even if you select the Play Sounds check box. |
| Sound to Play | If you chose to play sounds for notifications, you can choose the sound you prefer to hear. |
| Flash Task Bar | Choose whether you want the Genesys Cloud app icon to flash in the taskbar when you receive a new message. If you enable this setting, it flashes even if you have not selected the Enable Desktop Notifications check box. |
Change the default settings for open at startup and share your current location.
From Preferences, click General. Customize your general preferences.
| Setting | Description |
|---|---|
| Launch application on startup |
Select to open the Windows desktop app at startup. |
| Let Genesys Cloud determine your current location |
Select to share your current geolocation with other users. |
| Select a download location | To specify a different location to save downloads, click Change… |
You can change how chats and the chat roster appear.
From Preferences, click Chat. You can also access chat preferences from the chat panel. You can adjust the following preferences:
| Category | Settings |
|---|---|
| Sort Order |
Choose how Genesys Cloud lists chat rooms in the chat roster.
|
| Set Notification Volume |
To open the Sound preferences, click Set Notification Volume. Adjust the slider for the Chat Notification Volume setting. |
| Media |
Choose how media, such as images, social media, and videos, appear in your chats.
For more information about images and media in chats, see Send media and files in a chat. |
| Display Density |
Choose the amount of spacing between chat room names in the chat roster.
|
| GIPHY Keyboard |
When using the /giphy chat command, choose how you want the gif selection to appear.
Note: Your admin can disable the /giphy function. |
To change your password, from Preferences, click Password.
- Complete the three fields. As you type the new password, Genesys Cloud prompts you with suggestions to meet the requirements. The default password requirements are as follows:
- The minimum length is eight characters.
- The maximum length for a password is 400 characters.
- Passwords must contain at least one number, one special character, one uppercase letter, and one lowercase letter.
- You cannot reuse any of your previous 10 passwords.Notes:
- Your administrator can set different minimum and maximum requirements for your organization.
- Do not copy and paste a password to set it. If your password contains double-byte characters (for example, Japanese or Chinese characters), you cannot log in later with the keyboard.
-
After you complete the fields, click Change Password.
Note: If your new password doesn’t fit your organization’s minimum and maximum requirements, Genesys Cloud displays a message with suggested changes to meet the requirements. - Use your new password the next time you log in to Genesys Cloud.
Use your voicemail PIN to access your voicemail from your phone when you are not logged on Genesys Cloud.
To change your voicemail PIN, from Preferences, click Voicemail PIN.
- Enter your new PIN in the fields.
- Click Change PIN.
- From Preferences, click Language.
- From the list, click the name of your preferred language.
- Click Apply and reload. Genesys Cloud refreshes with your language selection.Note: This procedure changes your language preference for this session. For more information about how to change your language preference for future sessions, see Log in for the first time.
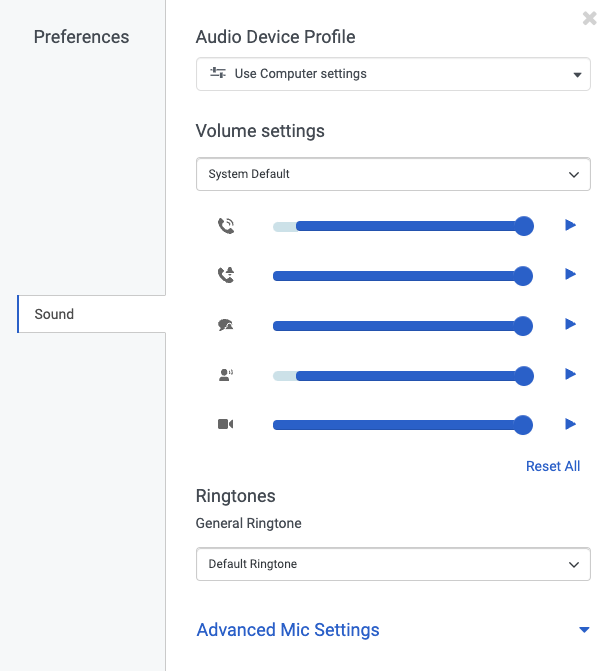
Audio Device Profile
You can test and adjust sound levels for input and output devices and set up audio profiles in your sound preferences. For more information about audio device profiles, see Create a new audio profile.
Volume settings
To adjust and test your sound preferences, do the following:
- From the device list, select the device you want to adjust.
- Move the slider to adjust the volume levels for these settings:

Call Volume The volume level for the incoming voice on a WebRTC call. 
Phone Ringer Volume The volume level for incoming phone call alerts. 
Chat Notification Volume The volume level for incoming chat alerts. 
Interaction Notification Volume The volume level for agents' incoming interaction alerts. 
Video Notification Volume The volume for video notifications. - To test the volume levels for each setting, click Play .
Ringtones
- From the list, select a ringtone. Genesys Cloud plays a sample of the ringtone.
- (Optional) Repeat step 1 until you find the ringtone that you want to use.
Advanced mic settings
Genesys Cloud's microphone sound processing provides the best audio experience for most environments. In some environments, you may improve the audio experience by disabling some or all microphone sound processing.
To change advanced microphone settings, follow these steps:
- Click Advanced Mic Settings. The panel expands to show the advanced microphone settings.
- Disable or enable the following settings:
- Automatic Mic Gain controls microphone volume levels. Disable this option if you experience microphone volume fluctuation.
- Echo Cancellation removes from the microphone sound that comes through your speakers. If you do not use speakers, this option has no effect on your sound quality.
- Noise Suppression removes background noise. In some situations, the microphone may be unable to separate your voice from the noises around you. Try to position your microphone closer to your mouth and speak louder before you disable this option.
You can set your preference for how you want to join video chats.
To set your video preferences, from Preferences, click Video.
- To join video chats with your microphone off, enable Mute my mic when joining.
- To join video chats with your video off, enable Disable my camera when joining.
- To join video chats automatically, without a confirmation window, enable Join conference automatically.
- To join video chats with video popped out, enable Always popout my video when joining.
You can set your preferred direct routing options.
To set your direct routing preferences, from Preferences, click Direct Routing.
Primary backup
- Under Primary Back up, click Select Primary Backup Routing Options.
- Click one of the following options.
- Queue: To specify a queue as your primary backup, select Queue. Under Queue, click Select Primary Backup Queue and begin to type the name of the queue. Click the queue when it appears in the list.
- User: To specify another user as your primary back, select User and follow these steps.
- Under User, click Select Primary Backup User and begin to type the name of the user and click the user when they appear in the list.
- (Optional) To set a queue as a secondary backup, under Secondary Backup, click None and begin to type the name of the queue and click the queue when it appears in the list.
- (Optional) To bypass the configured timeout and immediately forward interactions to your backup, enable Assign to backup immediately.
- To save your selections, click Save Changes. Or, to clear your direct routing preferences, click Clear Settings.