
Add a new activity plan
- Genesys Cloud CX 3, Genesys Cloud CX 4, Genesys Cloud CX 3 Digital, Genesys Cloud CX 1 WEM Add-on II, Genesys Cloud CX 2 WEM Add-on I, or Genesys Cloud EX license
- Workforce Management > Activity Plan > Add and View permission
To add a new activity plan, perform the following steps:
- Click Admin.
- Under Workforce Management, click Activity Plans.
- Click Menu > Workforce Management > Scheduling > Activity Plans.
- From the Business Unit list, in the upper right corner, select the business unit.
- Click New Activity. The New Activity page opens.
- In the Activity Plan Name field, enter a name and click the tick.
- Update the fields as required in the General, Attendees, Facilitators, Service Goal Override, and Session Availability tabs.
- Click Create to create the activity plan or click Create and Run Now to create and run the activity plan.
The following tabs list and describe the fields that are available in each tab of the New Activity view. For more information, click a tab.
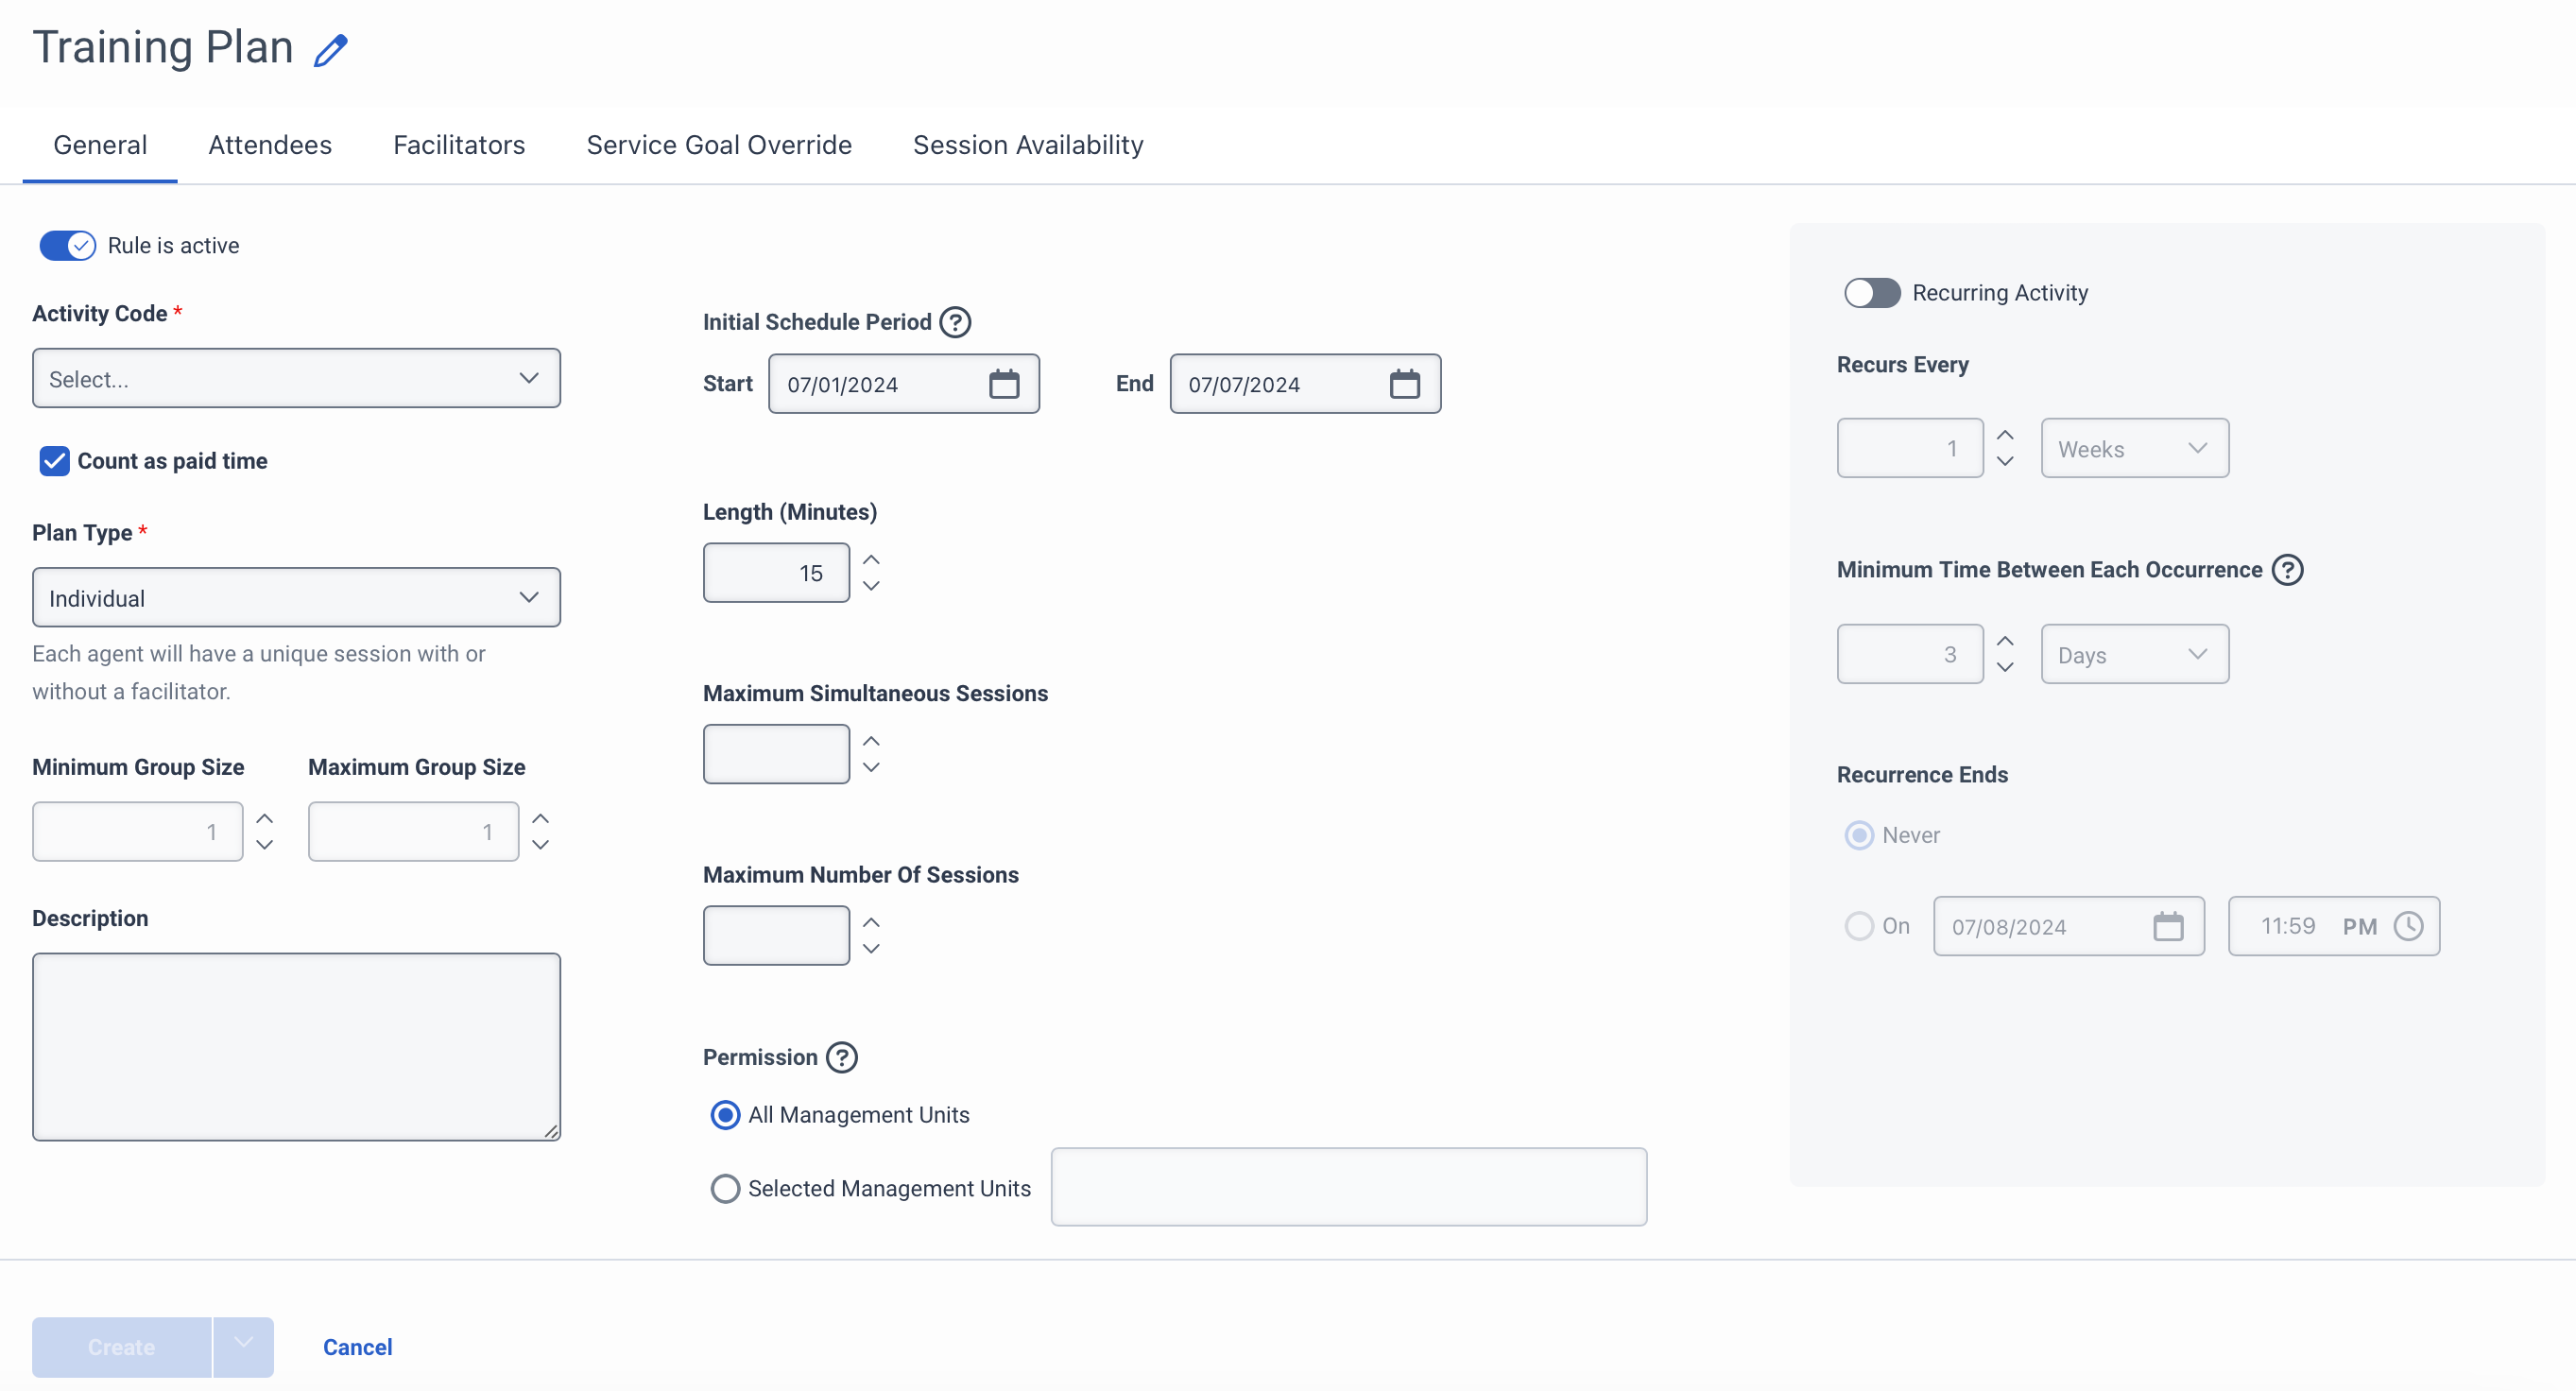
Based on the values that you set on the General tab, the values in the other tabs are populated. The following table describes the fields on the General tab.
| Field | Description |
|---|---|
| Rule is active | Indicates whether the activity plan is active. |
| Activity Code |
Select the activity code under which the activity plan needs to be created. The activity codes displayed here are based on the configuration made in the Activity Code page. The activity codes available for selection are:
For information about activity codes, see Add an activity code. |
| Count as paid time | Indicates whether the activity is considered as paid time. |
| Plan Type |
Indicates the type of activity plan selected. You can select the type based on the activity you are setting up. The plan types are as follows:
|
| Minimum Group Size | Indicates the minimum number of groups for the activity plan. This field is active only when you set the Plan Type field to Group. The minimum number that you can assign to this field is 1. |
| Maximum Group Size | Indicates the maximum number of groups for the activity plan. This field is active only when you set the Plan Type field to Group. The maximum number that you can assign to this field is 6000. |
| Description | Include a short description of the activity plan to help other administrators understand what is being scheduled by the plan. |
| Initial Schedule Period |
Indicates the first occurrence of the activity. You can set the date range with the start and end fields. These fields, by default, select the upcoming week. Click the Start and End field Calendar icons to set the start and end dates, respectively. icon and set the start date.
|
| Length (Minutes) | Indicates the length of the interval allowed in between sessions. The default value is 5 minutes and increments there forth. |
| Maximum Simultaneous Sessions | Indicates the number of sessions happening simultaneously. The minimum number of simultaneous sessions is 1 and the maximum number is 6000. |
| Maximum Number of Sessions | Indicates the maximum number of sessions for the activity. |
| Permission |
Indicates whether the activity plan applies to all management units or only to specific management units in the business unit. |
| Recurring Activity | Indicates whether this activity is recurring. The fields in this section are active only when you enable this field. |
| Recurs every |
Indicates whether the activity is recurring in days or weeks. This field is available for edit only when the Recurring Activity toggle is enabled.
|
| Minimum Time Between Each Occurrence |
Indicates the minimum time between each occurrence in days or weeks. This field is available for edit only when the Recurring Activity toggle is enabled.
Note: The system stores up to 1000 occurrences.
|
| Recurrence Ends |
Indicates when the recurrence is ending. The options available are as follows:
|
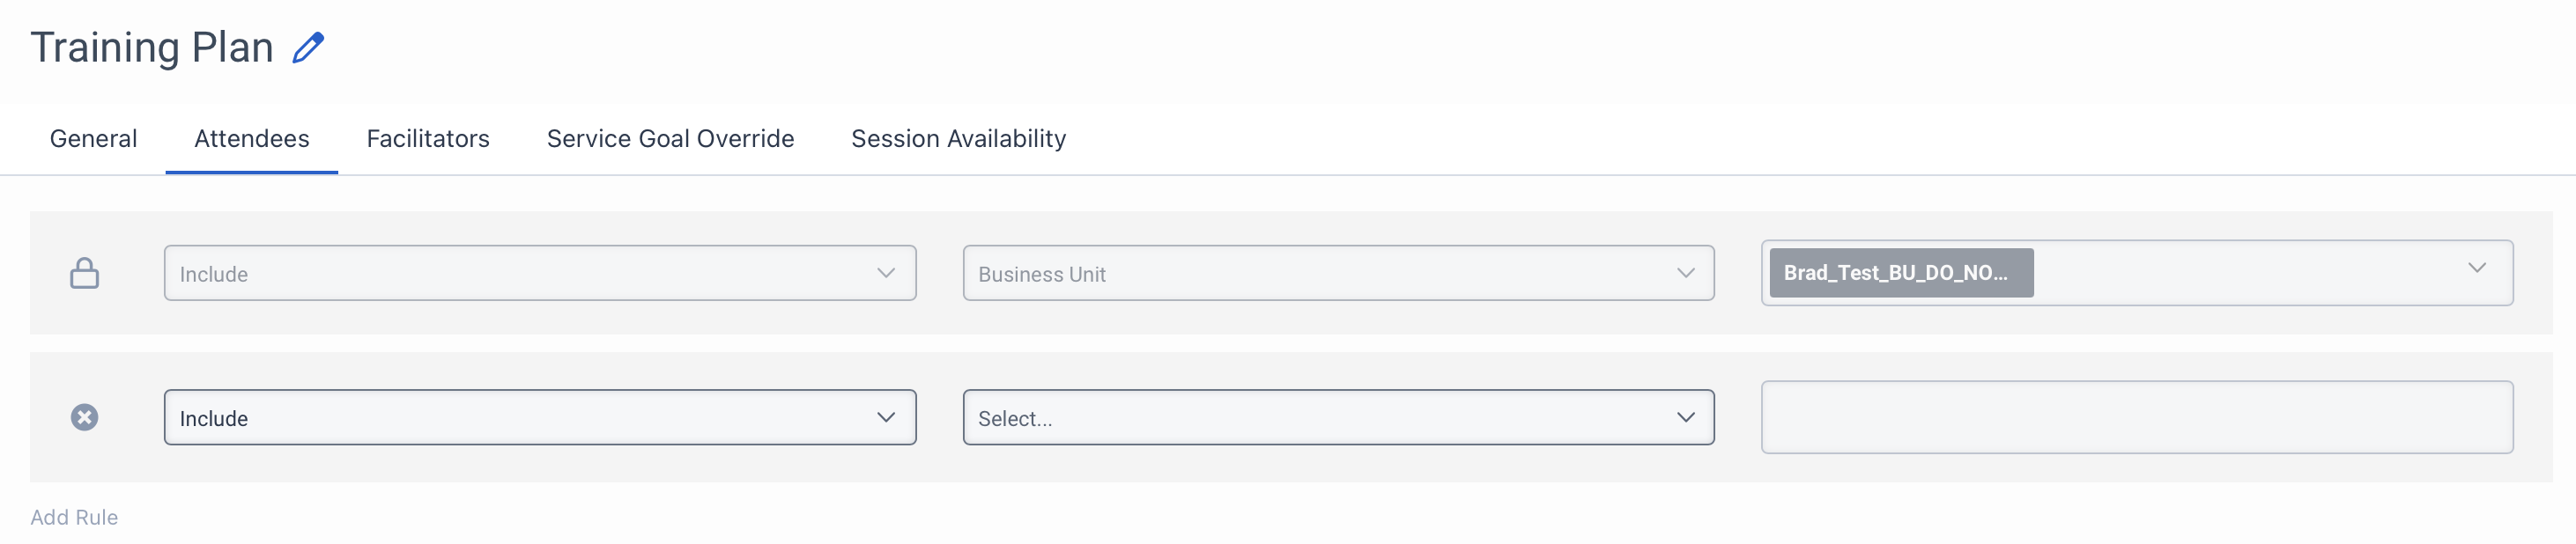
The following table describes the fields on the Attendees tab.
| Field | Description |
|---|---|
|
Include/Exclude
|
Indicates whether the attendee should be included or excluded. The business unit and the management units selected in the Permission field in the General tab are added by default. You cannot modify these entries. If you want to include or exclude anyone in particular, you can click Add Rule available at the bottom of the last entry. Note: When the row indicates a , it means that the entries are complete and you cannot modify them. When it indicates , it means that the row is available for entries.
|
| Select | Indicates whether it is a business unit or management unit or user that you want to add to the activity plan. Select an option from the drop-down. This field is available for selection only for those entries that you manually add. |
| Details |
Indicates the management unit or user detail that you want to add to the activity plan. The format of this field depends on what you select in the Select field. If you select:
Note: When you select management units and users, the system checks whether the management units are under the business unit and if the users are under the management unit and business unit.
|
| Add Rule |
Adds a new row and data can be selected as required. |
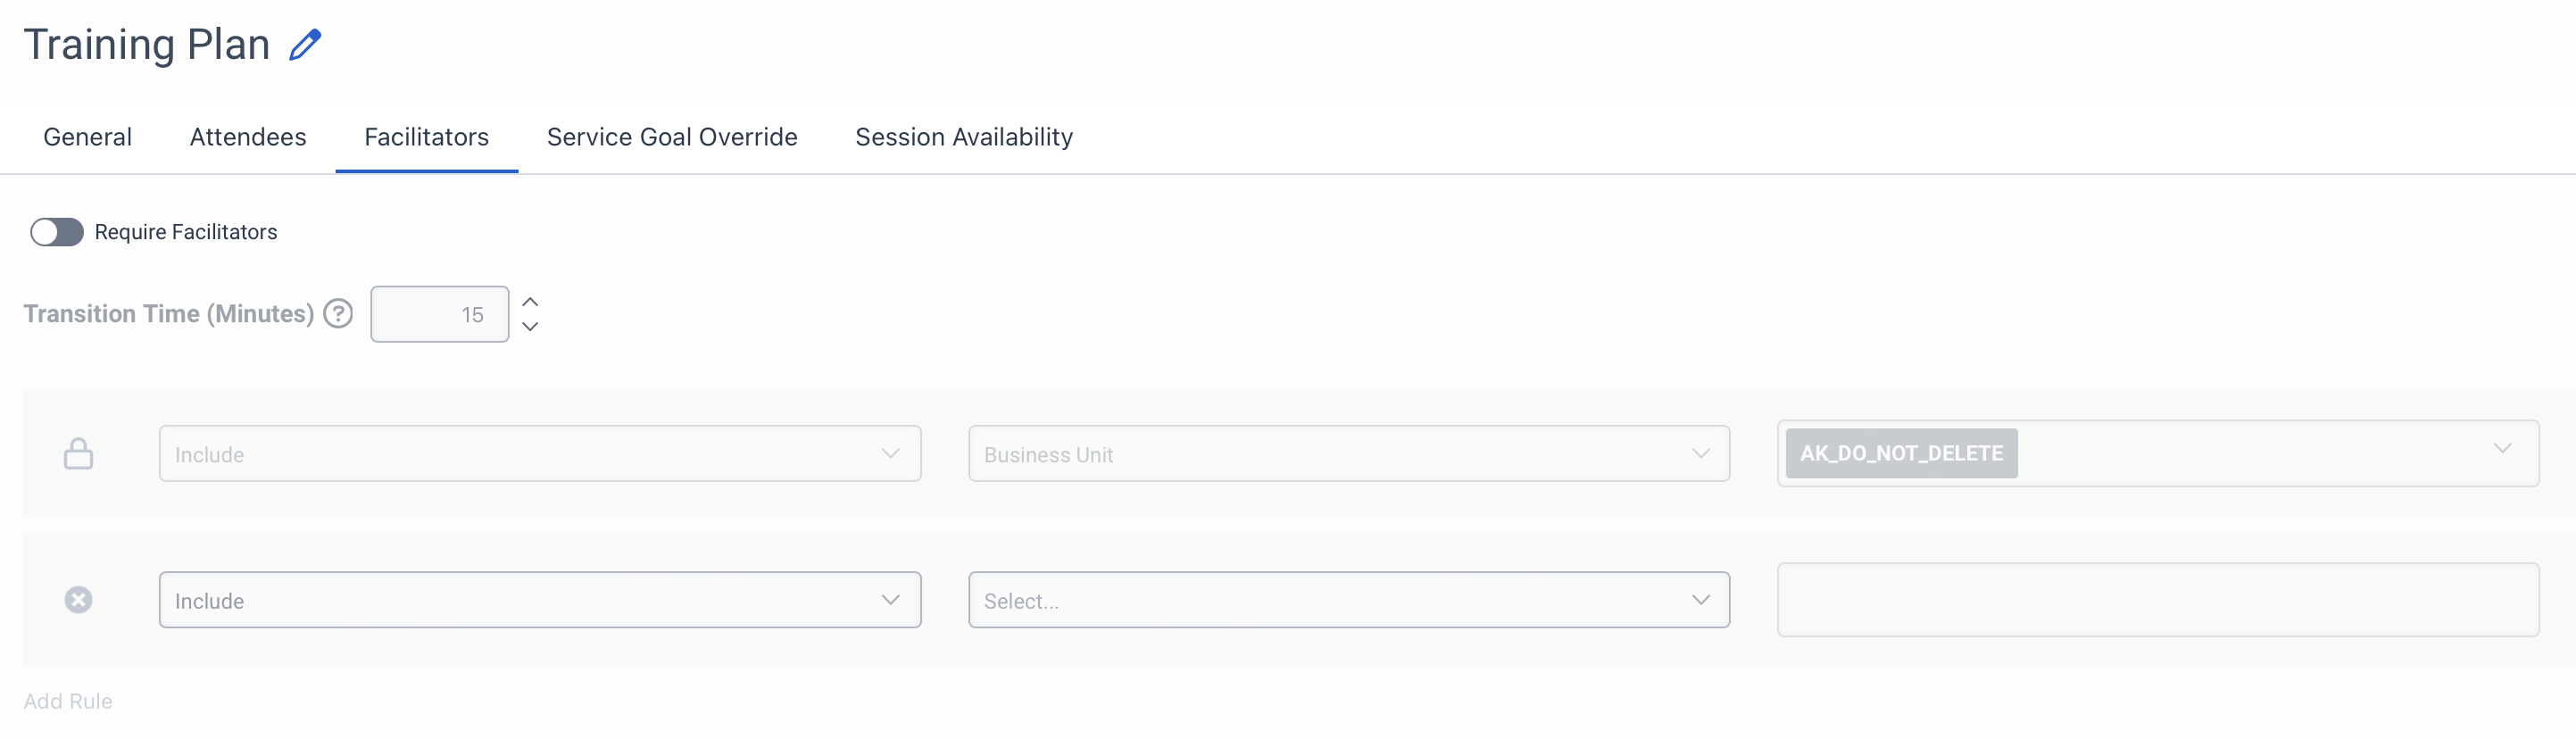
The following table describes the fields on the Facilitators tab.
| Field | Description |
|---|---|
|
Require Facilitators |
Enable this toggle to indicate that facilitators are required for this activity plan. You can add or modify values on this tab only when you enable this toggle. If you enable this toggle, then it is mandatory to have an internal facilitator for every session. For example, if there is a session that is available based on the agents’ availability but if the facilitator is not available, then no sessions are generated. If you are planning for an external facilitator, you need not enable this toggle. You can check for session details directly on the Session Availability tab. |
|
Transition time (Minutes) |
Indicates the transition time in minutes. A facilitator can handle multiple sessions and this transition time helps the facilitator to take a break and move to the next session. |
|
Include/Exclude |
Indicates whether the facilitator is included or excluded. The business unit and the management units selected in the Permission field in the General tab are added by default. You cannot modify these entries. If you want to include or exclude anyone in particular, you can click Add Rule available at the bottom of the last entry. Note: When the row indicates a , it means that the entries are complete and you cannot modify them. When it indicates a , it means that the row is available for entries.
|
| Select |
Indicates whether it is a business unit or user that you want to add to the activity plan. Select the option from the drop-down. This field is available for selection only for those entries that you manually add. Note: You can have a collection of users listed as facilitators. However, for an activity plan, you can select only one facilitator per session.
If you include a user in both Attendee and Facilitator tabs, then the system includes the user automatically to the Facilitator tab as a facilitator. |
| Details |
Indicates the management unit or user detail that you want to add to the activity plan. The format of this field depends on what you select in the Select field. If you select:
Note: When you select the management units and users, the system checks whether the management unit are under the business unit and if the users are under the management unit and business unit.
|
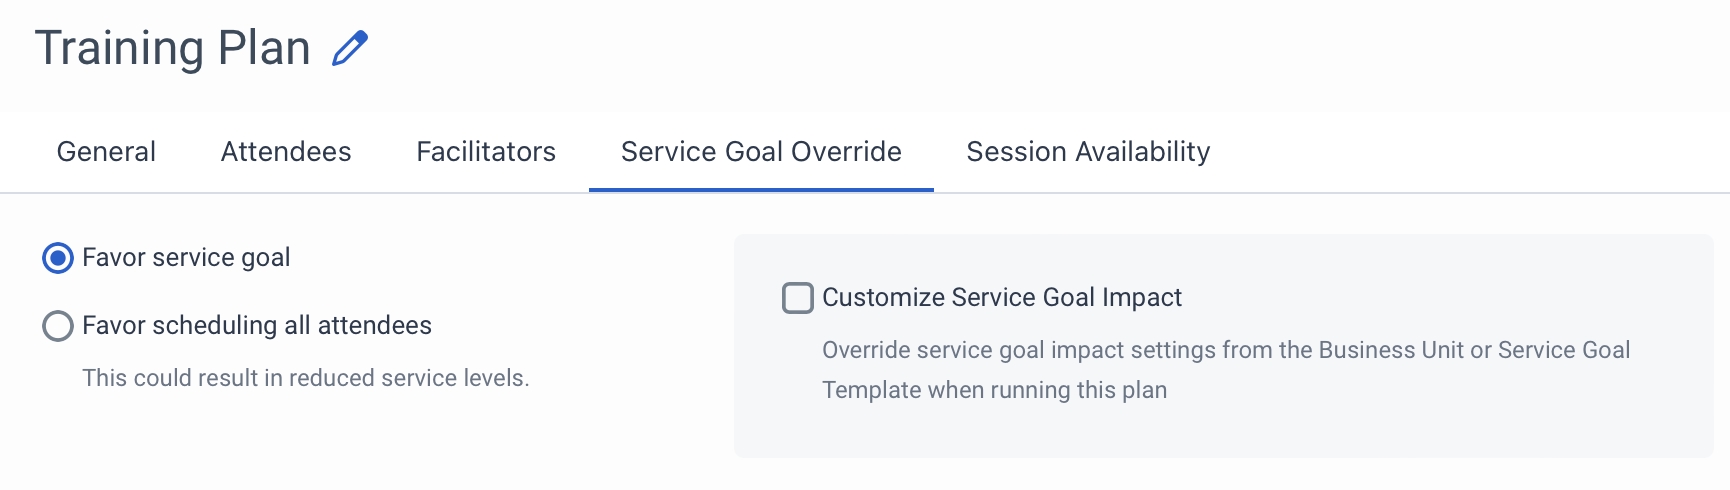
The following table describes the fields on the Service Goal Override tab.
| Field | Description |
|---|---|
| Favor service goal | Indicates that the activity plan is in favor of the service goal set at the business unit level and does not attempt to override any of the rules set in the service goal templates. Sessions are created based on the service goal of the business unit. The available session slots are not generated if the system detects any violations of service goals. |
| Favor scheduling all attendees | Indicates that the activity plan is in favor of the service goals set in the business units to which the attendees belong and tries to find sessions based on the criteria. Available session slots are generated even if the system detects any violations of service goals. This option might restrict the number of free slots for the activity plan. |
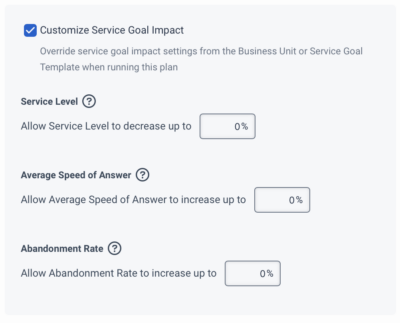
| Customize Service Goal Impact |
Indicates that the activity plan has a customized service goal template. These values you set here override the settings available the business unit level. When you select this option, additional fields are displayed.
Set the percentage value in each field. For more information about service goal templates, see Service goal templates overview. |
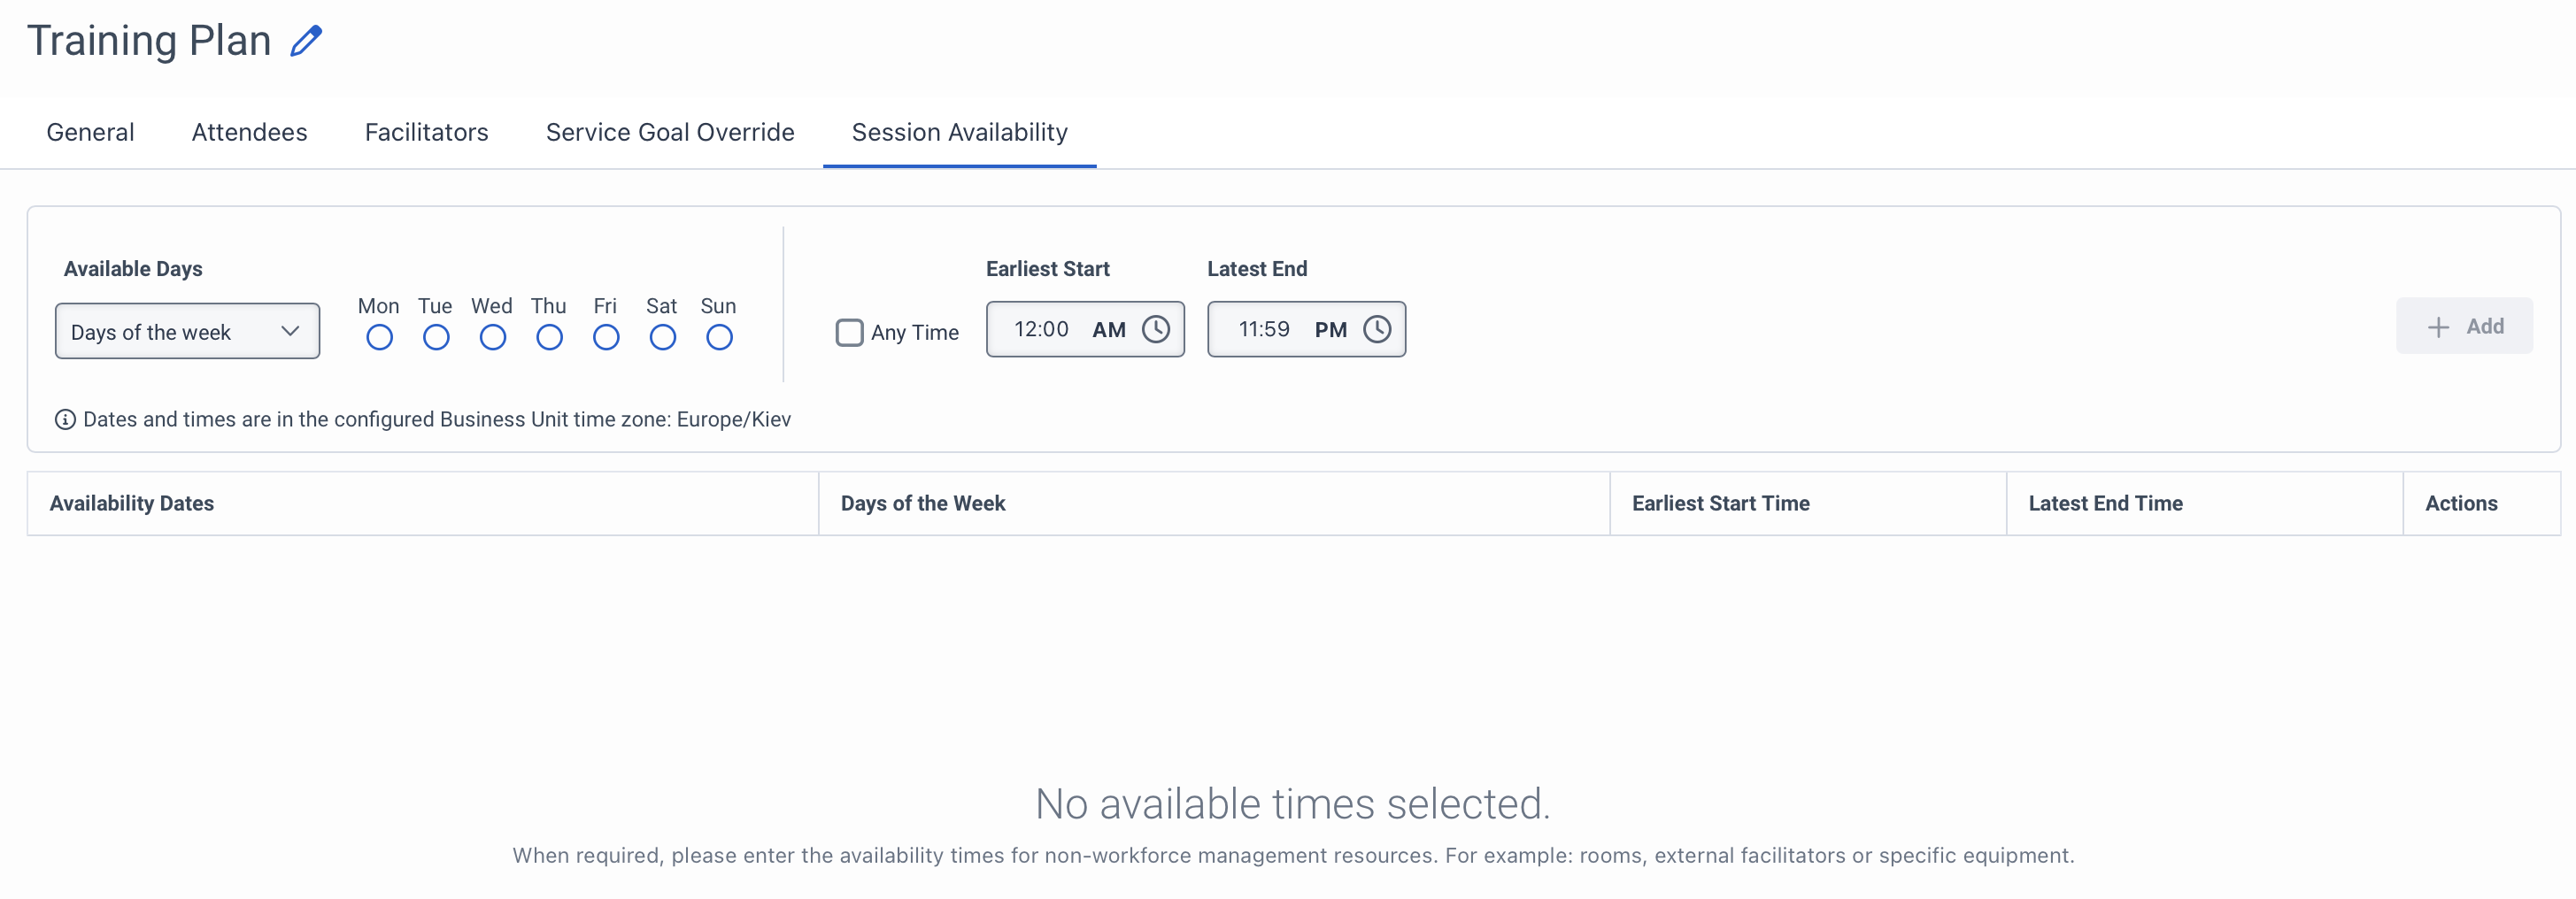
The following table describes the fields on the Session Availability tab.
| Field | Description |
|---|---|
| Available days |
Allows you to specify the availability of the external facilitators. The system performs a search based on the days you select here. You can choose any of the following values:
|
| Any Time | Indicates that all available times can be listed in the section below. |
| Earliest Start | Indicates the time that can be used as the start time. Click the Clock icon to select the start time. |
| Latest End | Indicates the time that can be used as the end time. Click the Clock icon to select the end time. |
| Add | This button displays when all fields are duly populated. Click to add the available time to the table. |
| Availability Dates | Displays the available dates. To create a best time, the system first checks for the available time of the contact provided on the Facilitators tab through the published schedule of the attendees and facilitators. Based on the best available timings, the available sessions appear. Since data of external facilitators is not available in Genesys Cloud, you need to manually enter the details. Details of internal facilitators are added to the Facilitators tab. |
| Days of the Week | Displays the selected days of the week. |
| Earliest Start Time | Displays the start time when you select this option. If you selected the Any Time option, then this field displays the text Any Time. |
| Latest End Time | Displays the end time when you select this option. If you selected the Any Time option, then this field displays the text Any Time. |
| Actions | Click the three dots to view and select the Edit and Delete options as needed. |