
Enable remote access to voicemail
To enable users to access and manage their voicemail remotely, follow these steps:
Note: When a user wants to access their voicemail remotely, Genesys Cloud prompts them to enter their extension and passcode. The passcode is the user’s voicemail PIN. If the user provides an incorrect passcode four times, Genesys Cloud disconnects the call. For security reasons, the call also disconnects if a passcode is not configured for the user. For more information about extension assignment and voicemail PIN, see the Suggested Articles.
- From the Architect home page, click or hover over the Flows menu and select Inbound Call.
- Click Add. The Create ‘Inbound Call Flow’ dialog box opens.
- In the Name field, enter a unique name for the flow.
- (Optional) In the Description field, add a short sentence or phrase to describe this flow.
- Click the Default Language list and select the flow’s default supported language.
- Click the Divisions list and select the division in which to place the flow.
- Click Create Flow. The flow’s configuration page opens.
- Perform one of the following steps:
- Click Task under Reusable Tasks.
- From the Toolbox, expand the Task category and drag a Task action into the Reusable Tasks area.
- Click the name of the Task in the design area, type a distinctive name, and click Done.
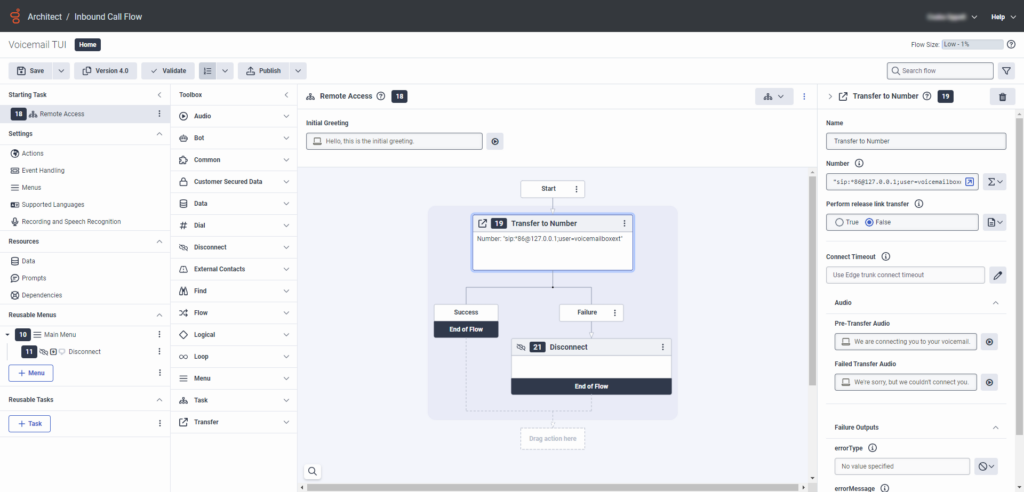
- From the toolbox, expand the Transfer category and drag a Transfer to Number action below Start in the task editor.
- To set the number via an expression to transfer the call to a remote voicemail retrieval address, click to enter expression mode, select Expression, and add the
"sip:*86@127.0.0.1;user=voicemailboxext"expression inline. - (Optional) Configure a prompt to play before the call transfers to the caller’s voicemail.
- (Optional) Configure a prompt to play if the transfer action detects a failure.
- From the toolbox, expand the Disconnect category and drag a Disconnect action below the Failure path of the Transfer to Number action.Click the image to enlarge.
- To set your newly configured task as the starting task in place of the starting menu, click next to the task under Resuable Tasks and select Set this as the starting task. Notice that the reusable task moves up to become the Starting Task, and the Initial Greeting now appears in the Starting Task‘s design area. Also, the Main Menu moves to the bottom of the page to Reusable Menus.
- (Optional) In the Starting Tasks‘s design area, customize the initial greeting.
- Save and publish the flow.
