
Extension pools
Add a single extension or a range of extension numbers and assign them to a division within your organization.
- Click Admin.
- Under Telephony, click Extensions.
- Click Menu > Channels > Telephony > Extensions.
- Click the Extension Pools tab.
- Click Add.
- In the Extension Start field, type the extension number that you want to add to the organization.
- Leave the Extension End field unchanged.
- From the Division list, select a division.
- Click Create.
The extension number is now available for assignment to a user.
| Column | Description |
|---|---|
| Extension Start | The single extension number, or the first sequential number in a range of extension numbers. |
| Extension End | The last sequential number in a range of extension numbers. This field is blank if only one extension number was entered in the Extension Start box. |
| Division | The division in your organization in which you want to place the extension. Note: Only people with Telephony > Extension Pool > View permission in this division can use this pool. For more information, see Divisions overview. |
- Click Admin.
- Under Telephony, click Extensions.
- Click Menu > Channels > Telephony > Extensions.
- Click the Extension Pools tab.
- Click Add.
- In the Extension Start field, type the first sequential extension number for the range that you want to assign to the organization.
- In the Extension End field, type the last sequential extension number for the range that you want to assign to the organization.
- From the Division list, select a division.
- Click Create.
The extension numbers are now available for assignment to users.
| Column | Description |
|---|---|
| Extension Start | The single extension number, or the first sequential number in a range of extension numbers. |
| Extension End | The last sequential number in a range of extension numbers. This field is blank if only one extension number was entered in the Extension Start box. |
| Division | The division in your organization in which you want to place the extension. Note: Only people with Telephony > Extension Pool > View permission in this division can use this pool. For more information, see Divisions overview. |
- Click Admin.
- Under People and Permissions, click People.
- Click Menu > People and Permissions > People Directory.
- In the Search field, begin typing the user's first or last name and click Edit Person next to the appropriate match. The user's profile displays.
- In the Person Details tab, click View Edit Mode.
- In Contact Information, click Edit.
- Under Phone, find the phone number that you want to add the extension number to and type it in the ext. field.
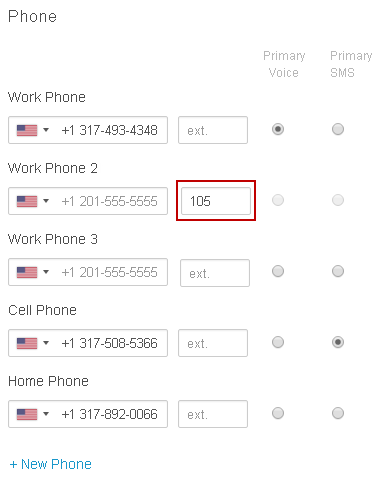 Note: Do not add an extension number in a Work Phone entry that contains a previously entered phone number. This action prevents Genesys Cloud from generating a dial plan for the user, and the extension does not appear in the list of extensions on the Assignments page. Add the extension number in an empty Work Phone entry.
 - Click Save.
If the extension number you want to remove exists within a range, you must delete the entire range of extensions. You cannot delete a single extension from a range unless it was originally entered as a single extension number. Also, you cannot delete an extension pool when an extension within the pool's range is assigned to a user.
- Click Admin.
- Under Telephony, click Extensions.
- Click Menu > Channels > Telephony > Extensions.
- Click the Extension Pools tab.
- Select the extension number or range of numbers that you want to remove.
- Click More .
- From the menu that appears, click Delete.
- When you see the confirmation dialog, click Yes, Delete.
| Task | Description | ||||||||
|---|---|---|---|---|---|---|---|---|---|
| Rearrange columns |
Click any column and drag it to a new position. |
||||||||
| Add/Remove columns |
You can customize the Extension Pools view by adding and removing columns. Use Choose the data to display and select next to the columns you want to display.
To return the Extension Pools view to its default configuration, clear all the check boxes and click Save. |
||||||||
| Set row density |
You can customize the Extension Pools view with the row density setting. Use Choose the data to display and select one of the row density options. Comfy increases the amount of space between rows and Compact condenses the amount of space between rows. |