Series: Set up a call center in Salesforce
Configure client events
- Configure call center settings
- Set up a call center in Salesforce
- Change the region of your Genesys Cloud organization
- Configure call center settings
- Configure Omni-Channel sync
- Configure country codes
- Map interaction attributes to Salesforce activity fields
- Configure call controls
- Customize interaction details
- Configure search in Salesforce
- Configure extension points
- Use different configurations for different agents
- Configure Omni-Channel sync
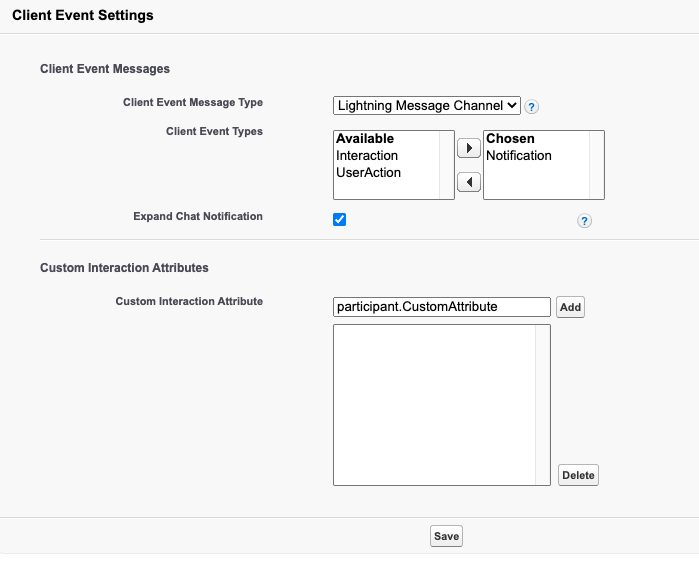
The Client Event Settings section allows you to configure client event messages and add custom interaction attributes. In the Client Event Messages section, you can configure the integration to fire Interaction, Notification, or UserAction events in Lightning Experience and to include message content in chat notification payloads. In the Custom Interaction Attributes section, you can add custom interaction attributes to access data that you can use during an interaction.
- Click Setup.
- Search for Installed Packages.
- Under Build, click Installed Packages.
- On the Installed Packages page, click Configure next to the Genesys Cloud for Salesforce package.
- Under Client Event Settings, configure Client Event Messages and Custom Interaction Attributes.
- In the Client Event Messages section, tell the integration which message type to use for communication, which event types to listen for, and whether to include message content with chat notifications.
- For Client Event Message Type, select the message type that you want the integration to use to publish or listen for events in Lightning Experience.
This setting causes an event to fire whenever the client is loaded (postMessage API) or after a Lightning app subscribes to a channel (LMS).
Important: Genesys recommends that new development for Lightning Experience use Lightning Message Service (LMS), not the postMessage API. Salesforce plans to release LMS in Summer ’20. Genesys will eventually deprecate the use of the postMessage Web API.For more information, see Events in Salesforce.
Note: If you select postMessage API for Client Event Message Type, then agents will not be able to detach the client from the browser window. For more information, see Access the client. - For Client Event Types, select the event types under Available that you want the integration to publish events about. Click Arrow to add them under Chosen.
- Select Expand Chat Notification (for chat notification events).
This setting causes the integration to amend the chat notification payload with message content.
Important: This setting is unavailable until you configure Client Event Types to publish Notification events.
- For Client Event Message Type, select the message type that you want the integration to use to publish or listen for events in Lightning Experience.
- In the Custom Interaction Attributes section, add a custom interaction attribute.
This setting allows you to access and use data during an interaction. For example, after you add an attribute, you can then use the attribute in Architect flows or scripts to display knowledge articles about a particular topic to an agent or to screen pop information about contract deals for an agent to mention to a customer. For more information, see Events in Salesforce, About Architect, and About scripting.
- Add an attribute name.
You can use custom attributes or the default attributes used to map interaction attributes to Salesforce activity fields, some of which may already be present on the generic interaction.
The following table lists custom attributes that you can use. For more information about the default attributes, see Synchronize interaction attributes with Salesforce activity records.
Interaction attribute Interaction type Data type Description Participant.{ColumnName} Outbound dialing String Column name in campaign management contact list. See Contact list view. Participant.{CustomFieldName} Call, callback, email, message, ACD voicemail String Custom field name that is assigned using Set Participant Data in an Architect flow. See Set Participant Data. Chat String Custom field name that is used in the chat widget. - Click Add.
- To delete a custom interaction attribute, select the attribute and click Delete.
- Add an attribute name.
- Click Save.
For information about all steps necessary to set up a call center, see Set up a call center.
For more information about the integration, see About Genesys Cloud for Salesforce.


