
Series: Set up a call center in Salesforce
Configure Omni-Channel sync
- Configure client events
- Set up a call center in Salesforce
- Change the region of your Genesys Cloud organization
- Configure call center settings
- Configure client events
- Configure country codes
- Map interaction attributes to Salesforce activity fields
- Configure call controls
- Customize interaction details
- Configure search in Salesforce
- Configure extension points
- Use different configurations for different agents
- Configure country codes
- Use of Salesforce apps with console navigation
- Authentication configured (for secondary statuses only)
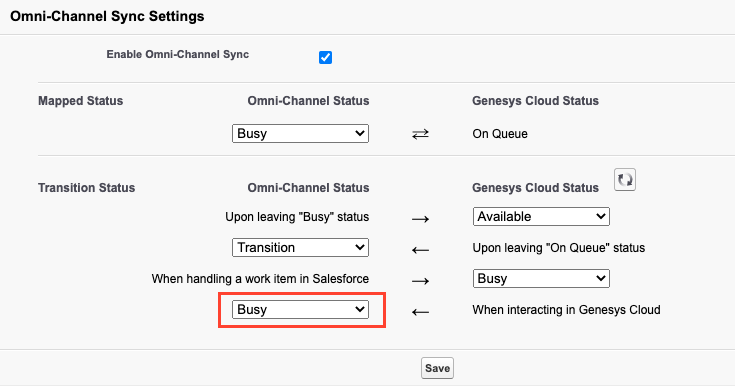
The Omni-Channel Sync Settings section allows you to map Omni-Channel statuses to Genesys Cloud statuses when you are On Queue, transitioning from On Queue, or handling a work item. For information about use cases for these settings, see How to use Omni-Channel sync.
After setting up a call center for the first time, select the statuses to sync between Salesforce Omni-Channel and Genesys Cloud for Salesforce.
- Click Setup.
- Search for Installed Packages.
- Under Build, click Installed Packages.
- On the Installed Packages page, click Configure next to the Genesys Cloud for Salesforce package.
- Under Choose a Call Center, select the version of the call center definition.
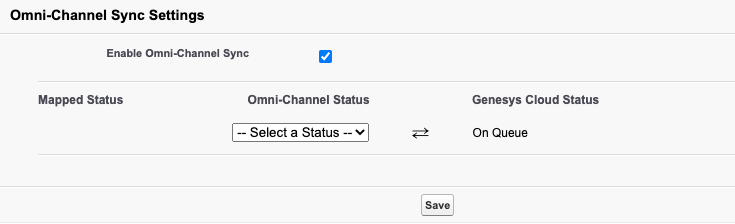
- Under Omni-Channel Sync Settings, select Enable Omni-Channel Sync.
By default, Enable Omni-Channel Sync is not selected.

After you select Enable Omni-Channel Sync, the Mapped Status section appears.
- In the Mapped Status section, select an Omni-Channel status from the menu.
This setting controls which Omni-Channel status syncs with On Queue in Genesys Cloud for Salesforce. When agents select the assigned status in one product, the corresponding status changes in the other product.
The Omni-Channel status indicates in Omni-Channel that agents are busy working on interactions in Genesys Cloud for Salesforce.
The statuses in the menu are pulled from the statuses that you set up in Salesforce. For more information, see Salesforce Omni-Channel.
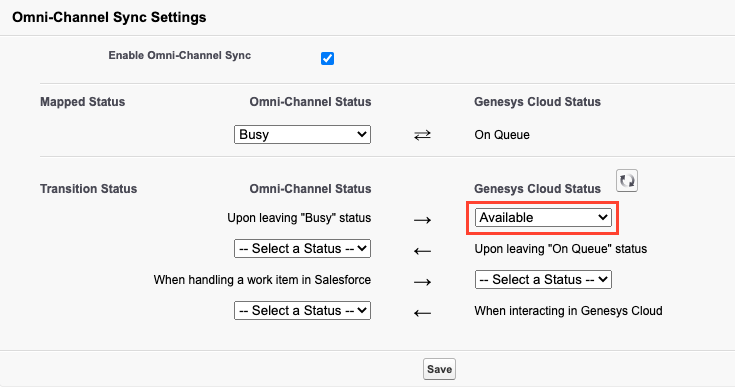
After you select the Omni-Channel status under Mapped Status, the Transition Status section appears.
- In the Transition Status section, select Omni-Channel and Genesys Cloud statuses from the menus.
These settings control which statuses appear when agents leave the statuses under Mapped Status and when they are handling work items in either product.
You can select either primary and secondary statuses in Genesys Cloud.
Important: To be able to select secondary statuses, the integration must first retrieve them from your Genesys Cloud organization. Make sure valid OAuth credentials exist for Authentication under Shared Settings. (For more information, see Create an OAuth client, OAuth client permissions, and Configure authentication.) Then click the Refresh button next to Genesys Cloud Status under Omni-Channel Sync Settings.- Select the Genesys Cloud status to appear in the client when agents leave the Omni-Channel status selected under Mapped Status.
In the example, Available ensures that agents do not receive interactions in Genesys Cloud for Salesforce immediately after changing their status from Busy in Omni-Channel.
The statuses in the menu are pulled from Genesys Cloud.
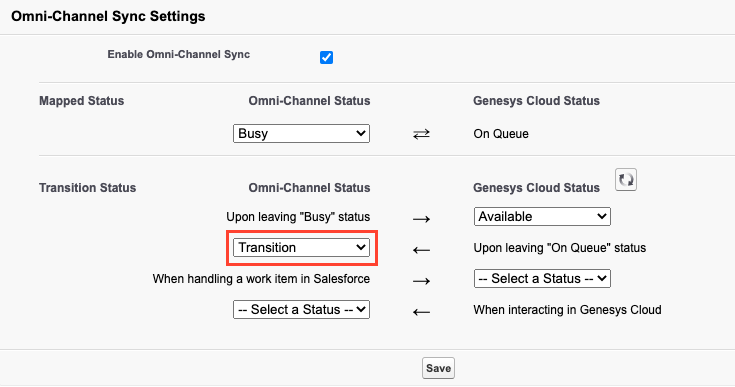
- Select the Omni-Channel status to appear in Omni-Channel when agents leave the Genesys Cloud status selected under Mapped Status.
In the example, Transition, a busy status that we created in Salesforce, ensures that agents do not receive interactions in Omni-Channel immediately after changing their status from On Queue in Genesys Cloud for Salesforce.
The statuses in the menu are pulled from statuses that you set up in Salesforce. For more information, see Salesforce Omni-Channel.
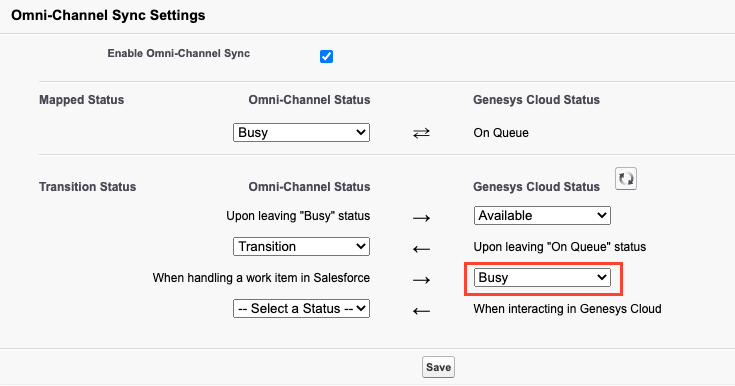
- Select the Genesys Cloud status to appear in the client when agents are handling a work item in Salesforce.
In the example, Busy ensures that agents do not receive interactions in Genesys Cloud for Salesforce when they are handling a work item in Salesforce.
The statuses in the menu are pulled from Genesys Cloud.
- Select the Omni-Channel status to appear in Omni-Channel when agents are handling work items in Genesys Cloud.
In the example, Busy ensures that agents do not receive interactions in Salesforce when they are handling an interaction in Genesys Cloud for Salesforce.
The statuses in the menu are pulled from statuses that you set up in Salesforce. For more information, see Salesforce Omni-Channel.
- Select the Genesys Cloud status to appear in the client when agents leave the Omni-Channel status selected under Mapped Status.
-
Click Save.
For information about all steps necessary to set up a call center, see Set up a call center.
For more information about the integration, see About Genesys Cloud for Salesforce.