
Work with quick replies in bot conversations
Quick replies are responses that users can select as a reply during a message interaction. When they select the quick reply, it becomes part of the message. After they send the response, the quick replies disappear, which prevents a scenario where customers can select replies attached to earlier messages in the interaction.
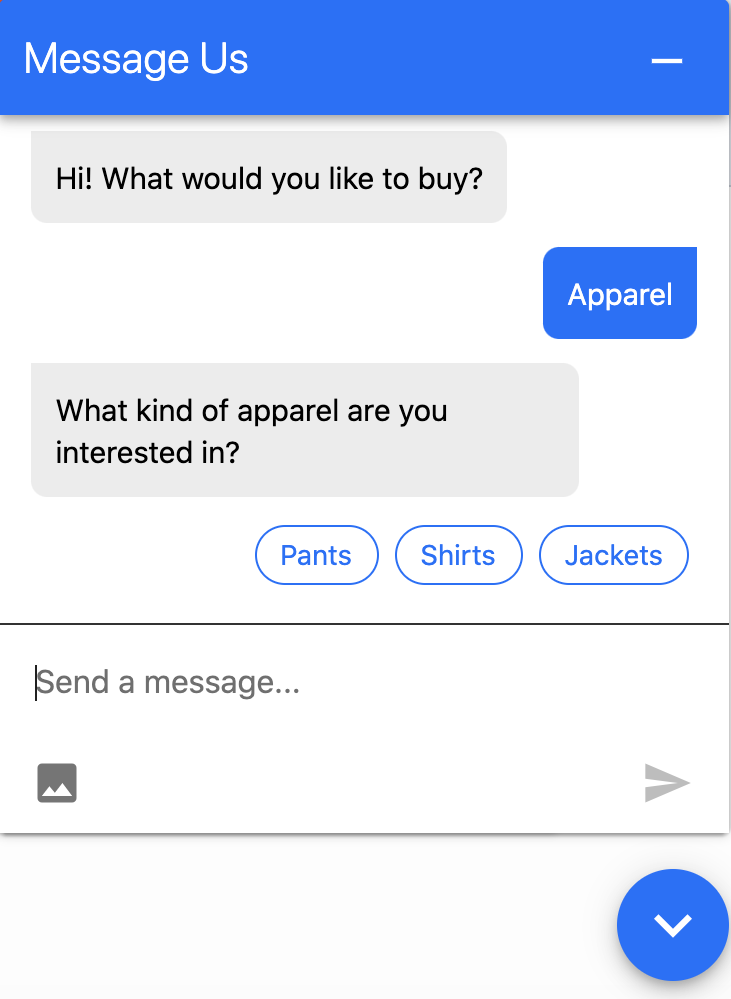
Example: Quick replies in Genesys Web Messenger
Bot and channel support
Quick replies allow for fast and structured responses and enable you to offer simple, guided answers to direct messages by choosing from a “yes or no” format, or from list of options. Quick replies facilitate bot conversations by enhancing the customer’s automated experience and more expediently resolving problems.
On most channels, quick replies are most beneficial when you limit them to five responses. If you want to incorporate more than the recommended number, consider letting users type their reply or look for ways to structure the message to group quick replies into five or fewer.
Currently supported bots:
- Genesys Dialog Engine Bot Flows
- Amazon Lex V1
- Google Cloud Dialogflow CX
- Google Cloud Dialogflow ES
- Digital Bot Connector
- BYOB Connector
- Nuance Mix
Currently supported channel targets include:
- Genesys Web Messenger
- Facebook Messenger
- WhatsApp Messenger
- Open Messaging Note: Before you can use this feature in Open Messaging, you must first create a configuration profile and select the appropriate Quick Reply message type. Then, assign it to your open messaging integration. For more information, see Create and assign a configuration profile.
When you configure quick replies in WhatsApp, keep the following considerations in mind:
- WhatsApp limits the initial displayed quick reply prompt to 20 characters or less. If you configure the initial prompt with more than 20 characters, then only the first 19 characters appear, followed by an ellipsis. The customer must click the prompt to view and select from the available options.
- The customer can select each button and is not limited to a single choice. Your bot behavior should account for scenarios in which the user may select multiple options.
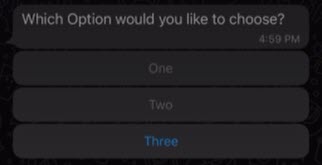
- WhatsApp supports three quick replies or less. If you configure more than three quick replies, then the message appears as a list.
For example, if you configure a message that asks, “Which option would you like to choose?” and include options of One, Two, and Three, then all buttons appear in the initial prompt to the customer:
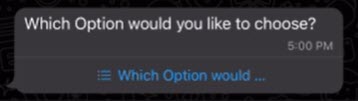
If you configure a message that asks, “Which option would you like to choose?” and then include options of One, Two, Three, Four, and Five, then a portion of the prompt phrase, specifically the first 23 characters followed by an ellipsis, appears as a clickable heading:
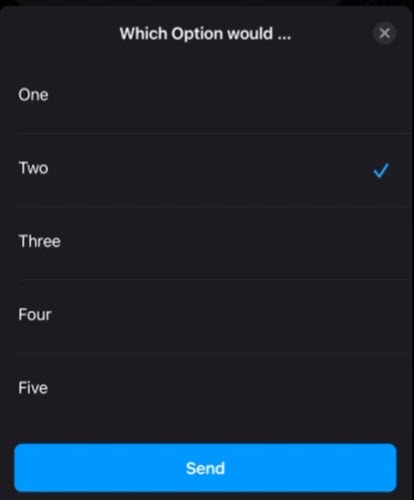
After the user clicks the question, WhatApp displays the choices in a separate dialog box:
Genesys Dialog Engine Bot Flows
These sections describe how to incorporate quick replies into your Genesys Dialog Engine Bot Flows, and include use case examples and other resources.
- The quick replies work with the Ask for Yes/No and Ask for Slot,Anything Else? Loop actions, and confirmation questions.
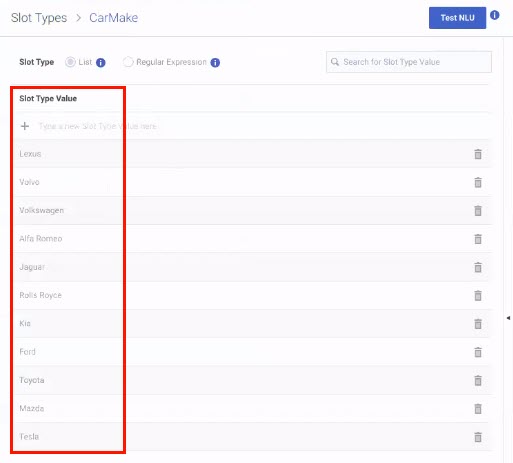
- During the slot creation process, for custom list types, add the quick replies that you want to present to customers when they encounter an Ask for Slot action.
- When you disable this option or use a NOT_SET boolean, quick replies are unavailable.
- For existing bot flows, this option is disabled by default.
- For new bot flows, this option is enabled by default.
- For quick reply buttons with no available textual element in the prompt, by default a question mark is added in place of text. This behavior also applies to image-only prompts.
- Open an existing bot flow or create a new one.
- Under Settings, click User Input.
- Under General, enable Automatic Quick Reply Buttons.
- Make any additional changes according to your flow design.
- Save and publish the flow.
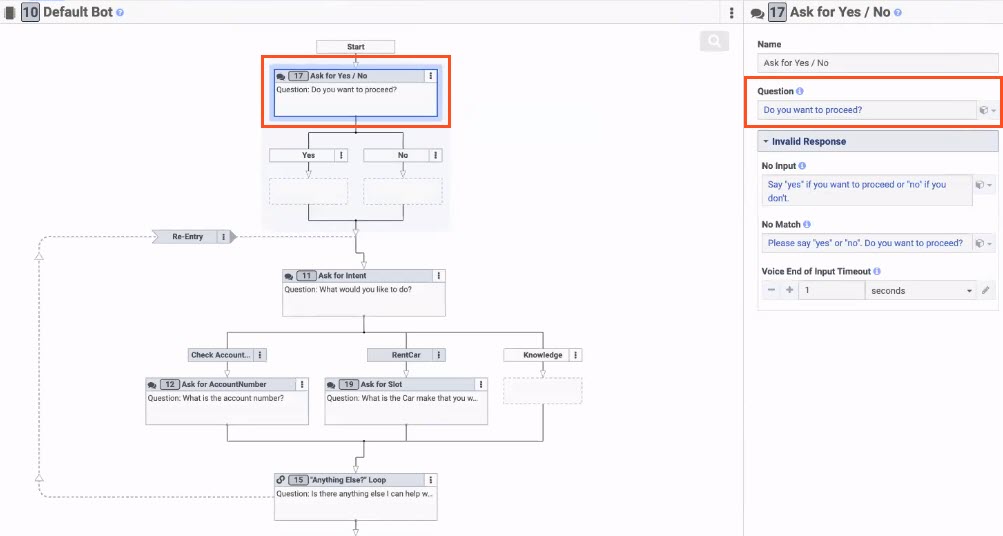
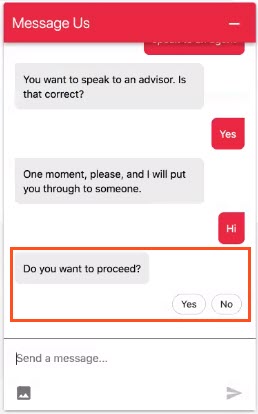
Click the images to enlarge.
Ask for Yes/No action in a bot flow
Ask for Yes/No in a bot conversation
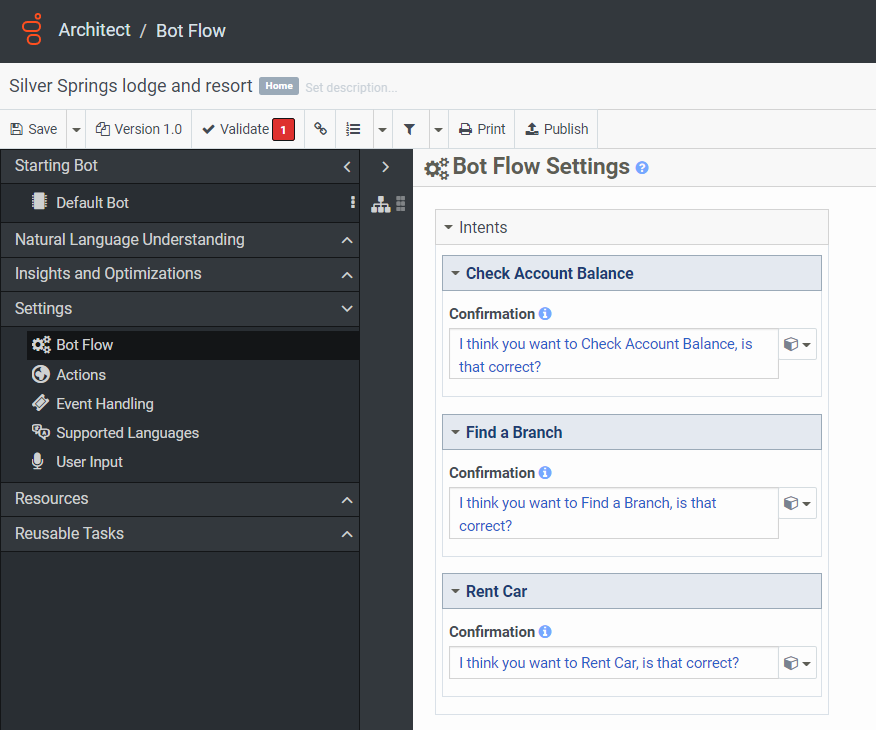
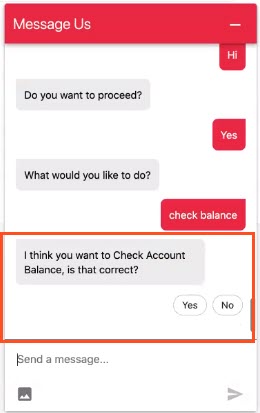
Click the images to enlarge.
Ask for Confirmations in a bot flow
Ask for Confirmations in a bot conversation
Click the images to enlarge.
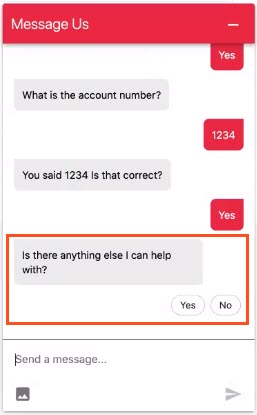
Anything Else? Loop action in a bot flow
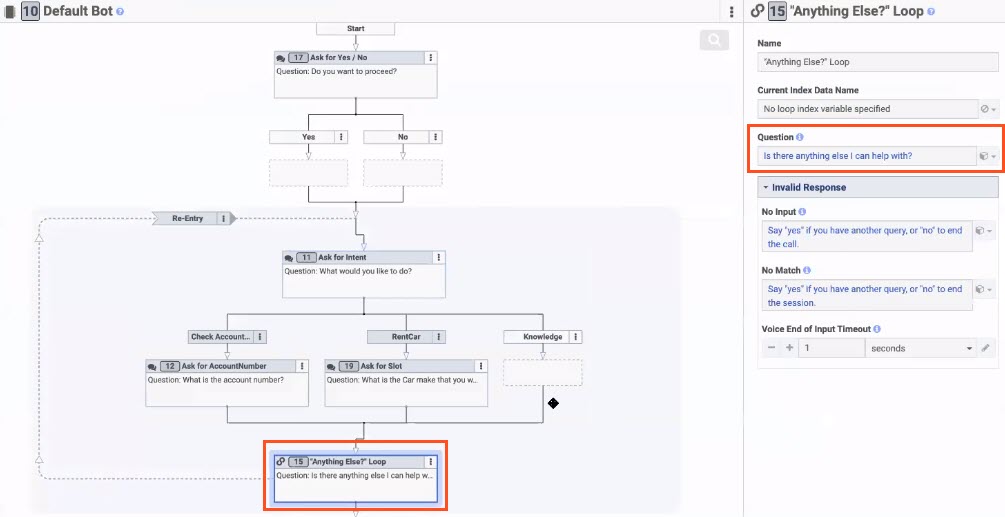
Anything Else? Loop in a bot conversation
Click the images to enlarge.
Ask for Slot action in a bot flow
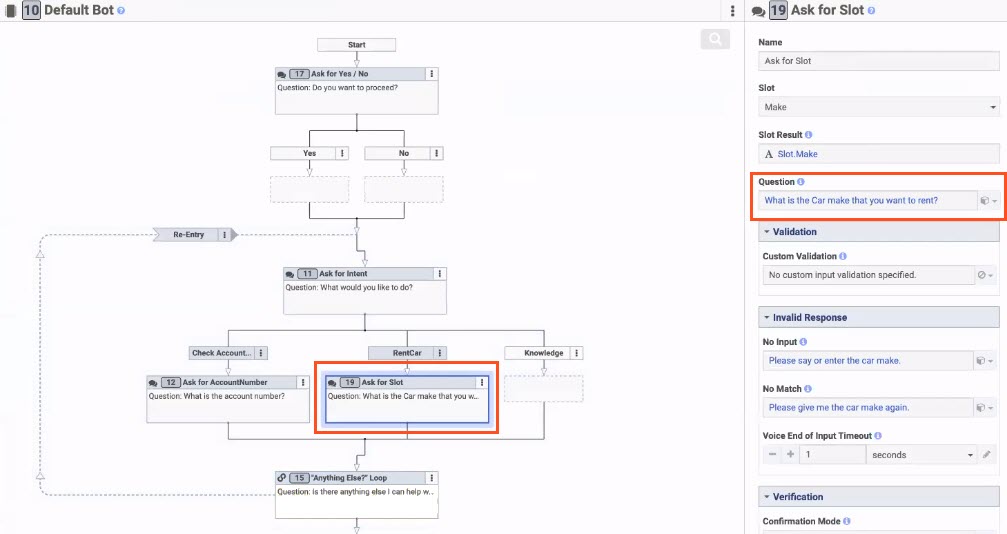
Ask for Slot in a bot flow
Knowledge base slots in a bot conversation
Click the image to enlarge.
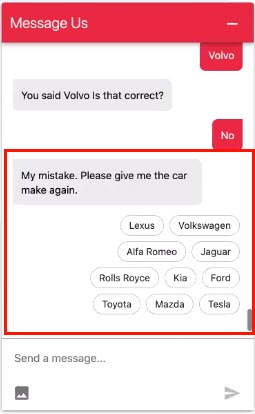
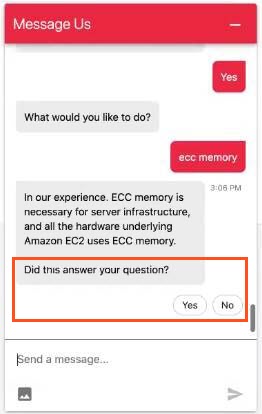
Knowledge feedback question in a bot flow
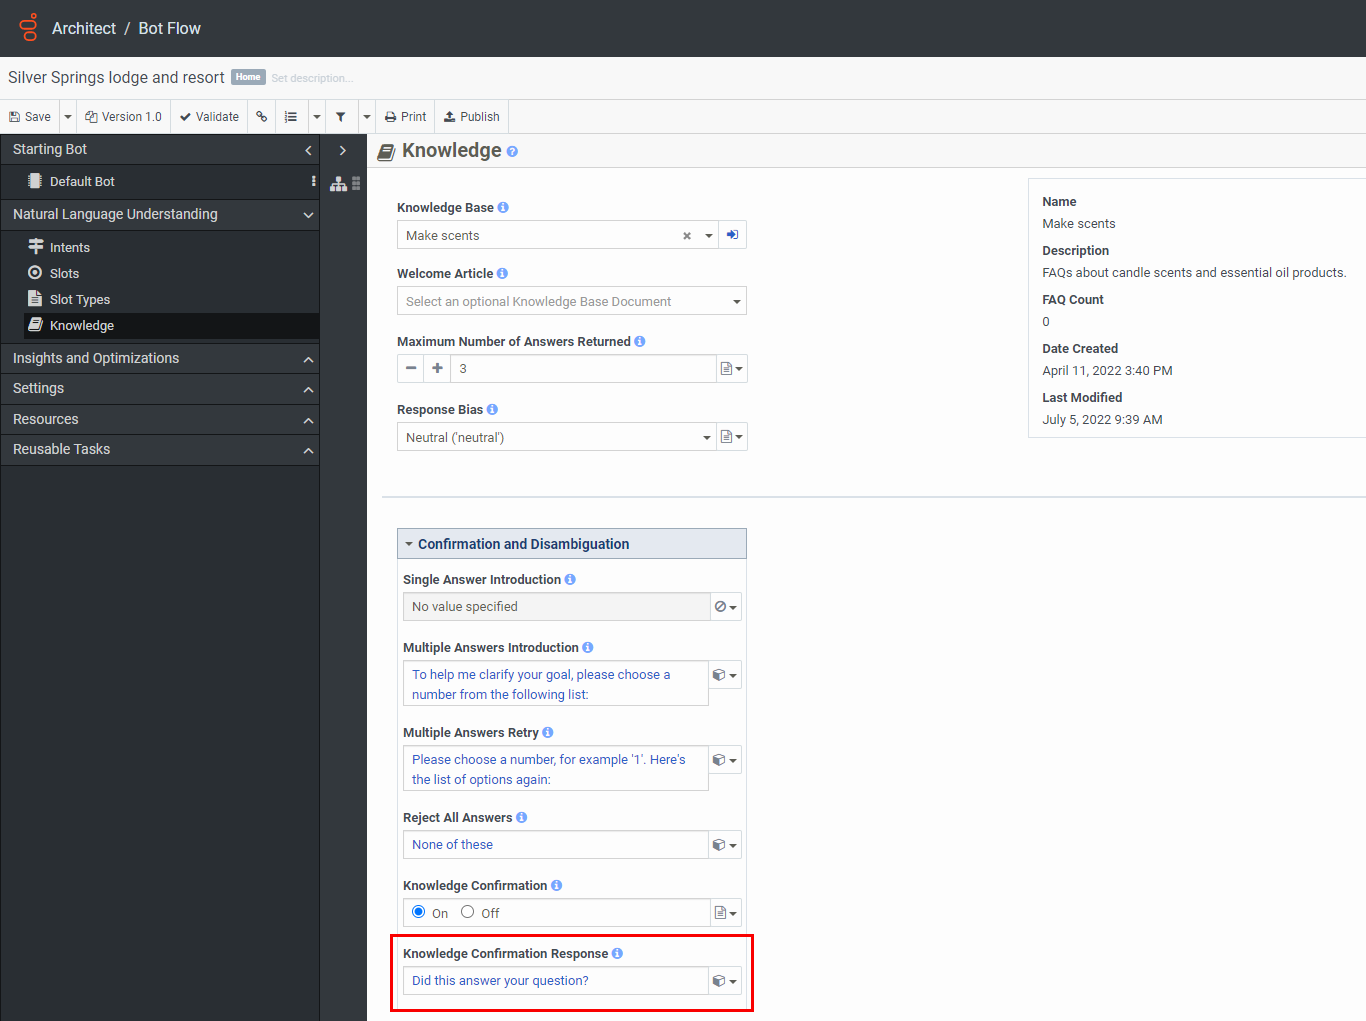
Knowledge feedback question in a bot conversation
Amazon Lex V1
These sections describe how to incorporate quick replies into your Amazon Lex V1 bot, and include use case examples and other resources.
- Install the Amazon Lex integration from Genesys AppFoundry.
- Configure the IAM role with permissions for the Amazon Lex app.
- Configure and activate the Lex integration in Genesys Cloud.
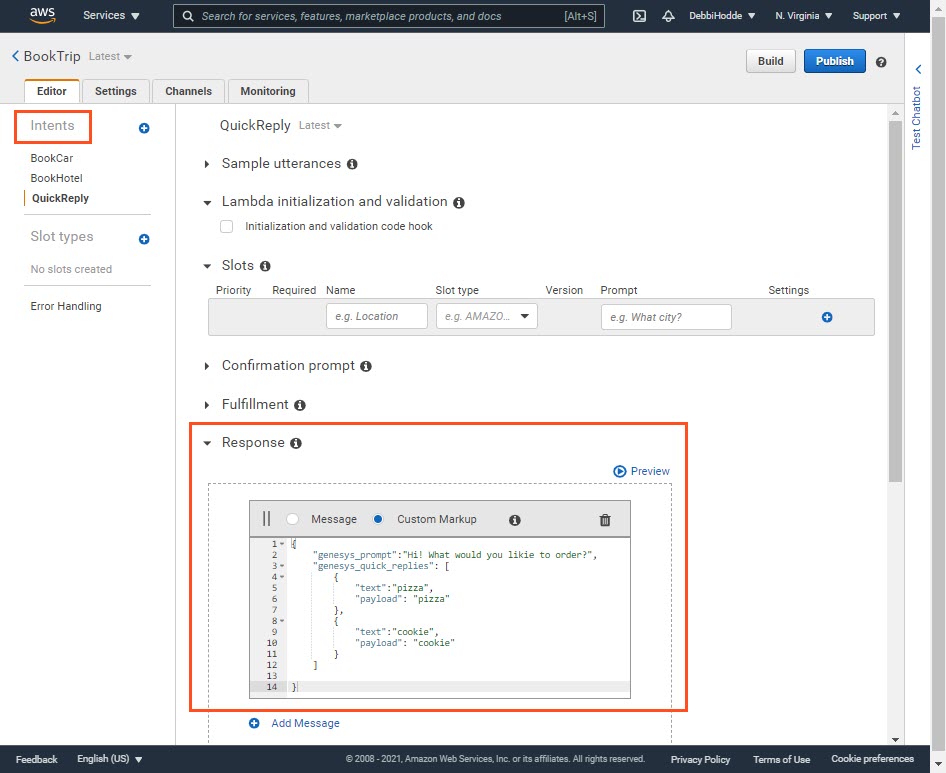
- To set up quick reply options in the AWS Lex Console, use this custom JSON to define the replies for your bot’s intent:
{
    "genesys_prompt":"string", // required - The text is the prompt to use when filling slots.
    "genesys_quick_replies": [
        {
            "text":"string", // required - The text to show inside the quick reply.
            "payload": "string" //required - The content of the text back payload after a user clicks a quick reply.
        }
    ]
}
To use quick reply options that enable you to switch between your bot’s intents, in the AWS Lex Console, use the custom JSON in the intent’s Response field.
Click the image to enlarge.
To use quick reply options to fill your bot’s slot needs, use the custom JSON in a Lambda function.
Click the image to enlarge.

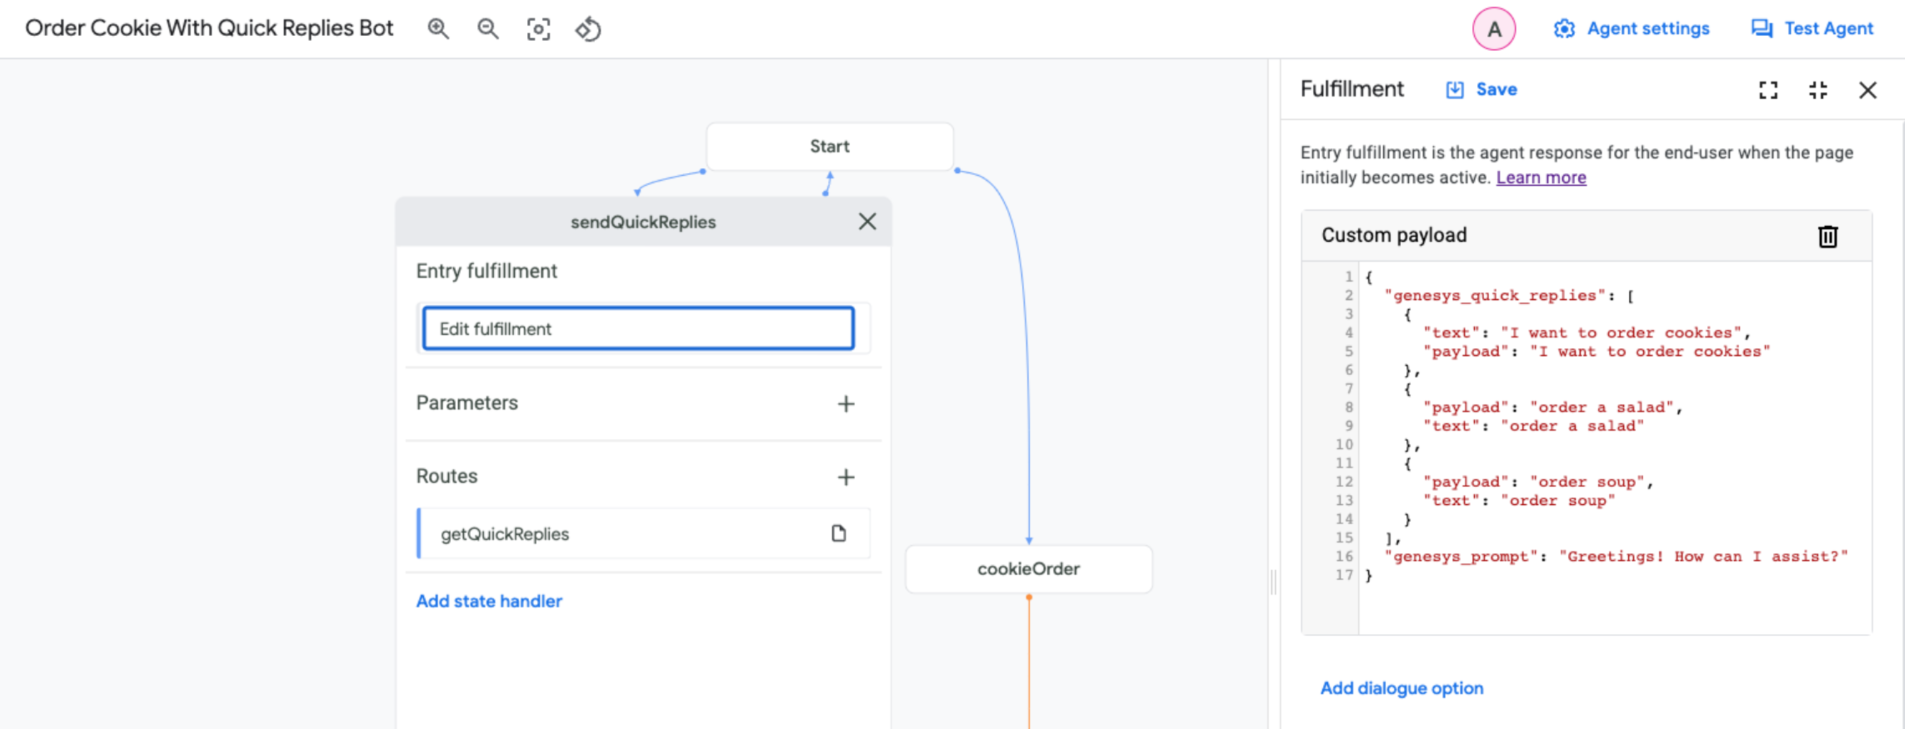
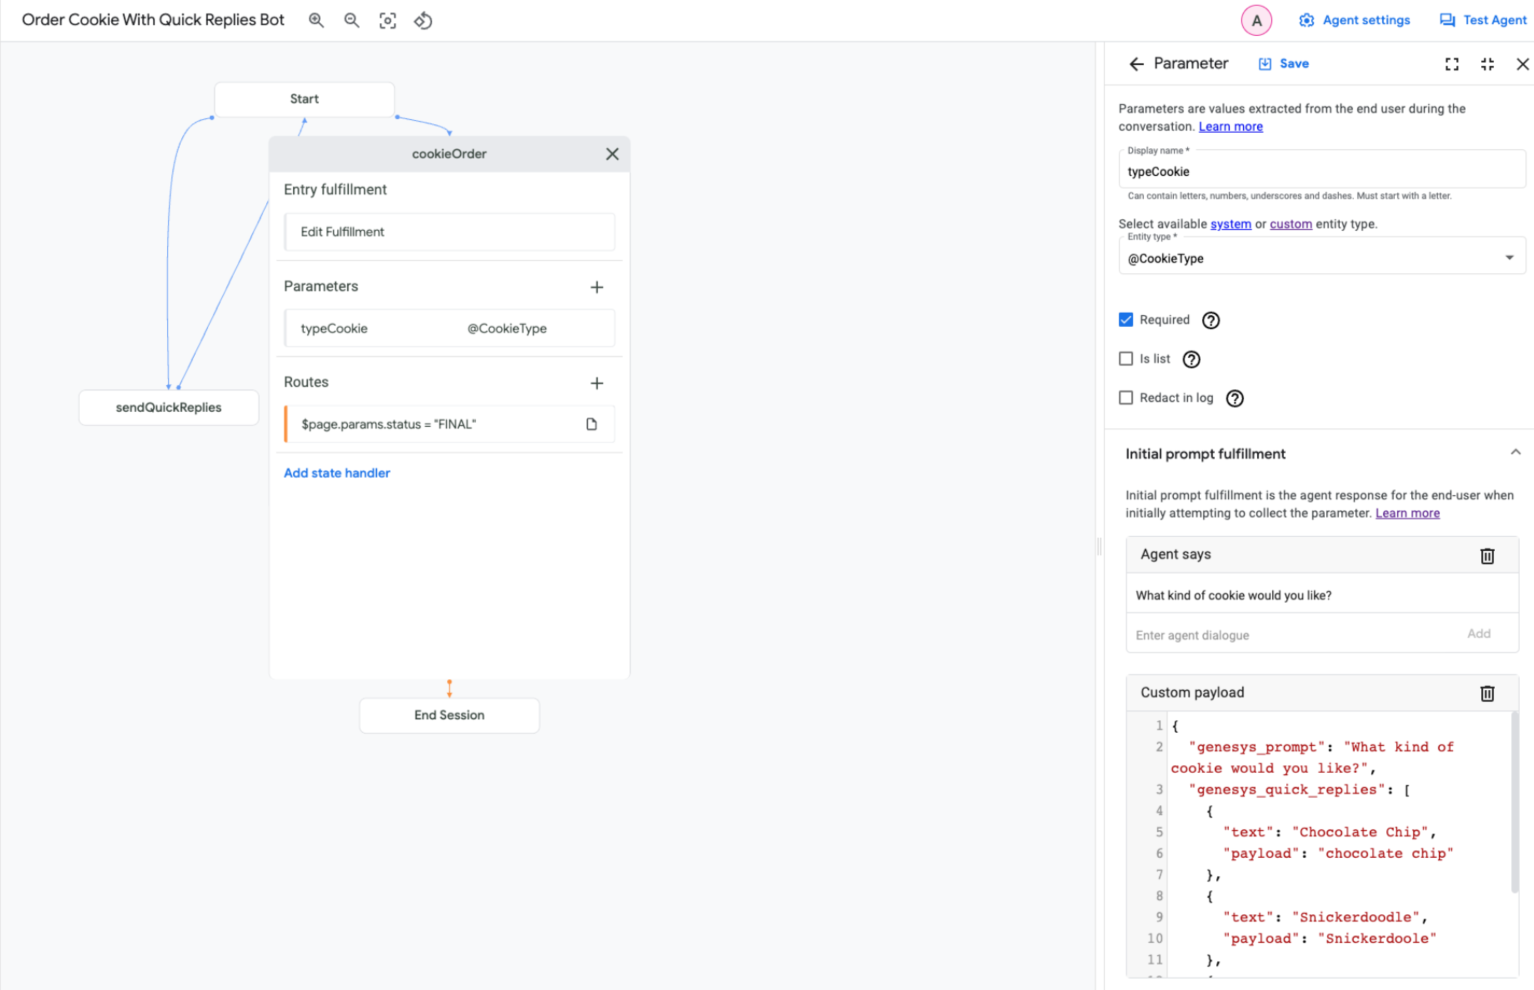
Google Cloud Dialogflow CX
These sections describe how to incorporate quick replies into your Google Cloud Dialogflow CX bot, and include use case examples and other resources.
- Install the Google Cloud Dialogflow CX integration from Genesys AppFoundry.
- Configure and activate the Google Cloud Dialogflow CX integration in Genesys Cloud.
- To set up quick reply options in the Dialogflow console, use this custom JSON to define options for your bot’s intent:
{
    "genesys_prompt":"string", // required - The text is the prompt to use when filling slots.
    "genesys_quick_replies": [
        {
            "text":"string", // required - The text to show inside the quick reply.
            "payload": "string" //required - The content of the text back payload after a user clicks a quick reply.
        }
    ]
}
To use quick reply options to switch between your bot’s intents, in the Google Dialogflow console, edit the fulfillment and use the Custom Payload option to specify the JSON.
Click the image to enlarge.
To use quick reply options to fill your bot’s slot, select the parameter that you want to fill out and then use the Custom payload to provide the prompt and options..
Click the image to enlarge.
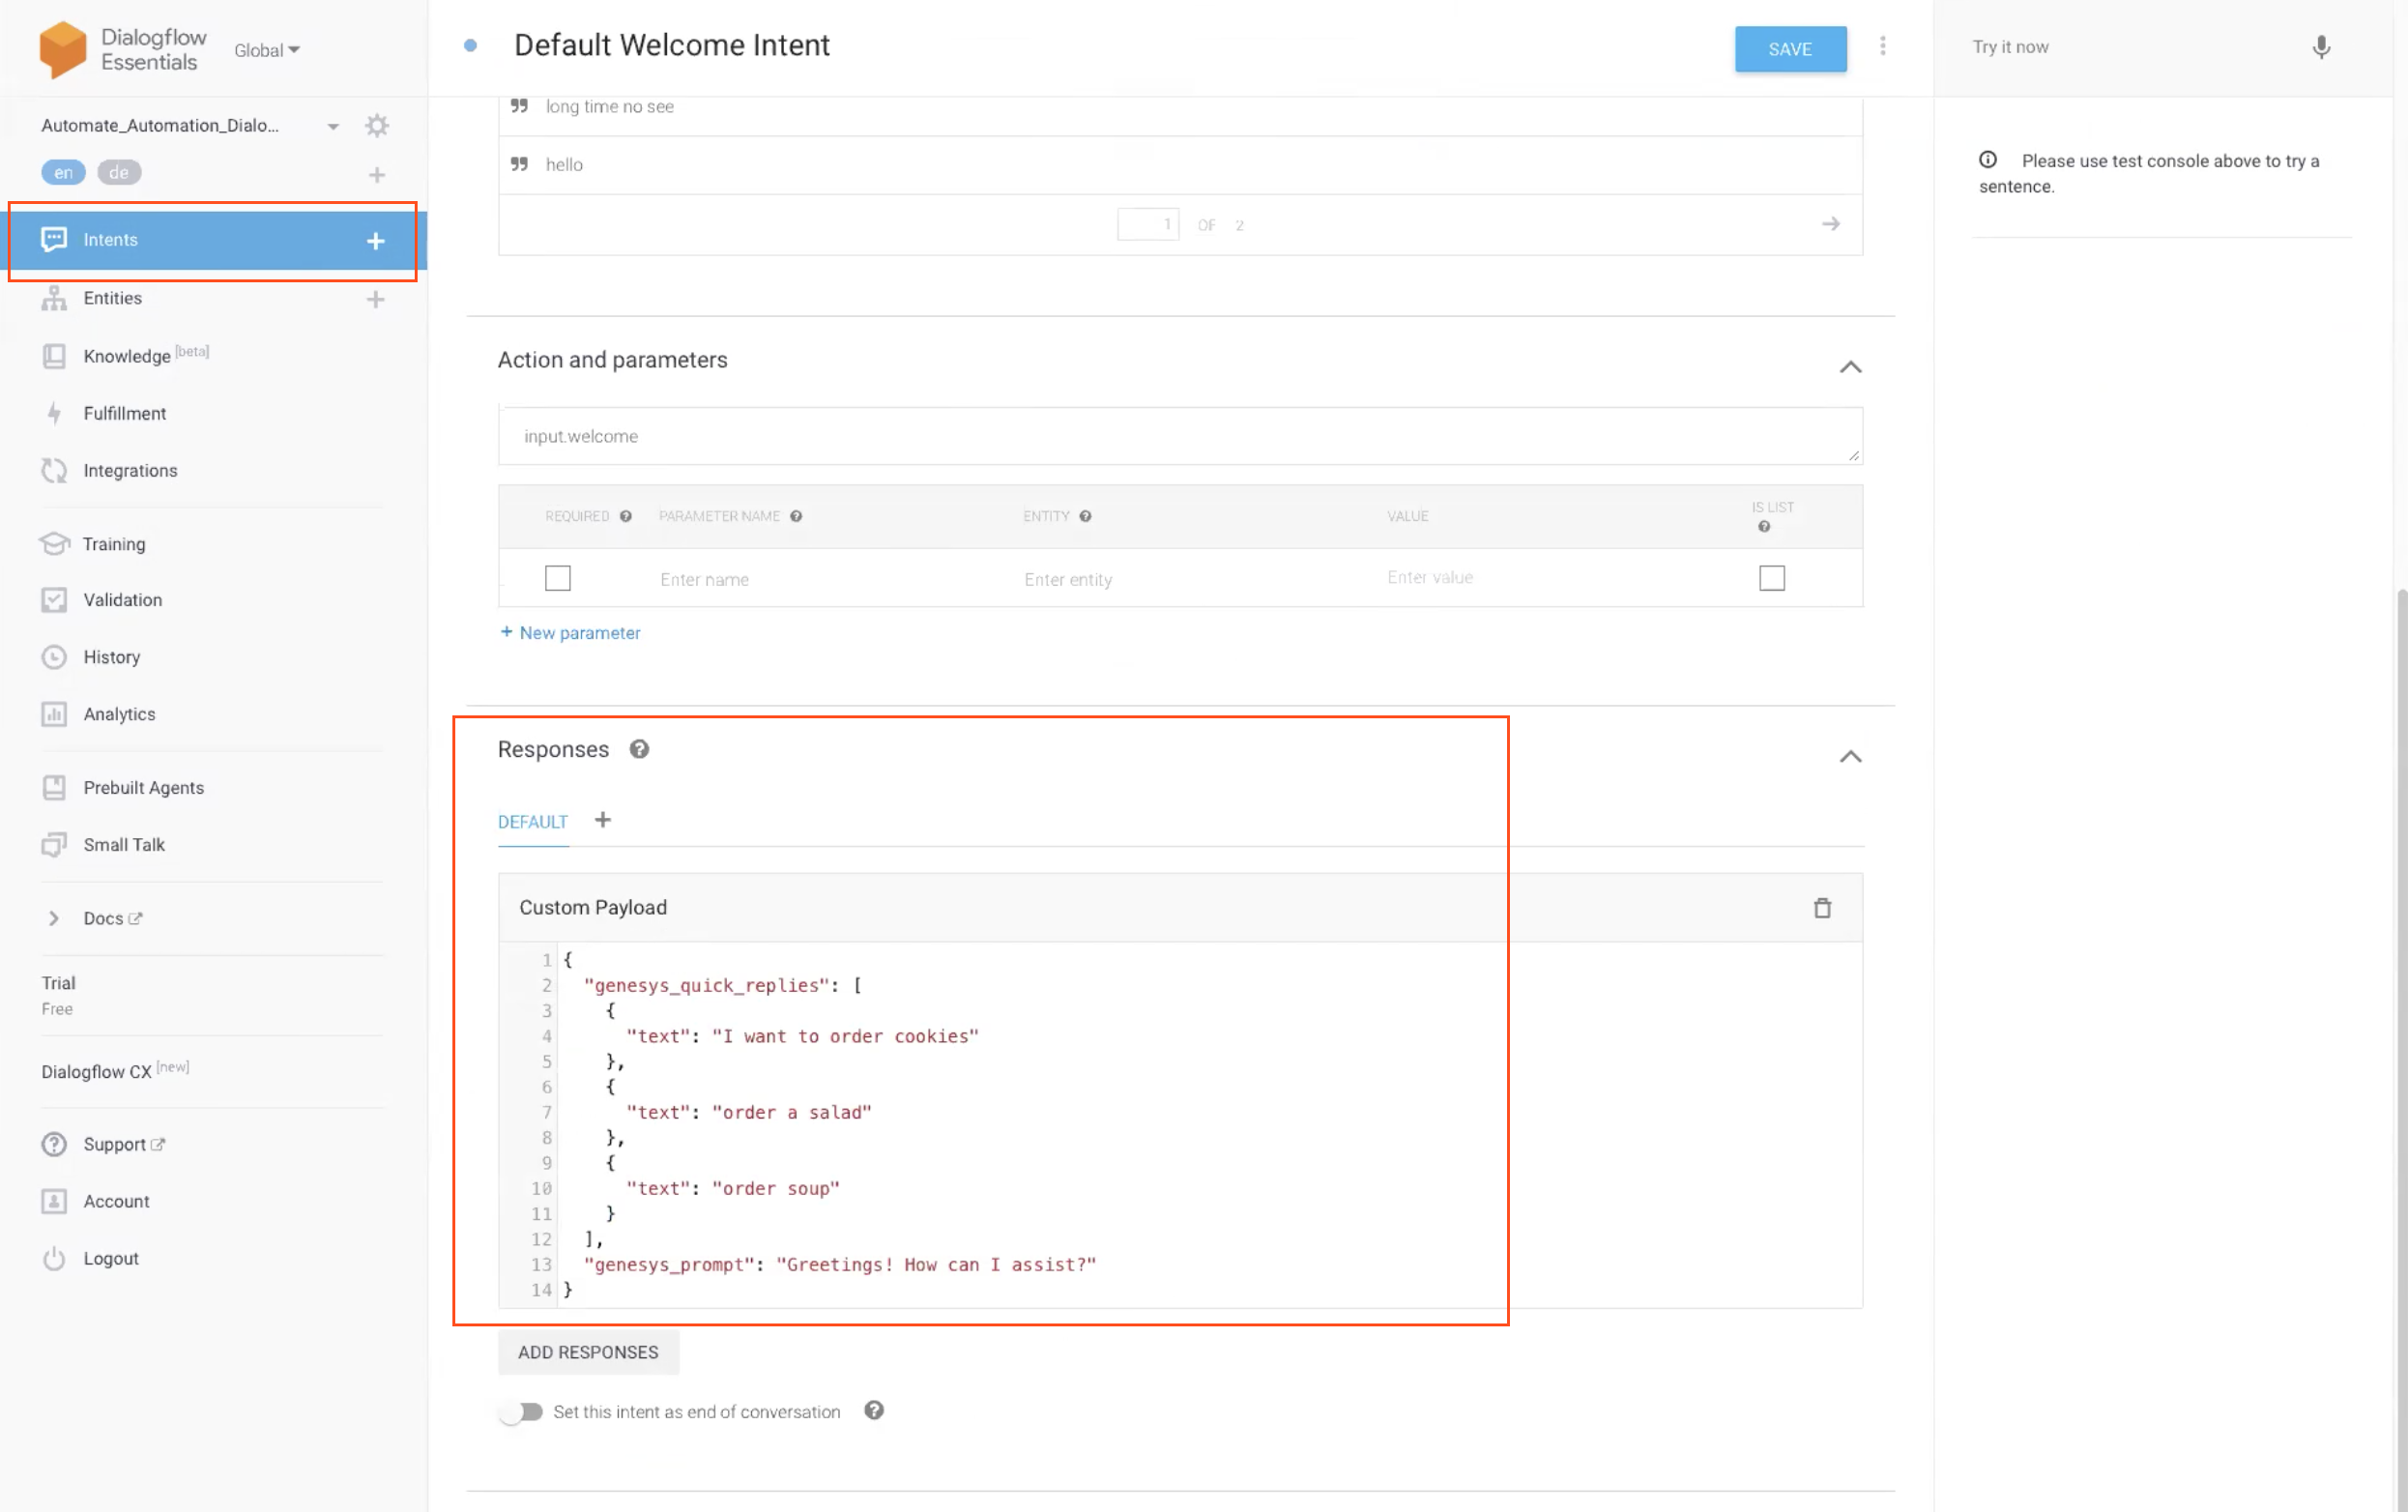
Google Cloud Dialogflow ES
These sections describe how to incorporate quick replies into your Google Dialogflow ES bot, and include use case examples and other resources.
- Install the Google Cloud Dialogflow ES integration from Genesys AppFoundry.
- Configure the Google Cloud Dialogflow ES platform service account credential.
- Enable the Google Dialogflow integration.
- To set up quick reply options in the Dialogflow console, use this custom JSON to define options for your bot’s intent:
{
    "genesys_prompt":"string", // required - The text is the prompt to use when filling slots.
    "genesys_quick_replies": [
        {
            "text":"string", // required - The text to show inside the quick reply.
            "payload": "string" //required - The content of the text back payload after a user clicks a quick reply.
        }
    ]
}
Click the image to enlarge.
Click the image to enlarge.

Learn more:
- About the Google Cloud Dialogflow ES integration
- Webhook for slot filling in the Google Cloud Dialogflow ES guide
Digital Bot Connector
These sections describe how to incorporate quick replies into your Genesys Digital Bot Connector bot, and include other resources.
- Create a bot that adheres to Genesys Digital Bot Connector specifications.
- Configure the Genesys Digital Bot Connector integration.
- Use Genesys Normalized Format to define quick replies.
{
      "type":"Structured",
      "text": "What would you like to do?",
      "content" : [
        {
          "contentType": "QuickReply",
          "quickReply": {
            "text":"I want a cookie",
            "payload": "cookie"
          }
        }
      ]
    }
Bot Connector
These sections describe how to incorporate quick replies into your Genesys Bot Connector bot, and include other resources.
- Create a bot that adheres to the Genesys Cloud BYOB specifications.
- Configure the Genesys Bot Connector integration.
- Use Genesys Normalized Format to define quick replies.
{
  "type":"Structured",
    "content" : [
        {
            "contentType": "QuickReply",
            "quickReply": {
                "text":"Shirt",
                "payload":"Shirt"
            }
        },
        {
            "contentType": "QuickReply",
            "quickReply":
                "text":"Jacket",
                "payload":"Jacket"
            }
        }
    ]
}
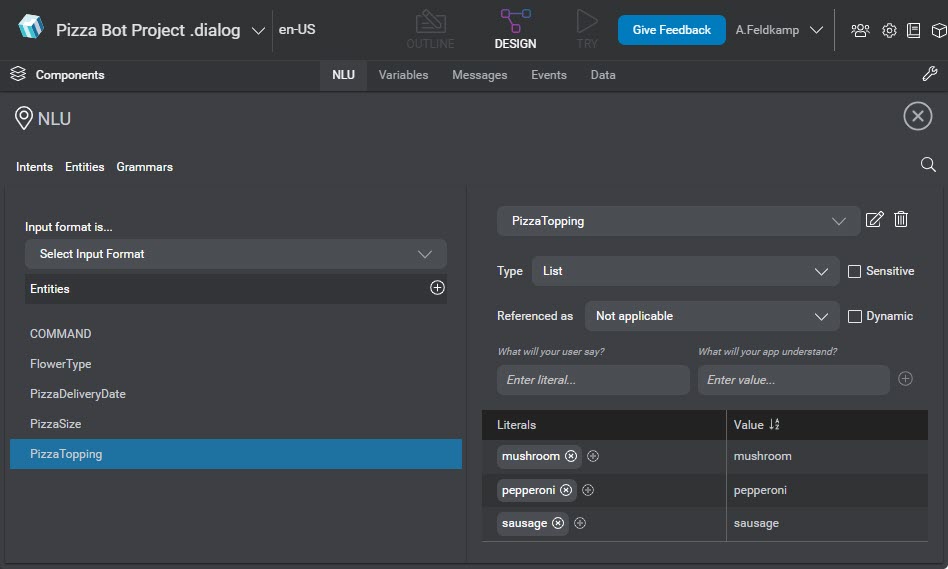
Nuance Mix
These sections describe how to incorporate quick replies into your Nuance Mix bot, and include use case examples and other resources.
- Install the Nuance Mix integration from Genesys AppFoundry.
- Add Nuance Mix credentials to Genesys Cloud.
- Add bots to the Nuance Mix integration.
- Activate the Nuance Mix integration.
- To set up quick reply options in the Nuance Mix console, perform these steps:
- Create a new project or open an existing one.
- Open your project in Mix.dialog.
- In your Nuance Mix project, add NLU intents and entities.
- Add literals to each intent and then map them to values.Note: The bot receives and returns these values when a user clicks a certain quick reply option.
Click the image to enlarge.
You can add interactive elements to your Nuance Mix bot and then use them as quick replies. From within the Nuance Mix project, select the appropriate question and answer block.
Next, select Interactivity. View the values that you previously created in the NLU section, create a label for each value, and then enable the values. Each label appears to the user, instead of the value. This feature provides you with more control over the customer experience.
For more information, see Define interactive elements in the Nuance Mix documentation.
Click the image to enlarge.
