
Scheduled Callbacks view
The following permissions:
- Analytics > Conversation Detail > View
- Routing > Queue > View
- UI > Supervisor Scheduled Callbacks > View
- Outbound > Campaign > View (to view the columns related to campaigns)
- Conversation > Communication > Disconnect (to cancel the scheduled callbacks)
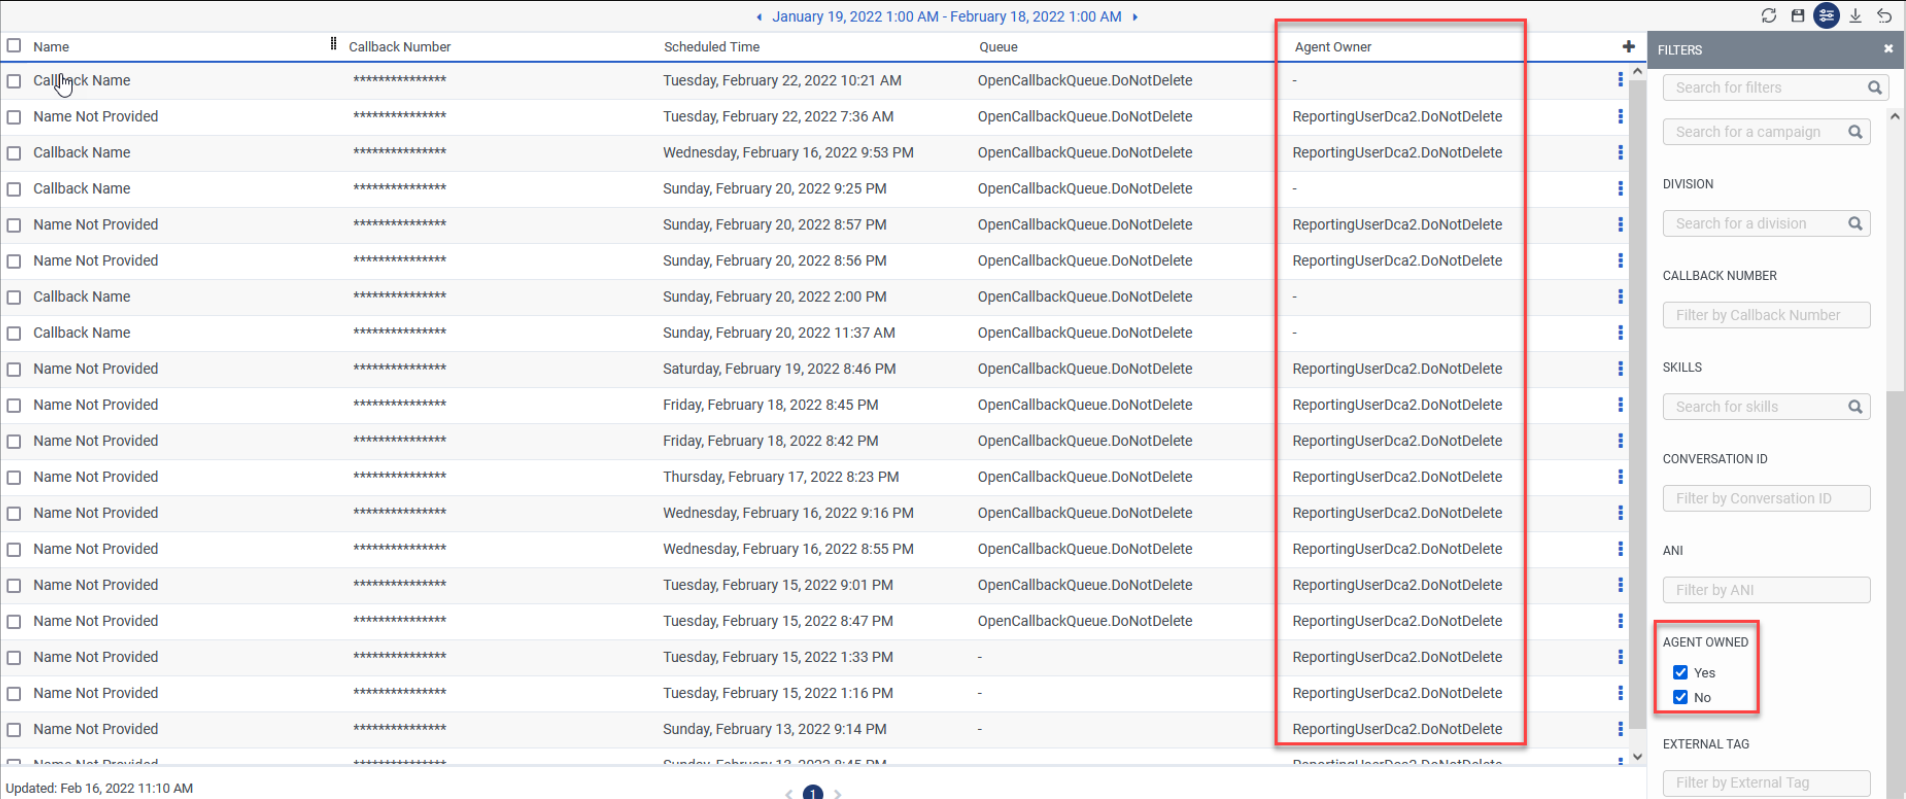
The Scheduled Callbacks view displays all callbacks scheduled by agents during interactions and the callbacks created by the Schedule Callback action in a call rule. There are two types of scheduled callbacks in this view:
- Scheduled callbacks with agent ownership: If an administrator has enabled agent-owned callbacks for a queue, agents in that queue can take ownership of their scheduled callbacks. If the agent who owns the callback is unavailable at the scheduled callback time, the callback waits for the agent to become available. If an agent has taken ownership of the scheduled callback, the name of the agent who owns the callback appears in the Agent Owner column.
- Scheduled callbacks without agent ownership: Either the administrator did not enable agent-owned callbacks for the queue or the agent did not take ownership of the scheduled callback. In this case, the Agent Owner column is blank.
Available columns
To view the available columns, see the Scheduled Callbacks view section in the View available columns in performance views by category article.
- To view the consolidated list of available columns in the performance views, see Consolidated view of available columns in performance views.
- To view the list of available columns in the performance views by category, see View available columns in performance views by category.
Set a default time zone in the workspace
You can set the default time zone in the analytics workspace before viewing any analytics view.
To set the default time zone in the workspace, follow these steps:
- Click Performance > Workspace.
- Click Menu > Analytics > Analytics Workspace.
- On the left side, from the Time zone drop-down menu, select the required time zone as the default time zone for the analytics workspace.
View Scheduled Callbacks
To view and manage scheduled callbacks, click Performance > Workspace > Contact Center > Scheduled Callbacks.
To view and manage scheduled callbacks, perform the following:
- Click Menu > Analytics > Analytics Workspace.
- In the Default section, search for Scheduled Callbacks and then click the view name to open it.
By default, the view shows both types of callbacks – those with an agent owner and those without an agent owner. To view only one or the other, click Filters , and then click Yes or No under Agent Owned.
Manage Scheduled Callbacks
From the Scheduled Callbacks view, you can manage scheduled callbacks in the following ways:
- For agent-owned callbacks, you can cancel, reschedule, or reassign to another queue and agent.
- For scheduled callbacks without agent ownership, you can cancel or reschedule.
You can cancel any type of scheduled callback (those with or without agent ownership), and you can cancel a single scheduled callback or you can cancel multiple scheduled callbacks at once.
There are two ways to cancel a scheduled callback:
Option 1 - available for single cancellation:
- At the end of the row containing the callback you want to cancel, click More .
- Click Edit Callback to open the Edit Callback(s) window.
- Click Cancel Callbacks.
Option 2 - available for single or bulk cancellation:
- Select the scheduled callback you want to cancel.
- Click the Edit Callbacks button at the top of the Scheduled Callbacks view. This opens the Edit Callback(s) window.
- Click Cancel Callbacks.
-
-
You can reschedule any type of scheduled callback (the callback with or without agent ownership), meaning you can change the date or the time of a scheduled callback.
To reschedule a scheduled callback:
- At the end of the row containing the callback you want to reschedule, click More .
- To open the Edit Callback(s) window, click Edit Callback.
- Click Reschedule Callback.
- Select the new date and time for the scheduled callback.
- Click Next.
- Review the new scheduled date and time and click Confirm. Otherwise, click Previous to return to the Edit Callback screen or click Cancel to cancel the action.
- The reschedule period adheres to the queue setting that defines how far in advance an agent can schedule a callback. For example, if the cut-off for an agent to schedule a callback is February 15, all rescheduling dates beyond February 15 will be grayed out in this view.
- You cannot reschedule a callback if the callback is scheduled within the next 15 minutes.
You can reassign agent-owned callbacks to another agent within the same queue or to another queue and agent. You can re-assign a single agent-owned callback or multiple agent-owned callbacks at once.
There are two ways to reassign an agent-owned callback:
- Single cancellation
- Single or bulk cancellation
Single cancellation
- At the end of the row containing the callback you want to cancel, click More .
- To open the Edit Callback(s) window, click Edit Callback .
- Click Reassign Callbacks.
- In the Queue text box, start typing the name of the queue that the new agent owner belongs to.
- In the Agent Callback Owner text box, start typing the name of the new agent owner.
Single or bulk cancellation
- Select the scheduled callback you want to cancel.
- Click the Edit Callbacks button at the top of the Scheduled Callbacks view. This opens the Edit Callback(s) window.
- Click Reassign Callbacks.
- In the Queue text box, start typing the name of the queue that the new agent owner belongs to.
- In the Agent Callback Owner text box, start typing the name of the new agent owner.
- The callbacks are automatically placed on behalf of the queue or campaign, and use the queue’s ANI or the campaign’s ANI, not the agent’s ANI.
- For callbacks without agent ownership, when a callback reaches its scheduled time, it is removed from the list and sent to the originating queue.
- In some instances, a scheduled callback has both a queue and a campaign associated with it. When that occurs, the queue takes precedence over the campaign.
- For agent-owned callbacks, if the schedule out maximum for a queue changes after the callback is scheduled, the existing callback scheduled date will be used.
More about the Scheduled Callbacks view
Notes about this view
- This view does not update automatically. To see the most current data, click Refresh .
- To save the view with your filter and column settings, click Save .
- To export the data in the view, click Export .
- Exports of interactions less than 24 hours old are limited to 10,000 conversations per 12-hour period. This limit can be increased upon request. For interactions older than 24 hours, the export limit is 1,000,000 conversations per export. If the export results exceed the limit, the export returns partial data with a time stamp indicating the latest retrieved interaction.
Notes:When exporting conversation data, different limits apply based on how recent the interactions are:
- For interactions less than 24 hours old, you can export up to 10,000 conversations per 12-hour period. This limit is due to the data being pulled from a real-time source that is not tailored towards bulk retrieval.
- For interactions older than 24 hours, you can export up to 1,000,000 conversations in a single export. These older interactions are stored in a system optimized for large-scale retrieval and updated once daily.
If your export request includes more conversations than allowed, the system returns as much data as possible and provides a timestamp with the latest conversation retrieved. However, if your request is entirely for recent conversations less than 24 hours old and exceeds the limit—or if the real-time data has not yet made it into the daily system—your export may come back empty.
Customize the view
Customize the Scheduled Callbacks view to show only certain data. For example, you can choose to show only certain columns or filter to see certain types of callbacks. You can also save your filter and column settings as a saved view to switch quickly between different data of interest in the same view.
To customize analytics views, use the date filter.
To filter metrics by date or configure a custom date range, use presets. When filtering metrics for this view, select any custom date range up to one month.
To use a preset to filter metrics, complete the following steps:
- Click the date to display the date filter.
- In the Presets list, select a preset date option.
Date presets
| Presets | Description |
|---|---|
| Today | Shows data for the time period that includes the current interval. |
| Yesterday | Shows data for the previous day. |
| This week | Shows data for a Sunday through Saturday time period. |
| Last week | Shows data for the previous week and Sunday through Saturday. |
| Previous 7 days | Shows data for the previous seven days. |
| This month | Shows data for the current month with no extra days. |
| This month by week | If the month does not start on Sunday or end on Saturday, shows data for the current calendar month starting on Sunday and ending on Saturday including extra days. |
| Last month | Shows data for the previous calendar month with no extra days. |
| Previous 30 days | Shows data for the previous 30 days. |
| Day | Shows data for a single 24-hour day. |
| Week | Shows data for a Sunday through Saturday time period. |
| Month | Shows data for the exact month with no extra days. If the current month is selected, you see the data up to the current date. |
| Month by Week | If the month does not start on Sunday or end on Saturday, shows data for a calendar month starting on Sunday and ending on Saturday including extra days. |
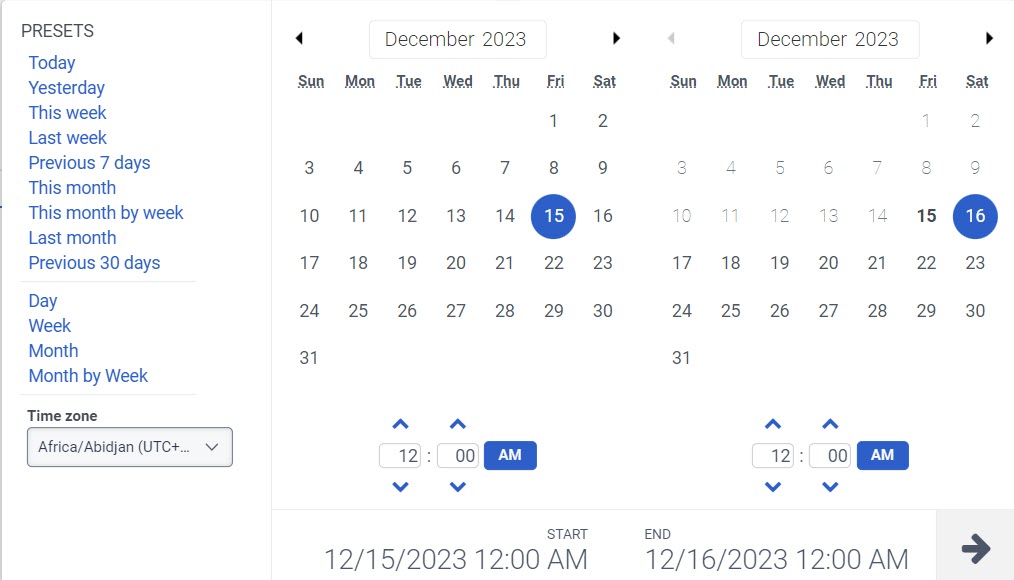
- To use a custom date range to filter metrics, complete the following steps:
-
- To display the date filter, click the date.
- Select a start date and an end date on the calendar, and click the filter arrow .
- To view data for a different time period using the same date presets, click the arrows on either side of the date display. For example, to view data for the previous day, click the Day preset, and then click the arrow on the left side of the date.
- To view data for a different time zone using the same date presets, from the Time zone drop-down menu, select the required time zone. You can create and save reports with the same selected time zone.
To filter by information about the callbacks, click Filters , and then search or scroll to select the filter you want to use.
Filters
| Filter | Description |
|---|---|
| Agent Callback Owner | Displays agent-owned callbacks where the agent is inactive or deleted. |
| Queue | Displays callbacks associated with the selected queues. |
| User | Displays data for inactive and deleted users. |
| Campaign Name | Displays callbacks associated with the selected campaigns. When you type a campaign name, the suggested campaigns are displayed with their campaign types, Voice or SMS. Display callbacks for multiple campaigns by entering other campaign names and searching again. |
| Division | Filters callbacks for a specific Division. See About access control. |
| Callback Number | Displays callbacks associated with the selected telephone number. |
| Skills | Displays callbacks that have the selected skills. Filter for multiple skills at one time by entering other skills and searching again. |
| Conversation ID | Filters for callbacks matching the specific conversation ID. This filter returns callbacks that occurred within the specified date range filter. |
| ANI | Displays callbacks with the selected ANIs.
|
| Agent Owned | Displays callbacks that are either agent-owned or not agent-owned. |
| External Tag |
Displays information for interactions that have the External Tag attached to the conversation record. Note: External tag data is not available for web chat interactions.
|
To show or hide columns:
- At the top right corner of the columns, click the Pick columns icon. The Add/Remove Column pane appears.
- Click the Manage columns tab.
- (Optional) To sort the columns in ascending or alphabetical order, click Sort by > Column Name A-Z.
- (Optional) To sort the columns in descending or reverse alphabetical order, click Sort by > Column Name Z-A.
- (Optional) To categorize or uncategorize the columns, click Sort by and enable or disable the Group by Categories toggle.
- Search or scroll to select the columns you want to view. Note: You can also use keyboard navigation to choose the columns.
- Click Save. The selected columns appear on the screen. Note: The column selections appear only after saving the changes and do not apply to the table immediately.
To reorder the columns within the column picker:
- At the top right corner of the columns, click the Pick columns icon. The Add/Remove Column pane (column picker) appears.
- Click the Reorder columns tab.
- Click the grid icon
 of a column, and then drag and drop to reorder it within the column picker.
- Click to select the grid icon of the column to be reordered, and on the keyboard, press the Spacebar.
- To position the column, use the Up or Down arrow keys.
- Press the Spacebar. The chosen column is reordered.
To rearrange the columns outside the column picker, click a column header and drag it.
To reset a view to default column settings, click Reset view to defaults .
You can select up to 20 columns.
You can copy the callback conversation ID to the clipboard and use it to filter callbacks or share it with someone, such as Customer Care.
To copy the conversation ID:
- In the callback row, click More .
- Click Copy Conversation ID .