
Series: Set up Genesys Agent Assist
Configure your organization to use Agent Assist
Prerequisites
- You need to have a configured Genesys Agent Assist role.
Configure your organization to use Agent Assist
- Click Admin.
- Under Contact Center, click Assistants > New Assistant.
- Under Name, enter a name which represents the role of the assistant.
- Select the purpose provider of the assistant: Digital, or Digital & Voice.
- Select the language, and the corresponding knowledge base.
- Click Save.
- Queues appears at the top of the screen, next to Assistant. Select Queues.
- Select Assign to queues.
- From the list, select the queue or queues you want to assign the Genesys Agent Assist assistant to. To add the queue or queues to the assistant, click Assign.
- Repeat steps 2–4 to assign more queues to the assistant.
Note:
Genesys Agent Assist is assigned on a single, per queue basis. If the queue you select is assigned to a different assistant, a message appears, asking you to reassign the new assistant.
To remove a queue from the assistant, click Unassign next to the queue name, then click Yes.
Enable recording on the trunk
Enabling recording is mandatory for Genesys Agent Assist transcription. The data are deleted after the transcription is done.
For more information, see Enable recording.
Configure transcription for Voice SKUs
Genesys Cloud is able to manage transcription through the Genesys Native transcription engine, or the Enhanced Voice Transcription Service (EVTS).
Note: EVTS is an add-on feature and incurs additional costs.
To set the transcription engine:
- Click Admin.
- Under Quality, click Programs > Program Editor.
- Select the transcription engine. EVTS is only available at this step if you have purchased it separately.
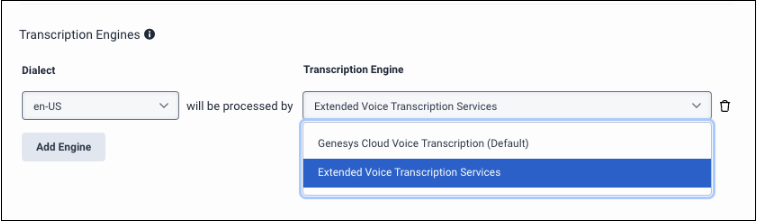
- Click Save.
To configure voice transcription for Genesys Agent Assist Voice SKUs:
- Click Admin.
- Under Contact Center, click Queues.
- Select the queue you want to configure voice transcription for.
- Click the Voice tab.
- Toggle Voice transcription:
- If you use Genesys Cloud Voice transcription, toggle Voice transcription to ON or OFF, according to your needs.
- If you use EVTS, toggle Voice transcription to ON.
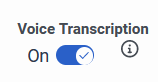
- Click Save.
Assign the Genesys Agent Assist role to users :Previous Suggested Article Next Suggested Article: