
Control knowledge behavior in your voice or digital bot flow
- Genesys Cloud CX 1, Genesys Cloud CX 1 Digital Add-on II, Genesys Cloud CX 2,Genesys Cloud CX 2 Digital, Genesys Cloud CX 3 Digital, Genesys Cloud CX 3, Genesys Cloud CX 4, or Genesys Cloud CX AI Experience license
- Architect > UI > View permission
- Architect > Flow > Add, View, Edit, Delete permissions
- Language Understanding > All permission
- Knowledge > All permission
- Analytics > Knowledge Aggregate > All permission
Add knowledge to your voice or digital bot flows to create FAQ-style bots. To add knowledge, create a knowledge base in the knowledge workbench and then link it to your voice or digital bot flow. You can also select an existing knowledge base from within in Architect, or you can open the knowledge workbench from Architect and then create and build a new knowledge base. Find the Knowledge section from the Architect’s Natural Language Understanding menu.
This article describes examples and recommended practices that control how the knowledge behavior occurs from start to finish in your voice or digital bot flow. For more information about how to create question and answer pairs, and how to add knowledge to your flow, see Add knowledge to your bot flow.
Custom knowledge handling overview
When you use the custom mode to configure advanced knowledge handling, you can manually decide how to handle knowledge and then configure behavior according to your business needs. For example:
- Introduce an answer article
- Loop articles in cases of disambiguation
- Link to the category or label within the knowledge article
- Gather feedback
You can design a reusable task that runs immediately after it matches one or many knowledge articles. The actions that trigger this reusable task are Wait for Input or a Digital Menu. The reusable knowledge task gives you more control to adapt the flow behavior from start to finish and then decide when to show the knowledge article, disambiguation, and feedback.
For example, you can store the matched knowledge articles, which the bot would typically use in the knowledge handling, as a flow variable by an Ask for action. Then you can decide what happens next in the designated task and control the customer journey.
Custom knowledge handling process and results
The participant provides an utterance or phrase. The bot checks to see if the utterance has a high confidence on one article, or on many articles. In cases of disambiguation, the digital bot flow loops through a presentation of tiles for each knowledge article, and then loops through the articles by category until the participant confirms their intent. Then, the flow can run a Send Knowledge Feedback action after the article appears to capture positive or negative feedback, which gives you more control around knowledge configuration.
- Standard or custom settings: Choose between standard and custom settings in the flow’s default knowledge base area to determine how to control what happens when an utterance triggers an article so that you can customize the customer experience.
- Knowledge search list: Access the knowledge search results list in your end-to-end task. Custom handling enables you to author knowledge handling and control what happens before, during, and after Architect surfaces the article.
- Categories and labels: Use an article’s category or label that helps you make flow logic decisions in your tasks and to determine the correct path for the user.
- Manage knowledge handling: Capture and run a knowledge task when the digital bot flow finds a knowledge match and bypass existing automatic knowledge handling.
- Global knowledge feedback: Use global knowledge feedback to capture customer feedback after the bot presents an article from a Show Knowledge Article action to ensure that all feedback applies to the same knowledge optimization dashboard.
- Session.LastKnowledgeSearchID variable: Architect captures this built-in session variable each time a knowledge search happens. You can use it as an input to the Send Feedback action and send feedback through the correct search result.
- Confident scores: Use the confidence scores to configure logic in your knowledge task and manually handle disambiguation.
How you control knowledge differs, depending on whether you use a digital bot flow or a voice bot flow.
Control knowledge in digital bot flows
The following process describes how you can use advanced, refined knowledge handling in digital bot flows and provide your customers with more accurate results.
- Switch to Custom mode to configure custom knowledge logic.
- Create a variable in which to store search results.
- Create the custom knowledge reusable task.
- Add a Decision action to the reusable task and configure the Yes path.
- Configure the No path for the reusable task’s Decision action.
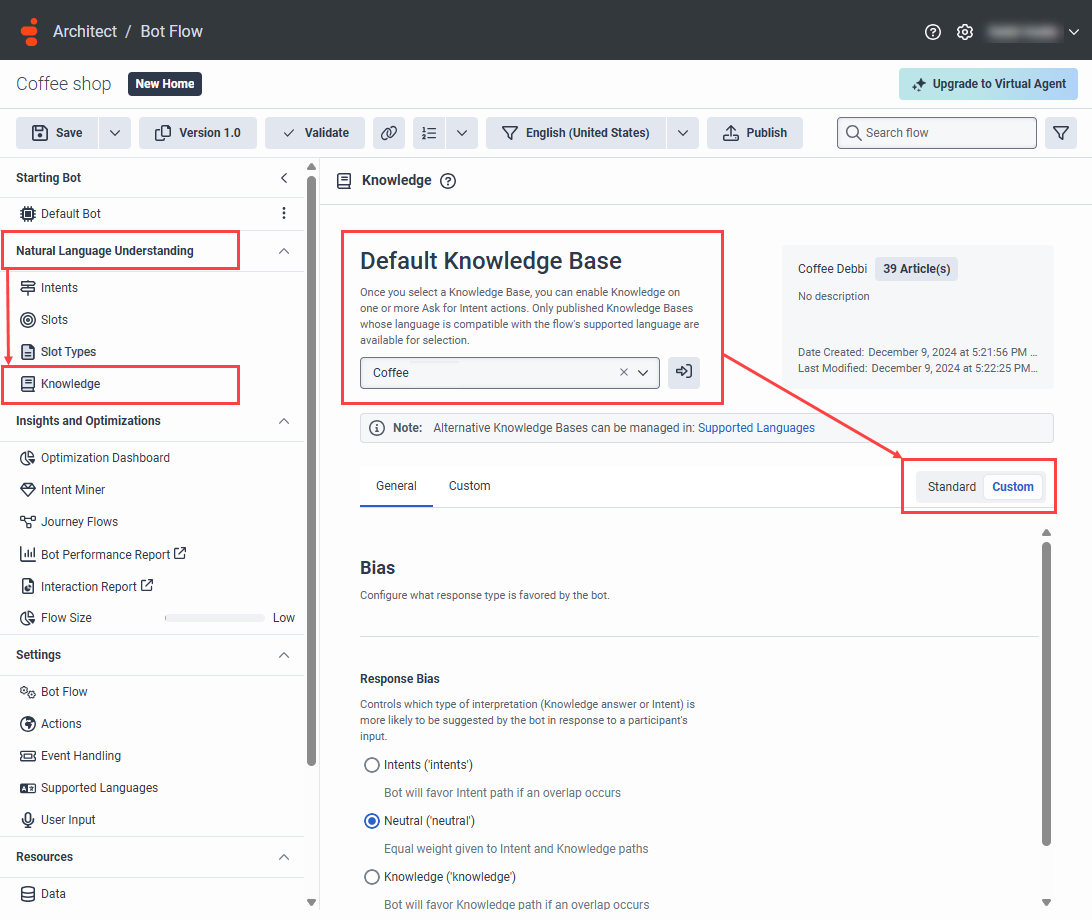
Advanced digital bot flow authors can switch to To switch to custom mode, follow these steps:
- Open a digital bot flow or create a new one.
- Under Natural Language Understanding, click Knowledge.
- Under Default Knowledge Base, click the drop-down and select the default knowledge base.
- To override the standard, global knowledge settings and create a reusable knowledge task, click Custom. A dialog box opens, asking you to confirm the switch to custom logic.
- From the Switch to Custom dialog box, click Switch.
Click the image to enlarge.

- Under Resources, click Data.
- Under Add Variable, select KnowledbeBaseDocument Collection.
- In the Enter variable name field, type
searchResults. - Click Create.
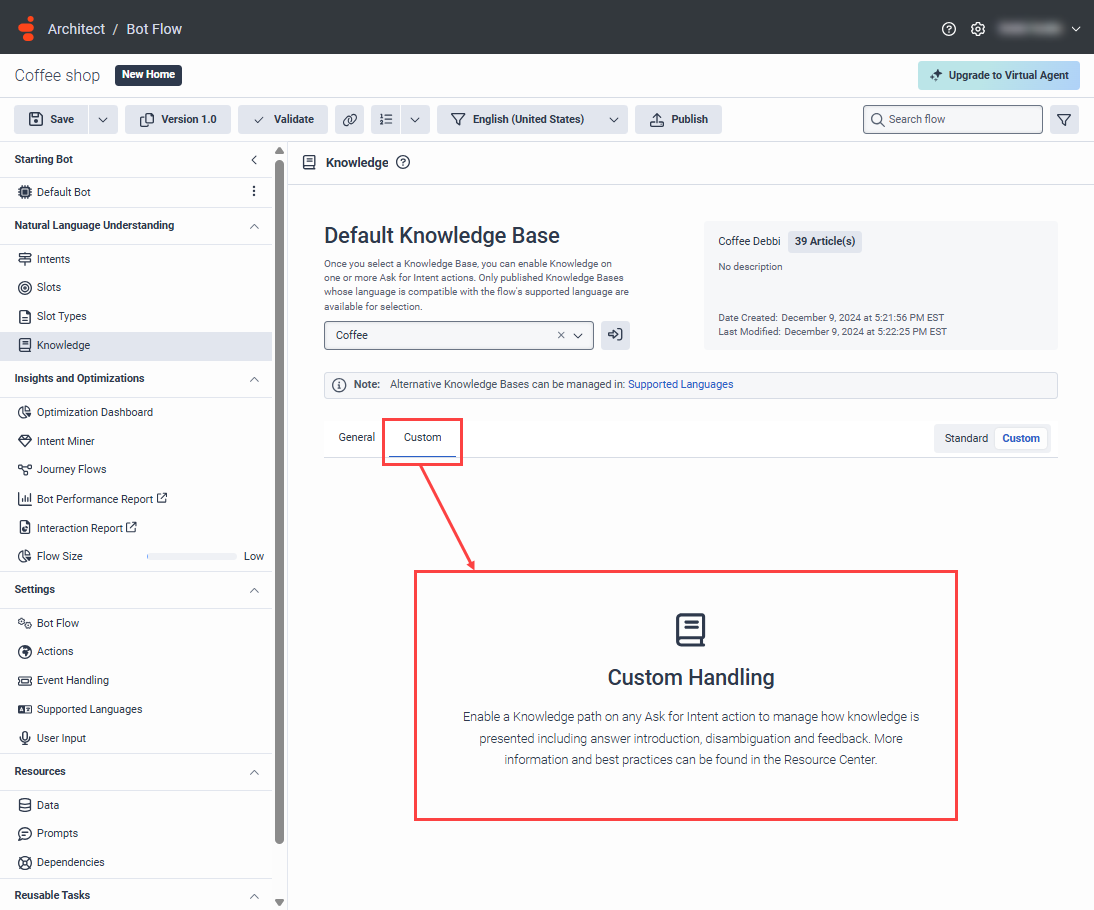
Select or create a reusable task and configure custom knowledge settings. These settings include answer introduction, disambiguation, feedback, and follow up.
- Click the Custom tab.
- Under Custom, perform one of these steps:
- To select an existing task, click Select a task and then choose the preferred task.
- To create a new task, follow these steps:
- Click Add . The Task Name dialog box opens.
- Enter a name for the knowledge task and then click Create New Task.
- To open the existing or new task in the task editor, click Open task .

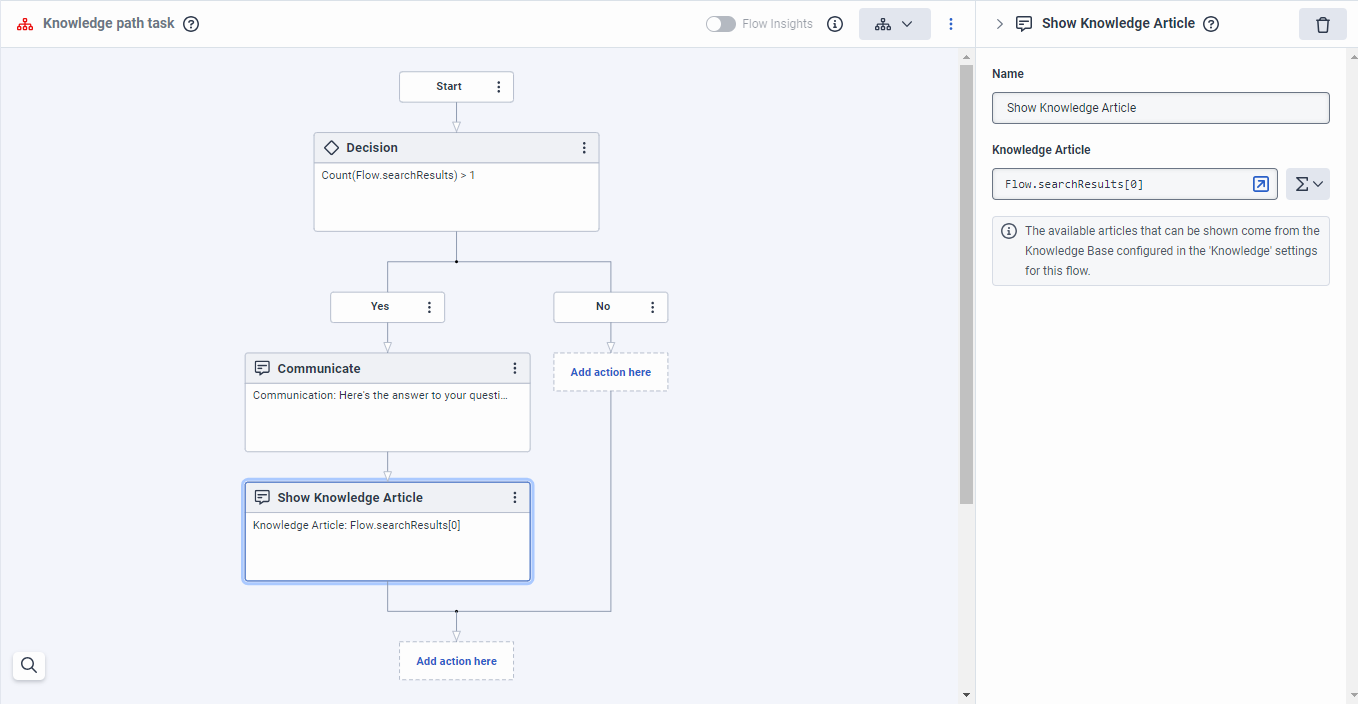
The example that follows describes how to add a Decision action and configure the Yes path for a reusable knowledge task, after you switch to custom knowledge.
- Under Reusable Tasks, click the knowledge task that you want to configure.
- Add and configure a Decision action:
- From the Toolbox, expand the Logical menu and drag a Decision action into the task editor below the Start box.
- Rename the Decision action, or leave the default name.
- Under Expression, click Expression Modes and then click Expression .
- In the Expression box, type
Flow.searchResults[0].content.
- Under the Decision action’s Yes path, add and configure a Communicate action.
- From the Toolbox, expand the Communicate menu and drag a Communicate action into the task editor.
- Rename the Communicate action, or leave the default name.
- Under Communication, click Click to add text and in the Rich Text Builder, type Here’s the answer to your question.
- Click Save.
- Under the Communicate action, add and configure a Show Knowledge Article action.
- From the Toolbox, expand the Communicate menu and drag a Show Knowledge Article action below the Communicate action.
- Rename the Show Knowledge Article action, or leave the default name.
- Under Knowledge Article, click Expression Modes and then click Expression .
- In the Expression box, type
Flow.searchResults[0].
Click the image to enlarge.
The example that follows describes how to configure the No path for the Decision action in a reusable knowledge task, after you switch to custom knowledge. Here, add looping logic and then ask for confirmation from the participant whether the article is what they need.
- Add and configure a Loop action:
- From the Toolbox, expand the Loop menu and drag a Loop action into the task editor below the Decision action’s No path.
- Rename the Loop action, or leave the default name.
- Under Current Index Data Name, type
Flow.loopIndex. - Under Maximum Loop Count, click Expression Modes and then click Expression .
- In the Maximum Loop Count box, type
Count(Flow.searchResults).
- Under the Loop action, add and configure a Communicate action.
- From the Toolbox, expand the Communicate menu and drag a Communicate action into the task editor.
- Rename the Communicate action, or leave the default name.
- Under Communication, click Click to add text and in the Rich Text Builder, type Here’s an article that answers your question.
- Click Save.
- Under the Communicate action, add and configure a Show Knowledge Article action.
- From the Toolbox, expand the Communicate menu and drag a Show Knowledge Article action below the Communicate action.
- Rename the Show Knowledge Article action, or leave the default name.
- Under Knowledge Article, click Expression Modes and then click Expression .
- In the Expression box, type
Flow.searchResults[Flow.loopIndex].
- Add and configure an Ask for Yes/No action.
- From the Toolbox, expand the Ask menu and drag an Ask for Yes/No action below the Show Knowledge Article action.
- Rename the Ask for Yes/No action, or leave the default name.
- Under Question, click the text box and in the Rich Text Builder, type Did that answer your question?
- Click Save.
- Under No Match, click the text box and in the Rich Text Builder, type Please enter Yes or No. Did that answer your question?
- Click Save.
- Add and configure a Send Knowledge Feedback action below the Ask for Yes/No action’s Yes path.
- Expand the Data category and drag a Send Knowledge Feedback action below the Yes path.
- Rename the Send Knowledge Feedback action, or leave the default name.
- Under Knowledge Search ID, type
Session.LastKnowledgeSearchId. - Under Knowledge article, type
Flow.searchResults[Flow.loopIndex]. - Under Knowledge Feedback, click Enter value and select Positive.
- Expand the Loop menu and drag an Exit Loop action below the Send Knowledge Feedback action.
- Add and configure a Send Knowledge Feedback action below the Ask for Yes/No action’s No path.
- Expand the Data category and drag a Send Knowledge Feedback action below the No path.
- Rename the Send Knowledge Feedback action, or leave the default name.
- Under Knowledge Search ID, type
Flow.searchResults[Flow.loopIndex]. - Under Knowledge article, type
Session.LastKnowledgeSearchId. - Under Knowledge Feedback, click Enter value and select Negative.
- From the Toolbox, expand the Communicate menu and drag a Communicate action into the task editor.
- Rename the Communicate action, or leave the default name.
- Under Communication, click Click to add text and in the Rich Text Builder, type Sorry about that! Let’s try again.
- Click Save.
- From the Toolbox, expand the Disconnect menu and add an Exit Bot Flow action below the Communicate action.
- Validate and save the flow.
Click the image to enlarge.

Control knowledge in voice bot flows
The following process describes how you can use advanced, refined knowledge handling in bot flows and provide your customers with more accurate results.
- Switch to Custom mode to configure custom knowledge logic.
- Add and configure an Ask for Intent action in the appropriate task, typically the Starting Bot.
- Select the knowledge path and choose the value in which to store knowledge search results.
- Configure the knowledge path for the Ask for Intent action.
- Open a bot flow or create a new one.
- Under Natural Language Understanding, click Knowledge.
- Under Default Knowledge Base, click the list and select the default knowledge base.
- To override the standard, global knowledge settings, click Custom. A dialog box opens, asking you to confirm the switch to custom logic.
- From the Switch to Custom dialog box, click Switch.
Click the image to enlarge.
Click the image to enlarge.
- Select the location in the flow in which to add the action. Choose one of the following options:
- Under Starting Bot, click Default Bot.
- Create a reusable task.
- Click an existing task.
- From the Toolbox, click to expand the Ask menu and then drag an Ask for Intent action into the appropriate location in the task editor.
- Configure the action:
- Give the action a meaningful name or leave the default name unchanged.
- Under Question, configure the initial question that you want the recipient to receive when they reach this point in the flow. For example, How can I help?
- Under Voice End of Input Timeout, choose the maximum length of time to pause after the system detects that the participant finished their response.
- Under Invalid Response > No Input, configure the response that the bot produces when it does not receive input from the participant.
- Under Invalid Response > No Input, to create a list of prompts that the bot incrementally returns when it does not receive user input, click Customize Input. Then configure the responses according to your preferences.
- Under Invalid Response > No Match, configure the response that the bot returns when the user’s input is not a valid match. For example, Tell me again what you want to do.
- Under Invalid Response > No Match, to create a list of prompts that the bot incrementally returns when it does not receive user input, click Customize Input. Then configure the responses according to your preferences.
- To configure the knowledge task and select the knowledge path, see the next section.
Click the image to enlarge.
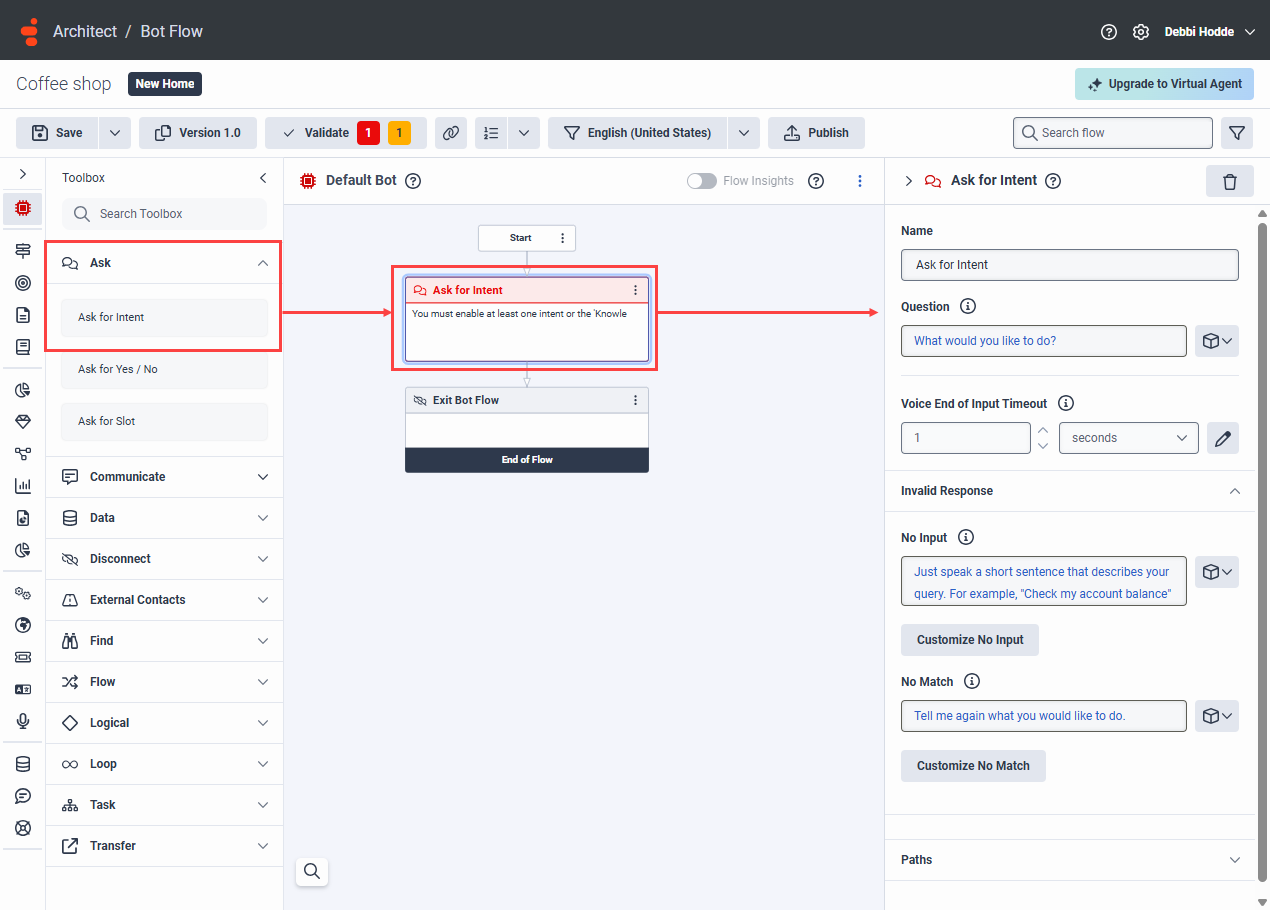
With custom knowledge, when you add an Ask for Intent action to your flow and then set the action path to Knowledge, Architect displays a configurable knowledge search results field above the Paths section. In this field, choose the variable that stores the collection of KnowledgeBaseDocument matching results from the search that Architect performs in the action. The results collection can contain multiple articles that strongly match the search.
- Under Paths, enable the Knowledge check box. The Knowledge Search Results field appears directly above the Paths section.
- Under Knowledge Search Results, select the variable in which to store the results of a knowledge query. For example, Flow.searchResults.
When you select the Knowledge path in your Ask for Intent action, Architect enables you to control the flow behavior before you present articles to the participant. Unlike standard handling, which presents the knowledge articles and follow-up communication with the participant automatically, custom handling lets you decide how to provide this information to the participant.
The following steps build on the scenario from the previous sections.
- Under the Ask for Intent action’s Knowledge path, configure a Communicate action.
- From the Toolbox, expand the Communicate menu and drag a Communicate action into the task editor.
- Rename the Communicate action, or leave the default name.
- Under Communication, click There are no items configured. The Communication Sequence Builder opens.
- Click Text and then add text for the response that the customer receives. For example, I think these answers will help.
- Click Save.
- Under the Communicate action, configure a second Communicate action.
- From the Toolbox, expand the Communicate menu and drag a Communicate action into the task editor.
- Rename the Communicate action, or leave the default name.
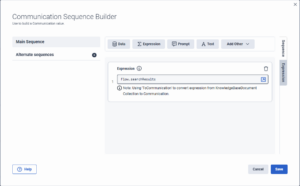
- Under Communication, click There are no items configured. The Communication Sequence Builder opens.
- Click Expression and then in the Expression box type the knowledge search results variable that you created in the previous section. For example, Flow.searchResults.
- Click Save.
Click the image to enlarge.
- Complete the flow configuration, then validate and save it.
