
Configure rule actions
Configure actions for call rules and digital rules. The system executes actions before pre-call and after wrap-up for calls, and it executes actions before pre-contact and after post-contact for messages.
-
Select an action type, and then configure the action’s attributes. The following table shows actions that you can select for a pre-call or wrap-up category.
Action Pre-Call Wrap-up Data Action—use an existing custom data action configured for an integration.
Note: When creating a Data Action to use for a Call Rule, it must be a Secure Data Action. For more information, see the article Call Secure Data action, and in the table scroll down to Secure Data Action.Designate Caller Id—set the caller ID name and number. Do Not Dial—skip dialing a contact. Update Contact Column—update the value of a column in the contact record. Route Call Based on Skills—route call to agent with best matching skills. Note:
Using a call rule to route based on skills overrides the functionality of skills-based dialing.Switch to Preview—preview dial this contact. Mark Contact as Uncallable—marks all numbers for the contact as uncallable. Mark Number as Uncallable—marks the current contact number as uncallable. Append Do Not Call list number—add the contact’s number to the first Do Not Contact list used by the campaign. This action prevents that number from being called again. Append DNC Custom Entry—add the contact’s custom exclusion column value to the first designated Do Not Contact list of Type Internal – Custom, used by the campaign. This action prevents contacts with this value from being called again. Schedule Callback—schedule a return call to the contact. Note: If an agent skips a preview dialing mode call, all pre-call rule actions except Route Call Based on Skills are ignored. In this scenario, the call was already routed based on skills, since that happened before preview pop occurred. Because the preview call was skipped, no other rule actions are applied. -
Configure the rule action’s attributes by typing or selecting values as needed.
Attribute Value Data Action To set up this type of rule action, select a predefined data action, configure the input data that the action requires, and tell the rule how to evaluate the information returned by the action.
Since data actions take a few steps to set up, this action type is described in detail in Use a rule to evaluate information from a data action. For more information, see Create a custom action for integrations and the Data actions section in About integrations.
Note: Publish a data action before you can use it in a call rule.Designate caller Id For a pre-call action, you can select “Designate Caller ID” to specify the caller ID information used for the call. You can specify Caller ID phone number and name as literal values, or by specifying columns from the contact list.
The system uses literal strings entered into the input fields of the rule action as actual caller ID values. For instance, if you enter
8002263462for the caller ID address and1-800-ACMEINCfor the caller name, these values appear on the call display whenever the rule conditions are true.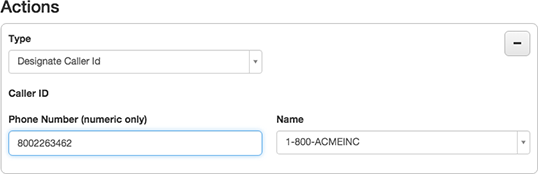
Tip: A pre-call rule can set just the Caller ID name, just the Caller ID phone number, or both. If only a name is set, the caller ID number from the campaign is used.
However, a user can use contact column values instead of static values. To use the contact column values, select from the Name list, or enter a value such as
contact.lastname. in the input area.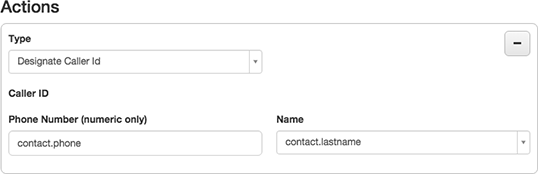
Column-based entries indicate that the system uses the value found in the lastname column of the contact for the corresponding caller ID whenever the rule conditions are true.
- If the contact does not have a value for that column or the column value is invalid as caller ID information, then the application uses the campaign’s caller ID value.
- If there is no campaign-level caller ID value, then the application uses the system caller ID value.
- The system localizes the word “contact” in the indicator contact.lastname to the user’s language.
Do Not Dial This action has no options to configure. It prevents the call from being placed.
A do-not-dial pre-call rule action always skips dialing if an error occurs while the rule condition is evaluated. Typically, a rule action is ignored if the rule is misconfigured in some way—for example, if the rule evaluates a column that does not exist. For do-not-dial actions, an additional check is performed to ensure that a skip always occurs if an error is detected.

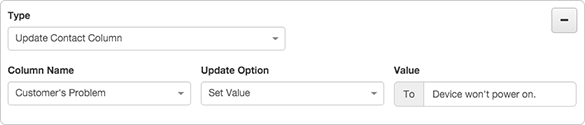
Update Contact Column This action updates a contact list column for the row of the current contact. To set this up, choose a column from the Column Name box. Then, select one of the following update options:
- Decrement (by One) — Subtracts 1 from the current value of the column.
- Increment (by One) — Adds 1 to the current value of the column.
-
Set Value — Sets the value of the column to the static value that you provide.
-
Set as Current Timestamp — Sets the value of the selected column to the current date and time.
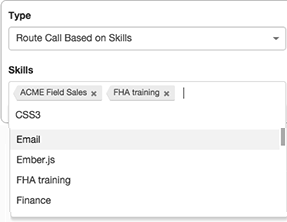
Route Call Based on Skills This action matches the call to an agent with matching skills. To configure this action, select one or more skills from the Skills list.
Important: For this feature to work properly, the queue used by this campaign must be configured to use the All Skills Matching or Best Available Skills skill evaluation method (click Admin > Contact Center, and then click Queues). If Disregard Skills is configured for the queue, then this rule action does not route the call based on agent skills. For more information, see Edit a queue’s routing settings in the Manage queues topic.
Switch to Preview This action preview pops this contact to the agent, irrespective of the dialing mode set for the campaign. It has no parameters.
Mark Contact as Uncallable This action marks all numbers for the contact as uncallable. It has no parameters.

Mark Number as Uncallable This action marks the current contact number as uncallable. It has no parameters.

Append DNC Number This action appends the contact’s telephone number to the campaign’s first designated Do Not Contact list. As a result, that number is never dialed again by any campaign that uses that DNC list. This action has no effect if the campaign does not have a DNC list assigned to it.
To set a time period during which the contact is included in the DNC list, set Does not Expire to False and enter the desired date and time in Expiration duration. This duration cannot be more than 180 days in the future. The expiration time must be in Greenwich Mean Time (GMT). Contact attempts for that record will resume after the expiration date and time.
Append DNC Custom Entry This action appends the contact’s custom exclusion column value to the campaign’s first designated Do Not Contact list of Type Internal – Custom. As a result, contacts with this value are never contacted again by any campaign that uses that DNC list. This action has no effect if the campaign does not have a DNC list assigned to it.
To set a time period during which the contact is included in the DNC list, set Does not Expire to False and enter the desired date and time in Expiration duration. This duration cannot be more than 180 days in the future. The expiration time must be in Greenwich Mean Time (GMT). Contact attempts for that record will resume after the expiration date and time.
Schedule Callback This action places a return call to the contact in a configurable number of minutes in the future. The default delay is five minutes. A callback cannot be scheduled more than one month (43200 minutes) in advance. For more information, see Callbacks in campaigns.
Note: The Schedule Callback action is not applied if no call is placed.

-
(Optional) Click Add New Action to add actions.
Rules can perform multiple actions. All actions in a rule are performed sequentially when the rule performs its actions.
-
Select an action type, and then configure the action’s attributes. The following table shows actions that you can select for a pre-contact or post-contact category.
Action Pre-Contact Post-Contact Append to DNC List—appends the contact’s address or custom exclusion column value to the campaign’s first designated DNC list. This action prevents a message from being sent to the contact again.
Do Not Send—skip sending a message to a contact. Mark Contact Address Uncontactable—marks the contact address for the contact as not contactable. Mark Contact Uncontactable—marks the current contact as not contactable. Set Content Template—select this action to use a content template for a contact when the rule condition is met.
Set SMS Phone Number—Sets the sender SMS phone number when a rule condition is met.
Update Contact Column—update the value of a column in the contact record. -
Configure the rule action’s attributes by typing or selecting values as needed.
Attribute Value Do Not Send This action prevents the message from being sent. It has no parameters.

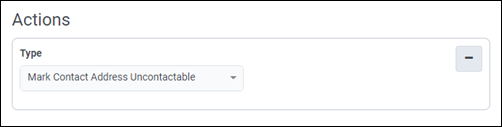
Mark Contact Address Uncontactable This action marks the contact address for the contact as not contactable. It has no parameters.
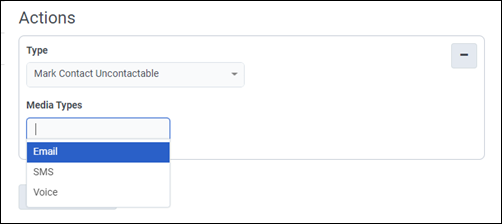
Mark Contact Uncontactable This action marks the current contact as not contactable. To configure this action, select a Media Type. Available media types are Email, SMS, and Voice.
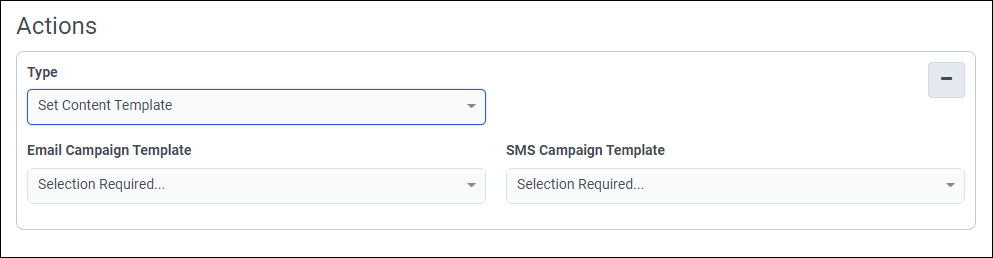
Set Content Template
This action allows you to use a content template for a contact when the rule condition is met. You can only select one Set Content Template action per rule. When you have multiple rules with a Set Content Template action in the rule set, the first rule to evaluate true and set the content template is the action that applies.
To configure this action, select at least one Email Campaign Template or SMS Campaign Template, and the campaign uses the content template type that matches the campaign type.
Sender SMS Phone Number
Select the phone number that you provisioned for the campaign.
Notes:
- If at runtime your rule tries to set the phone number to a different phone number type than the phone number type on the campaign, the rule action fails with an OUTBOUND-RULE-ERROR-SKIPPED error.
- If you have more than one Set SMS Phone Number action in the rule sets on your campaign, only the first one to run takes action.
- You can only have one Set SMS Phone Number action per rule.
- You can only have a maximum of five Set SMS Phone Number actions on a running campaign.
Update Contact Column This action updates a contact list column for the row of the current contact. To set this up, choose a column from the Column Name box. Then, select one of the following update options:
- Decrement (by One)—subtracts 1 from the current value of the column.
- Increment (by One)—adds 1 to the current value of the column.
-
Set Value—sets the value of the column to the static value that you provide.
-
Set as Current Timestamp—sets the value of the selected column to the current date and time.
Append to DNC List This action appends the contact’s address or custom exclusion column value to the campaign’s first designated DNC list. This action prevents a message from being sent to the contact again. This action has no effect if the campaign does not have a DNC list assigned to it.
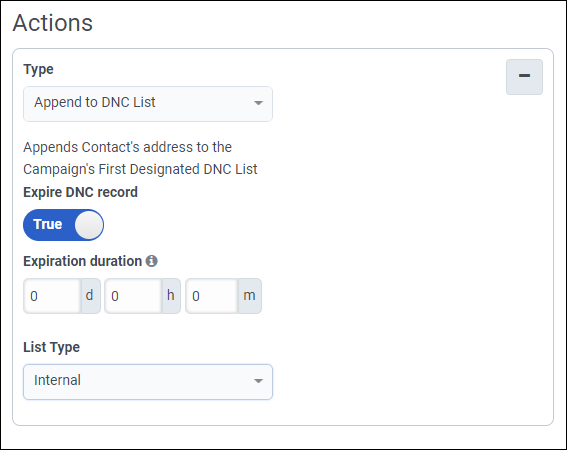
To set a time period during which the contact is included in the DNC list, set Expire DNC record to True, and then set the desired number of days, hours, and minutes in Expiration duration. This duration cannot be more than 180 days in the future. Contact attempts for that record will resume after the expiration time.
To set the type of DNC list to append to, under List Type, select Internal or Internal – Custom.
-
(Optional) Click Add New Action to add actions.
Rules can perform multiple actions. All actions in a rule are performed sequentially when the rule performs its actions.