
Configure Microsoft Entra ID for Genesys Cloud SCIM (Identity Management)
To use Genesys Cloud SCIM (Identity Management), configure Microsoft Entra ID to sync user entities to Genesys Cloud. In Microsoft Entra ID, create an enterprise application that you configure to work with the SCIM APIs. Then assign users and groups to this enterprise application.
- Genesys Cloud OAuth client. For more information, see Create an OAuth client (Genesys Cloud SCIM tab).
- Token generation
- Application setup
- Provisioning
- Mappings (optional)
- Users and groups
- Scope (optional)
Token generation
Generate a token to use for Provisioning.
- Open Postman.
- Import the Genesys Cloud Client Credentials collection for the appropriate collection format from the following links:
- Collection Format v1: https://www.getpostman.com/collections/06d3bac569ec729f0a59
- Collection Format v2: https://www.getpostman.com/collections/b4f0048c7fc833b914c2
- Replace {{environment}} in the POST API call with the login URL where your Genesys Cloud organization is located, for example, https://login.mypurecloud.com/oauth/token. For a list of regional URLs, see Platform API (Genesys Cloud Developer Center).
- Under Authorization, add the following information:
- Username: Enter the Client ID from the Genesys Cloud OAuth client you created.
- Password: Enter the Client Secret from the Genesys Cloud OAuth client you created.
- Click Send. Your access token appears in the response body. Use this token when you provision Microsoft Entra ID. See the Provisioning section.
Application setup
Add the Genesys Cloud for Azure application.
- Log in to Microsoft Entra ID.
- In the left column, click Enterprise applications.
- Click New application.
- Search for and click Genesys Cloud for Azure.
- Click Create.
Provisioning
Enter admin credentials and test the connection.
- In the left column under Manage, click Provisioning.
- Click Get Started.
- From the Provisioning Mode menu, select Automatic.
- Under Admin Credentials, add the following information:
- Tenant URL: Enter the URL of the SCIM endpoint: https://{domain}/api/v2/scim/v2/.
Use the domain associated with the location of your Genesys Cloud organization:
Genesys Cloud region Domain Americas (Canada) api.cac1.pure.cloud Americas (Sao Paulo) api.sae1.pure.cloud Americas (US East) api.mypurecloud.com FedRAMP api.use2.us-gov-pure.cloud Americas (US West) api.usw2.pure.cloud Asia Pacific (Mumbai) api.aps1.pure.cloud Asia Pacific (Seoul) api.apne2.pure.cloud Asia Pacific (Sydney) api.mypurecloud.com.au Asia Pacific (Osaka) api.apne3.pure.cloud Asia Pacific (Tokyo) api.mypurecloud.jp EMEA (Dublin) api.mypurecloud.ie EMEA (Frankfurt) api.mypurecloud.de EMEA (London) api.euw2.pure.cloud EMEA (Zurich) api.euc2.pure.cloud EMEA (UAE) api.mec1.pure.cloud - Secret Token: Enter the bearer token. The bearer token is the access token returned when you made an API call in Postman. See the Token generation section.
- Tenant URL: Enter the URL of the SCIM endpoint: https://{domain}/api/v2/scim/v2/.
- Click Test Connection.
- Click Save.
- Under Status, click On next to Provisioning Status.
- Click Save.
Mappings (optional)
The Microsoft Entra ID application automatically configures mappings for groups and users. You can modify these mappings or add new attributes to the existing mappings.
- Under Mappings, click the name of a mapping.
- Delete, edit, or add a new mapping.
This table shows the mappings of Microsoft Entra ID fields to SCIM fields.
Note:- The mappings allow a one-way push from Microsoft Entra ID to Genesys Cloud. For a table that shows the relationship between SCIM and Genesys Cloud fields, see SCIM and Genesys Cloud field mappings.
- If you are using Microsoft Teams integration with SCIM, then you must set additional field mappings to view the Microsoft Teams badge, view the external presence, and enable click-to-dial. For more information, see Configure the Microsoft Teams Integration.
- When you synchronize data with Microsoft Entra ID, attempting to clear a previously synced field by mapping it to an empty value will not work. Microsoft’s sync process ignores empty values and leaves the original data intact in the SCIM implementation. This limitation requires careful planning to avoid persistent and unwanted data. Genesys recommends performing a pilot test to minimize potential errors with a small subset to verify configuration and attribute mapping. Any required modifications may involve manual adjustments for the synced test users.
Microsoft Entra ID field SCIM field Required Notes userPrincipleName userName Yes This field generates the main email address in Genesys Cloud. Not([IsSoftDeleted]) active Yes displayName displayName Yes jobTitle title No manager scimEnterpriseUser. manager.value No Full URN: urn:ietf:params:scim:schemas:extension:enterprise:2.0:User:manager.value department scimEnterpriseUser.
departmentNo Full URN: urn:ietf:params:scim:schemas:extension:enterprise:2.0:User:department {Customer-dependent field} scimEnterpriseUser.
divisionNo This field is the name of the division in SCIM and is mapped to the Genesys Cloud divisionId. This field does not create a division.
Full URN: urn:ietf:params:scim:schemas:extension:enterprise:2.0:User:division
mail emails[type eq "work"].value No StripSpaces([telephoneNumber]) phoneNumbers[type eq "work"].value1 No You can map to a phone number with an extension or to an extension only. See the Extensions section. {Customer-dependent field} phoneNumbers[type eq "work2"].value1 No You can map to a phone number with an extension or to an extension only. See the Extensions section. {Customer-dependent field} phoneNumbers[type eq "work3"].value1 No You can map to a phone number with an extension or to an extension only. See the Extensions section. {Customer-dependent field} phoneNumbers[type eq "work4"].value1 No You can map to a phone number with an extension or to an extension only. See the Extensions section. {Customer-dependent field} phoneNumbers[type eq "home"].value1 No You can map to a phone number with an extension or to an extension only. See the Extensions section. {Customer-dependent field} phoneNumbers[type eq "other"].value1 No You can map to a phone number with an extension or to an extension only. See the Extensions section. StripSpaces([mobile]) phoneNumbers[type eq "mobile"].value1 No You can map to a phone number with an extension or to an extension only. See the Extensions section. givenName name.givenName No Not currently supported by Genesys Cloud. surname name.familyName No Not currently supported by Genesys Cloud. postalCode addresses[type eq "work"].postalCode No Not currently supported by Genesys Cloud. physicalDeliveryOfficeName addresses[type eq "other"].Formatted No Not currently supported by Genesys Cloud. streetAddress addresses[type eq "work"].streetAddress No Not currently supported by Genesys Cloud. employeeId scimEnterpriseUser.
employeeNumberNo Full URN: urn:ietf:params:scim:schemas:extension:enterprise:2.0:User:employeeNumber SingleAppRoleAssignment([appRoleAssignments]) roles[primary eq "True"].value This field is the role assigned to a user in Microsoft Entra ID app, and mapped to the Genesys Cloud user role.
Create an app role in Microsoft Entra ID and assign it to the user when adding them to the app. Use the SingleAppRoleAssignment function for attribute mapping. The user role name must be the same in both the platforms. Either create an app role in Microsoft Entra ID with the name of the Genesys Cloud role that you want to assign to the user, or vice versa.
— phoneNumbers[type eq "{type}"].primary = true No This field designates the phone number associated with the field as the primary phone number on the user’s contact information.
Use with constant True to set a specific phone type as the primary.
— scimUserExtensions.
routingSkills.[name eq "skill"].proficiencyNo Full URN: urn:ietf:params:scim:schemas:extension:genesys:purecloud:2.0:User:routingSkills — scimUserExtensions.
routingLanguages.[name eq "skill"].proficiencyNo Full URN: urn:ietf:params:scim:schemas:extension:genesys:purecloud:2.0:User:routingLanguages 1 For Microsoft Entra ID fields, use StripSpaces with phone number mappings, for example, phoneNumbers[type eq "mobile"].value == StripSpaces([mobile]). The StripSpaces function standardizes the format of telephone numbers in Microsoft Entra ID. Standardization ensures that telephone numbers match the format of telephone numbers in Genesys Cloud and prevent erroneous user updates from occurring.Extensions
You can set phone number fields to use phone numbers with extensions or extensions only.
-
Under Mapping type, select Expression.
- In the Expression box, add an expression for a phone number with an extension or an extension only. Important: Use any Microsoft Entra ID attribute in place of [telephoneNumber] or [attributeThatContainsExtension].
-
Extension only
Join(";ext=", "tel:", StripSpaces([attributeThatContainsExtension])) -
Phone number with an extension
IIF(IsNullOrEmpty(StripSpaces([attributeThatContainsExtension])),
    StripSpaces([telephoneNumber]),
    Join(";ext=",
        Append("tel:", StripSpaces([telephoneNumber])),
        StripSpaces([attributeThatContainsExtension])
    )
)
-
- For new mappings, in the Target attribute box, add the SCIM field for the phone number attribute, for example, phoneNumbers[type eq "work2"].value.
- Click Ok.
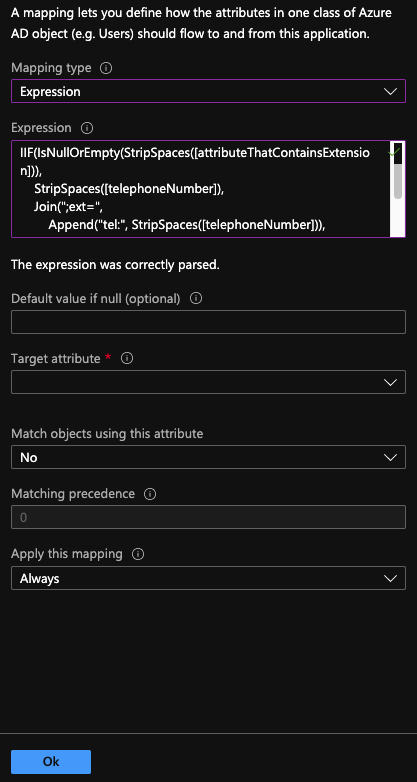
- Click Save.
For more information, see Customizing user provisioning attribute-mappings for SaaS applications in Microsoft Entra ID in the Microsoft Entra ID documentation.
Users and groups
Add users and groups that you want to sync from Microsoft Entra ID to Genesys Cloud.
- Provisioning can create, update, and delete users in Genesys Cloud.
- Provisioning can add users to a public group or remove users from a public group in Genesys Cloud, but cannot create or delete groups in Genesys Cloud. If you are syncing groups, only select Update.
- Groups must be set to public, as only public groups are supported, and the names must be the same (case insensitive) in both applications. Otherwise, Microsoft Entra ID cannot sync user membership to Genesys Cloud.
- In the left column under Manage, click Users and groups.
A list of users and groups in your Microsoft Entra ID appears.
- Click Add user.
- Click Users and groups.
- Select or search for any users and groups that you want to add to this application.
- Click Select.
- Click Assign.
For more information, see Managing user account provisioning for enterprise apps in the Microsoft Entra admin center in the Microsoft Entra ID documentation and What causes Genesys Cloud to change the status of a Microsoft Entra ID user to inactive or to delete a user?.
Scope (optional)
By default, Microsoft Entra ID sets the scope to Sync only assigned users and groups. You can change the scope so that Microsoft Entra ID syncs all users and groups to Genesys Cloud.
- In the left column under Manage, click Provisioning.
- In the Scope menu under Settings, select Sync all users and groups.
- Click Save.
The SCIM APIs now automatically sync user entities from your enterprise application to Genesys Cloud.
For information about Genesys Cloud SCIM (Identity Management), see About Genesys Cloud SCIM (Identity Management) and Genesys Cloud SCIM (Identity Management) overview (Genesys Cloud Developer Center).