
Series: Create a campaign setting
Configure contact list column management
When you save a new Genesys Cloud Campaign Setting, a Contact List Column Management section appears in the Details section of the setting. The Campaign Management integration imports the entries from the contact list column configured in the Global Campaign Settings. For more information, see Configure contact list columns.
- In Salesforce, click Setup.
- Search for Page Layouts in the Quick Find box.
- Navigate to Object Manager > Genesys Cloud Campaign Setting > Page Layouts.
- Click the existing page layout named Genesys Cloud Campaign Setting Layout to edit it.
- In the page layout editor, select the Visualforce Pages user interface element.
- Drag the Settings Column Management Page to the Genesys Cloud Campaign Setting Detail section.
- To add scrollbars to the new contact list column management section:
- Double-click the section to open the Visualforce Page Properties window.
- Select the Show Scrollbars option.
- Click OK.
- To use 1-Column Layout for the new contact list column management section:
- Double-click the title of the section to open the Section Properties window.
- Select the 1-Column layout option.
- Click OK.
- Click Save.
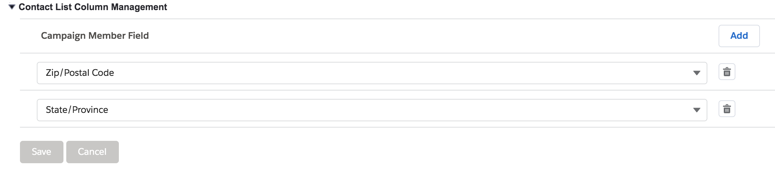
In this section, you can add entries or modify any of the entries imported from the global campaign settings.
- Under Contact List Column Management, make any of the following changes:
Any changes that you make to this section affect any new, active, or rescheduled campaigns associated with this campaign setting.
- (Optional) Add a Campaign Member Field.
Note: A particular Campaign Member Field cannot appear more than once.When you first create a campaign, all of the Campaign Member Fields under Campaign Management in the managed package are included with the campaign. If you add a Campaign Member Field to a campaign setting with associated campaigns that do not include this Campaign Member Field, the integration alerts you with an informational message.
- (Optional) Delete a Campaign Member Field.
- (Optional) Change an entry.
You can change the column that corresponds to a Campaign Member Field.
- (Optional) Add a Campaign Member Field.
- Click Save.
For more information, see About Campaign Management in CX Cloud from Genesys and Salesforce.
When you save a new Genesys Cloud Campaign Setting, a Contact List Column Management section appears in the Details section of the setting. The Campaign Management integration imports the entries from the contact list column configured in the Global Campaign Settings. For more information, see Configure contact list columns.
If you are upgrading from a managed package that included campaign management functionality, then you must add the Contact List Column Management section to the campaign setting page layout.
- In Salesforce, click Setup.
- Search for Page Layouts in the Quick Find box.
- Navigate to Object Manager > Genesys Cloud Campaign Setting > Page Layouts.
- Click the existing page layout named PureCloud Campaign Setting Layout to edit it.
- In the page layout editor, select the Visualforce Pages user interface element.
- Drag GenesysCloudSettingsColumnMgmtPage to the Genesys Cloud Campaign Setting Detail section.
- To add scrollbars to the new contact list column management section:
- Double-click the section to open the Visualforce Page Properties window.
- Select the Show Scrollbars option.
- Click OK.
- To use 1-Column Layout for the new contact list column management section:
- Double-click the title of the section to open the Section Properties window.
- Select the 1-Column layout option.
- Click OK.
- Click Save.
In this section, you can add entries or modify any of the entries imported from the global settings.
- Under Contact List Column Management, make any of the following changes:
Any changes that you make to this section affect any new, active, or rescheduled campaigns associated with this campaign setting.
- (Optional) Add a Campaign Member Field.
Note: A particular Campaign Member Field cannot appear more than once.When you first create a campaign, all of the Campaign Member Fields under Campaign Management in the managed package are included with the campaign. If you add a Campaign Member Field to a campaign setting with associated campaigns that do not include this Campaign Member Field, the integration alerts you with an informational message.
- (Optional) Delete a Campaign Member Field.
- (Optional) Change an entry.
You can change the column that a Campaign Member Field is associated with.
- (Optional) Add a Campaign Member Field.
- Click Save.
For more information, see About Campaign Management.
For more information about the integration, see About Genesys Cloud for Salesforce.