
Assign a development and feedback module
- Genesys Cloud CX 3, Genesys Cloud CX 3 Digital, Genesys Cloud CX 1 WEM Add-on II, Genesys Cloud CX 2 WEM Add-on I, or Genesys Cloud EX license
- For primary administrators
- Learning > Assignment > All permission
- Learning > scheduleSlot > View permission
- Learning > Module > All permission
- Learning > Rule > All permission
- Learning > CoverArt > All permission
- Learning > Schedule Slot Job > Add permission
- users > rules > All permission
- users > ruleUsers > All permission
- For performance administrators
- Learning > Assignment > Add, Delete, Reset, and View permissions
- Learning > Module > Add, Archive, Delete, Edit, and Publish permissions
- Learning > Rule > Edit and View permissions
- Learning > Cover Art > All permission
- Learning > Schedule Slot Job > Add permission
- users > rules > Add, Delete, Edit, and View permissions
- users > ruleUsers > View permission
- users > ruleDependents > Delete, Edit, and View permissions
- To view schedule preview for optimal slots
- Workforce Management > Schedule > View permission
As a supervisor, you can automatically assign development and feedback modules to agents after you publish the assignments. Enable the Auto Assign toggle in the Auto Assign tab of the Development and Feedback page. If you enable auto assign for a published module, the system assigns the module immediately. Genesys Cloud regularly checks the rules every night or when you publish a new version of the module and then assigns modules to agents that match the added or updated rules. If an agent no longer matches the rules and they did not start the module, Genesys Cloud automatically removes the module assignment. If the modules are in progress or completed, Genesys Cloud does not unassign the modules.
- You can only create, work with, edit, and assign a feedback module in divisions for which you have permission. That is, you can only view data from the divisions in which you are a member. For more information, see Divisions overview and Assign roles, divisions, licenses, and add-ons.
- You can reset a module when an agent makes a mistake and assign a module again to determine an agent’s progress. For more information, see Reset and assign a module again.
- You can only work with entities in divisions for which you have permission, when using rules.
You can disable auto assign so that the system no longer automatically assigns modules to users. When auto assign for a published module is unavailable, existing modules that are in progress or completed items remain assigned. Any items that a user has not started are unassigned.
Rule views available for existing modules
The Auto Assign tab displays the following two tabs for existing modules.
- Legacy Rules view: This view displays the rule configuration in the legacy format. When you open this view, a message displays indicating that you are viewing the last known configuration of the legacy rule. If you make and save changes, these changes are saved to the legacy rule, which continues to run under the legacy format. The legacy rules service is eventually deprecated. Genesys recommends migrating to the new User Rules view, which offers greater flexibility and additional options. To save your changes and migrate to User Rules, click Migrate Rule on the right side of the page. The system then automatically migrates the rule to the User Rules view. If you do not migrate the rule immediately, an overnight job attempts to migrate it automatically. In some cases, rules may be too complex to migrate. Modules with affected rules are highlighted on the Development and Feedback page. You can resolve these issues by removing rule items until the rule meets the complexity score requirements, or you can recreate the rule in the new rules service. For more information about complexity score, see Work with user association rules.
- User Rules view: This view displays the rule configuration in the new format. You can view the details of the rules here. In addition, you can also edit, reset the rules that are set for this module. For more information about how to edit or reset the rules, see Work with user association rules.
To assign modules automatically based on the rules you create, perform the following steps:
- Click Admin.
- Under Performance and Engagement, click Development and Feedback. The Development and Feedback page appears.
- Click Menu > Performance Management > Employee Engagement > Development and Feedback.
- The Development and Feedback page appears. Click New Module.
- Click the Auto Assignment tab.
- In the User Rules section, click +Add Rule.
- The Select a rule section appears. You can create a new rule or assign an existing rule to the module. For more information about creating a new rule or assigning an existing rule to a module, see Work with user association rules.
- You can modify module rules. You can edit published or draft views. When you update a rule and save the new criteria, the system applies it when you save the rule and to future scheduled executions of the automated assignment.
- If the rule changes the assignment and the module is in progress or complete, any prior assignment remains. If an agent does not start the module, the system unassigns it.
- When automatically assigning a module, the due date is calculated based on the recommended completion date defined when creating the module. By default, the due date is 30 days. For example, the module assigned by the assignment rules has its due date set to today + 30 days.
- There can be a maximum of 10 parameters per rule.
To assign a module manually, perform the following steps:
- Click Performance > Workspace.
- Click Menu > Analytics > Analytics Workspace.
- In the Employment Engagement section, click Agent Development.
- In the Default section, search for Agent Development and then click the view name to open it.
- Choose the agent that you want to assign a module.
- On the right side of the name of the agent, click Assign Module . The Assign Module window appears.
- In the Assign Module page, perform the following steps:
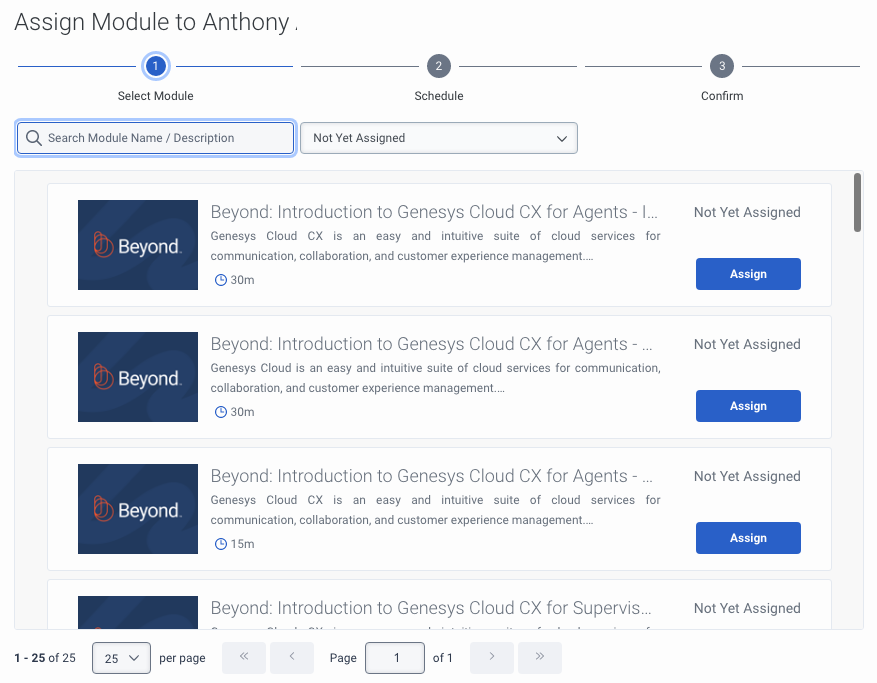
- In the Search Module Name/Description field, search for the module you want to assign.Note: Genesys Cloud performs the search on the module title and description.
- In the next drop-down, select a status of the module to refine the module list. Select one or all the following statuses:
- Planned. The module is assigned to the agent. To view the due date of the module, hover over the Planned status in each module.
- In Progress. The agent is performing the module. To view the due date of the module, hover over the In Progress status in each module.
- Completed. The agent completed the module. To view the due date, the completed date, and its score, hover over the Completed status in each module.
- Not Yet Assigned. The module is not assigned to the agent. By default, the module list first appears with modules that have the Not Yet Assigned status.
- Invalid Schedule. The assigned module was deleted or moved to a different schedule.
- Overdue. The module assigned to the agent is not completed by the agent. To view the module’s due date, hover over the Planned status in each module. Note: The list of modules varies based on the selected status.
- From the list of modules that appear, perform the required action based on the selected status:
- If the module status is Not Yet Assigned, click Assign in the required module to assign that module to the agent. Note: If a recommended duration is configured for a module, the recommended duration appears for the specific module.Click the image to enlarge.
- If the module status is In Progress, Completed, or Overdue, click Assign Again in the required module to assign that module to the agent. For more information, see Reset and assign a development and feedback module again.
- If the module status is Invalid Schedule, click Reschedule in the required module to reassign that module to the agent.
- If the module status is Not Yet Assigned, click Assign in the required module to assign that module to the agent.
- Select the required module and click Assign.
- In the Search Module Name/Description field, search for the module you want to assign.
- In the Schedule section, perform the following steps:
- In the Booking Method drop-down, select an option. Based on the option you select, the section below updates accordingly. The options are:
- Optimal Slots. This option is selected by default. When you select this option, the following fields appear:
- In the Assignment Duration field, select the required duration of the assignment.
- Click Search. Notes: Workforce Management uses the service goals to provide 5 optimal slots with differing time ranges. The most optimal slot is indicated with a label.
- Custom Slots. Select this option when you want to assign slots during a specific date range. When you select this option, the following fields appear:
- In the From fields, select the start date and time in the corresponding fields.
- In the To fields, select the end date and time in the corresponding fields.
- In the Duration field, select the required hours and minutes in the corresponding fields.
- Click Search.
- Off Schedule. Select this option when you do not want any impact to the agents’ schedule. Genesys Cloud workforce management does not add this time to the agent’s calendar as they are outside working hours. When you select this option, then in the Complete by fields, select the date and time. Note: Using this booking method will not add an activity into the agents schedule.
- Optimal Slots. This option is selected by default. When you select this option, the following fields appear:
- In the Optimal Slot section, select the required slot. Genesys Cloud indicates the most optimal slot with a label. The right side displays the calendar of the agent. You can view the existing schedule details and make the booking accordingly. Note: This section is unavailable when you set the Booking Method field to Off Schedule. If you are booking into the schedule then the calendar on the right hand side will display the agents calendar to help provide context when making your choice.
- Click Next.
- In the Booking Method drop-down, select an option. Based on the option you select, the section below updates accordingly. The options are:
- Review the details and click Confirm.
- To verify that the module is assigned successfully, open your Inbox or open your Activity page and search for the assigned module in the Assigned Modules section.
- When an assignment becomes out of sync with your schedule, the Genesys Cloud marks the assignment as an invalid schedule, and you must reschedule it. Agents can still complete assignments with an Invalid Schedule status without the need to reschedule.