Setup guide for CX Cloud, Voice for Salesforce Service Cloud
Before you can create and fully configure a contact center in Salesforce with Genesys as the third-party contact center provider, there are preliminary steps that you must complete. Follow the steps to set up the Salesforce environment for the CX Cloud from Genesys and Salesforce integration.
Create a Lightning app named Contact Center in Salesforce. When creating the app, you can add the Genesys Cloud CX Utility and Omni-Channel widgets. The Genesys Cloud CX Utility provides agents with the ability to manage their phone, queue, callback, and after call work. Apart from this utility, you can also add the following other utilities:
- Queue Stats
- Callback state
- Schedule callback
To create a Lightning app in Salesforce:
- On the Setup Home page, search for Apps in the Quick Find box and select App Manager.
- To open the New Lightning App wizard, click New Lightning App.
- Enter a name for the app; for example, Contact Center, and then click Next.
- Select Console navigation as the navigation style and click Next.
- Click Add Utility Item and add the following items. For each item, define its properties.
- Genesys Cloud CX Utility
- Omni-Channel Notes:
- For Genesys Cloud CX Utility, ensure that you select the Start automatically option.
- Genesys Cloud CX Utility displays the agent user name when an agent logs in to the Salesforce Service Cloud console. For more information, see Configure Genesys Cloud CX Base component.
- Click Next.
- Select Voice Calls and move it from the Available Items list to the Selected Items list. Then, click Next.
- Select to open the Voice Call record page as workspace tabs or subtabs of a given list of components and click Next.
- Select System Administrator and the profile assigned to an agent, and move it from the Available Profiles list to the Selected Profiles list.Note: Ensure that the user profiles selected have access to the contact center. For more information, see Assign permissions sets.
- Click Save & Finish.
Create a presence status for agents in Salesforce. Ensure that for each presence status includes the phone channel assignment. An agent can have the following presence statuses:
- Available
- Available for Voice
- Busy
To create a presence status in Salesforce:
- On the Setup Home page, search for Presence in the Quick Find box and select Presence Statuses.
- On the Presence Statuses page, click New.
- Under the Basic Information section, enter the status name. For example, Available or Available for Voice.
- Under the Status Options section, select Online or Busy accordingly.
- Under the Service Channel section, select the service channels from which you want to receive the voice calls and move them to the Selected Channels list.
- Click Save.
To make the presence statuses available for agents, assign the status to their profiles.
- On the Setup Home page, search for Profiles in the Quick Find box and select Profiles.
- Click the name of the user profile to which you want to give access to the presence status.
- Select the Available for Voice status and move it to the Enabled Service Presence Statuses section.
- Click Save.
The agents assigned with this profile can sign in to Omni-Channel with the Available for Voice presence status.
Salesforce provides Contact Center Admin (Partner Telephony) and Contact Center Agent (Partner Telephony) permission sets. Assign these permission sets accordingly to the administrator and agents. The permission set assignment is essential for you and your agents to access the contact center and start managing the voice calls.
To assign permission set to users in Salesforce:
- On the Setup Home page, search for Permission sets in the Quick Find box and select Permission Sets.
- From the list of permission sets, click Contact Center Admin (Partner Telephony) or Contact Center Agent (Partner Telephony).Note: For secure pause and resume of call recordings, assign the cloned permission sets. For more information, see Pause and resume call recordings.
- Click Manage Assignments.
- In the Current Assignments page, click Add Assignment.
- Select the user from the list and click Next.
- Select an expiration option of the permission for the user.
- Click Assign.
Pause and resume call recordings
If your organization records calls for training and quality purposes, then you might prefer not to record any sensitive information. Clone the existing Contact Center Admin (Partner Telephony) and Contact Center Agent (Partner Telephony) permission sets in Salesforce and edit the permission for call recordings. To allow agents to pause and resume call recordings, you must assign the users to a permission set that has the Control Call Recording option enabled for App Permissions. For more information, see Enable secure pause and resume of call recordings.
The Voice Call record page provides the agents with the relevant information during the call and when viewing the completed call records. You can either create a new Voice Call record page with the custom components from Genesys or edit an existing Voice Call record page by adding the custom components from Genesys.
If you are creating a record page, Genesys Cloud recommends using the Header with Three Region template to arrange the components in Salesforce. You can also customize the layout of the page as per your specific business needs.
To enable agents to manage callbacks, it is mandatory that you add the GC for SCV Callback State and GC for SCV Schedule Callback custom components for callback to the Voice Call record page.
To create a custom Voice Call record page in Salesforce:
- On the Setup Home page, search for App Builder in the Quick Find box and select Lightning App Builder.
- To create a Lightning page wizard, click New.
- Select Record Page and click Next.
- Enter a name for the page in the Label.
- Select Voice Call in the Object list and click Next.
- Under Standard list, select Header and Three Regions as the page template and click Done.
- In the Lightning App Builder, you can add, edit, or remove components.
Drag the following standard components and add them to the page:
- Highlights panel
- Phone
- Record Detail
Drag the following custom components (from Genesys Cloud) and add them to the page:
- GC for SCV Callback State
- GC for SCV Interaction Record Utility
- GC for SCV Queue Stats
- GC for SCV Schedule Callback
You can rearrange the components on the page. For more information, see Create and Configure Lightning Experience Record Pages in the Salesforce documentation.
- Click Save and then click Activation.
- To make the Voice Call record page as the default page for the contact center app, select APP DEFAULT and click Assign as App Default.
- On the Activation window, follow the wizard to assign the record page to other Lightning apps and form factor.
For more information, see Activate Lightning Experience Record Pages in the Salesforce documentation.
The following illustration shows an example of the page layout with the arranged components: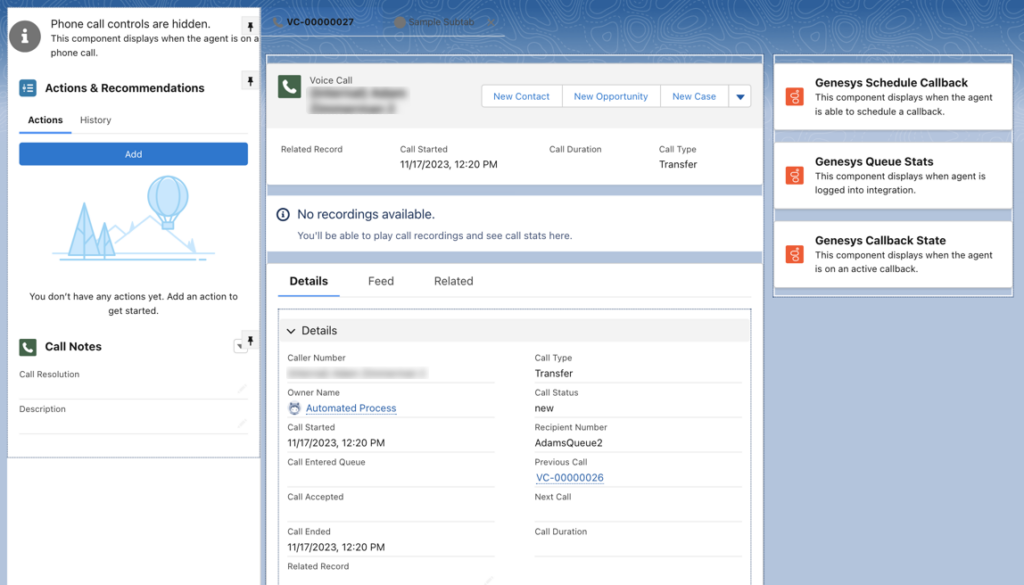
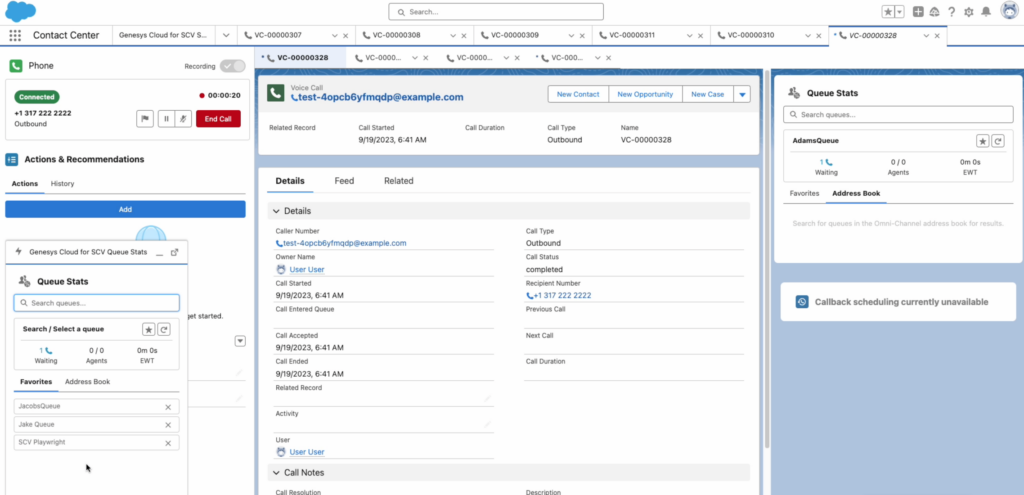
The following screenshot illustrates an example of how a voice call record appears for an agent: