
Series: Set up CX Cloud, Digital and AI for Salesforce Service Cloud Voice
Create presence user and routing configurations
- Create and assign presence statuses to user profiles
- Set up CX Cloud, Digital and AI for Salesforce Service Cloud
- Create service channels
- Assign field-level security
- Create and assign presence statuses to user profiles
- Create backup queues for the flows
- Create flows to route Experience and Email Experience objects
- Create record pages for the Experience objects
- Create an OAuth Client for Salesforce Service Cloud Voice
- Integrate Einstein Next Best Action in Salesforce
- Create a Lightning app for Digital and AI for Salesforce Service Cloud
- Create backup queues for the flows
Prerequisites:
- Install CX Cloud, Digital and AI for Salesforce Service Cloud Voice package.
A presence user configuration is required for agents handling Genesys Cloud chats and emails and a routing configuration required for flows to route the Experience and Email Experience objects.
Set the capacity of your agents. For example, if you have 10 agents, and each agent can handle five chats at the same time, then you can set the capacity at 50.
Create a presence user configuration
For Presence User configuration, set the capacity of your agents. For example, if you have 10 agents, and each agent can handle five chats at the same time, then you can set the capacity at 50.
To create the presence user configuration:
- On the Setup Home page, search for Presence Configurations in the Quick Find box and click Presence Configurations.
- Click New.
- Under the Basic Information section:
- Enter the Presence Configuration Name.
- Enter the Capacity of the agents.
- Under the Audio Settings section:
- Select the Play a notification sound for work requests option.
- Choose Default as the Notification Sound.
- Select the Play a notification sound if Omni Channel loses connection option.
Click the image to enlarge.

- Click Save.

After creating the presence user configuration, assign it to the agents or user profiles.
Notes:
- If you want your agents to answer the conversations automatically, then configure the presence configuration in Salesforce and do not set the queue to auto-answer in Genesys Cloud. Only agents mentioned in this conversation or member of the profile mentioned in the presence configuration can automatically answer.
- You can also use different configurations for chat, voice, and email. Some configurations allow auto-answer for chats, but not for emails. For example, the configurations can also use different alerts and capacities.
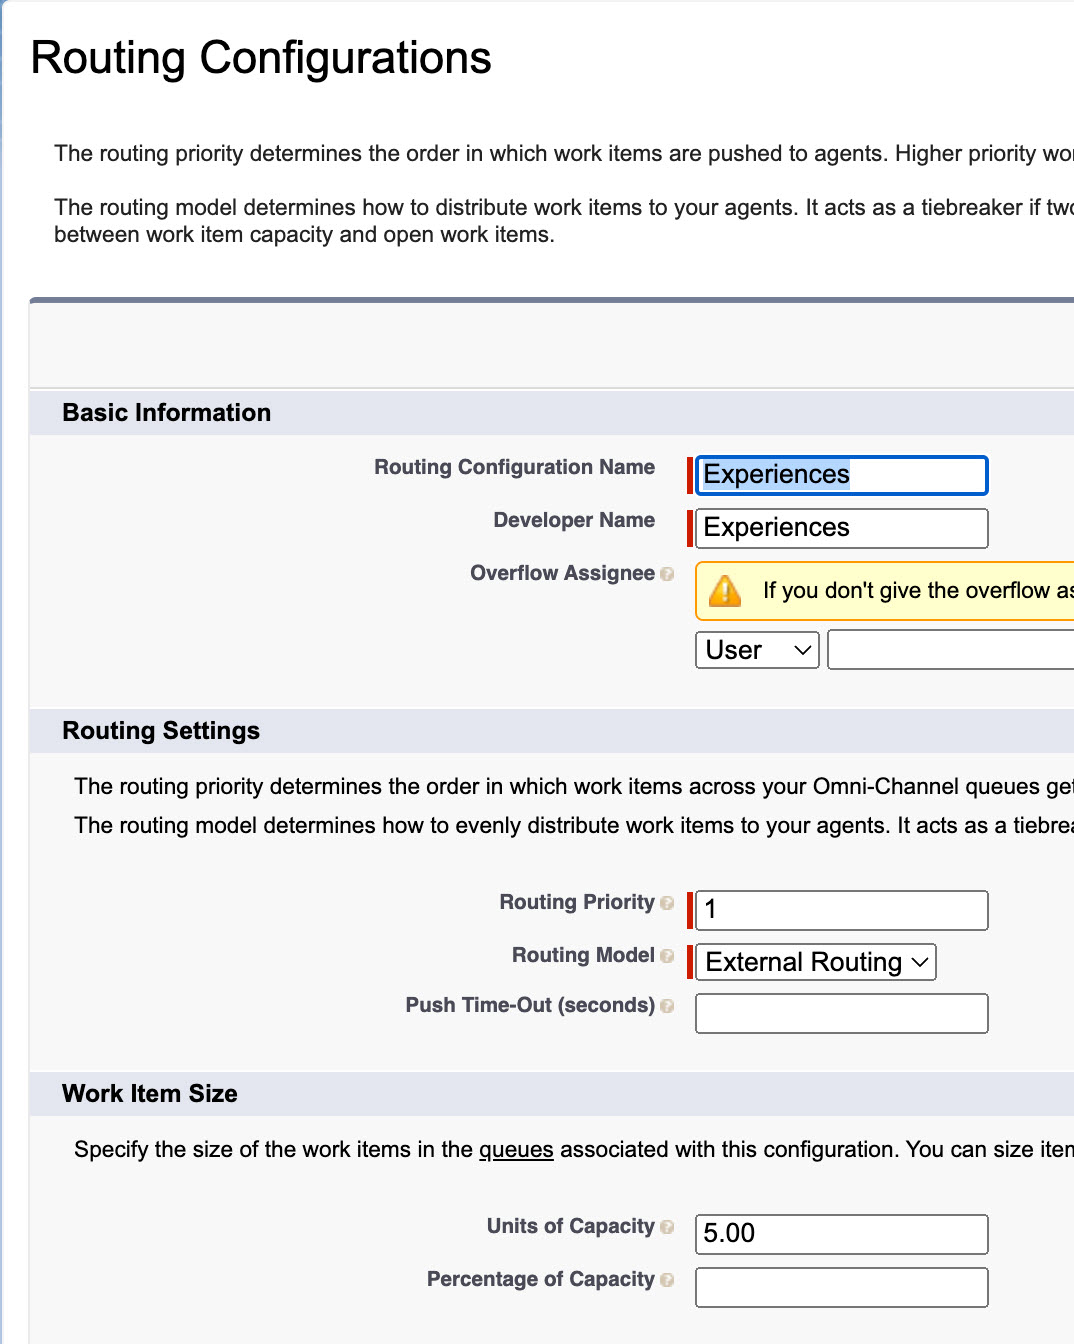
Create routing configuration
To create the routing configuration:
- On the Setup Home page, search for Routing Configurations in the Quick Find box and click Routing Configurations.
- Click New.
- Under the Basic Information section, enter the Routing Configuration Name.
- Under the Routing Settings section:
- Enter 1 as the Routing Priority.
- Choose External Routing as the Routing Model.
- Under the Work Item Size section, enter 5.00 as the Unit of Capacity.
Click the image to enlarge.
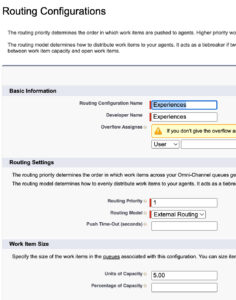
- Click Save.
Create and assign presence statuses to user profiles :Previous Suggested Article Next Suggested Article: Create backup queues for the flows