Series: Architect tutorial for beginning users
Lesson 5: Organize the starting menu structure
- Lesson 4: Create a reusable task for pet tracking services
- Lesson 1: Create and upload audio prompts
- Lesson 2: Create the initial flow and add menus
- Lesson 3: Create reusable tasks for lost and found pets
- Lesson 4: Create a reusable task for pet tracking services
- Lesson 6: Call flow default configuration
- Lesson 7: Add a language and language menu
- Lesson 8: Validate and publish the Genesys Cloud Animal Care call flow
- Lesson 6: Call flow default configuration
In this lesson, you add reusable tasks and reusable menus to the Main Menu that you originally created in Lesson 2. This lesson ties the call flow together.
Objectives
- Add the Appointments menu as a choice in the main menu.
- Add reusable tasks as menu options in the main menu.
Estimated time to complete: 15 minutes
Prerequisites
- Complete lessons 1–4.
- Review Common call flow design tasks.
Additional resources
Tasks
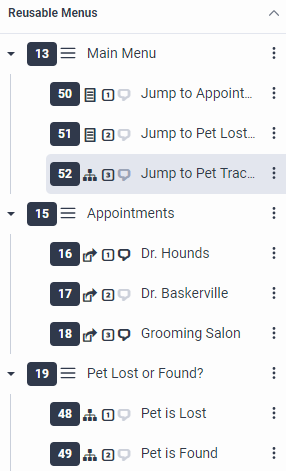
In a previous lesson, you created reusable tasks for lost or found pets. Here, add them to the Pet Lost or Found menu. Also, when you created the Main Menu, you gave callers the option of pressing 1 to schedule an appointment with a veterinarian or the grooming salon. Complete that option here, too.
- Add the Lost Pet reusable task to the Pet Lost or Found? menu:
- From the Toolbox, click to expand the Task category and drag a Jump to Reusable Task action into the Pet Lost or Found? reusable menu.
- Change the reusable menu name to Pet is Lost.
- Change the DTMF to 1.
- Add lost as a speech recognition term.
- Select the Lost Pet reusable task.
- Leave the remaining settings unchanged.
- Add the Found Pet reusable task to the Pet Lost or Found? menu:
- From the Toolbox, click to expand the Task category and drag a Jump to Reusable Task action into the Pet Lost or Found? reusable menu.
- Change the reusable menu name to Pet is Found.
- Change the DTMF to 2.
- Add found as a speech recognition term.
- Select the Found Pet reusable task.
- Leave the remaining settings unchanged.
- In the Reusable Menus area, select the Main Menu that we created in Lesson 2.
- From the Toolbox, expand the Menu category and drag a Jump to Menu action into the Main Menu.
- In the Jump to Menu design area, change the name to Jump to Appointments.
- Change the DTMF to 1.
- Add appointments as a speech recognition term.
- Click the arrow at the end of the Menu list and choose Appointments.
Practice
In addition to dialing 1 to schedule an appointment, callers can also press 2 to report a lost or found pet, or they can press 3 to hear about pet tracking. Here, add the reusable tasks to the Main Menu, which is similar to adding a reusable menu.
- From the Toolbox, expand the Menu category, drag a Jump to Menu action into the Main Menu, and complete the following steps:
- Change the reusable menu name to Jump to Pet Lost or Found.
- Change the DTMF to 2.
- Add lost, found as speech recognition terms.
- Select the Pet Lost and Found reusable task.
- Leave the remaining settings unchanged.
- From the Toolbox, expand the Task category, drag a Jump to Reusable Task action into the Main Menu, and complete the following steps:
- Change the reusable task name to Jump to Pet Tracking Services.
- Select a DTMF of 3.
- Add pet tracking as a speech recognition term.
- Select the Pet Tracking Services reusable task.
- Save your work.


