
Series: Architect tutorial for beginning users
Lesson 2: Create the initial flow and add menus
- Lesson 1: Create and upload audio prompts
- Lesson 1: Create and upload audio prompts
- Lesson 3: Create reusable tasks for lost and found pets
- Lesson 4: Create a reusable task for pet tracking services
- Lesson 5: Organize the starting menu structure
- Lesson 6: Call flow default configuration
- Lesson 7: Add a language and language menu
- Lesson 8: Validate and publish the Genesys Cloud Animal Care call flow
- Lesson 3: Create reusable tasks for lost and found pets
To manage the increasing volume and variety of calls, Genesys Cloud Animal Care wants to implement a simple auto-attendant menu. This menu includes an emergency menu that transfers the call to the appropriate doctor after the user confirms that the call is a pet-related medical emergency. The menu also contains a non-emergency main menu that provides extra options for callers.
Objectives
- Create a call flow
- Set up an emergency menu and create transfer actions for emergency and non-emergency calls
- Create the main menu and add actions
Estimated time to complete: 10 minutes
Prerequisites
- Complete lesson 1
- Review Architect concepts
- Ensure access to at least two configured Genesys Cloud users
- Have a telephone number appropriate for tutorial testing, such as a mobile phone or direct line, to which you can transfer calls
- Download the example prompts file, and extract the prompts to a local directory
Tasks
Create the call flow, set up an Emergency menu, configure an emergency calls transfer action, and create a Main Menu.
Create the call flow
First, create the main call flow that Genesys Cloud Animal Care presents to callers.
- From the Inbound Call Flows tab, click Add. The Create Flow dialog box opens.
- In the Name box, type Genesys Cloud Animal Care.
- In the Description box, type Main call flow.
- Click Create Flow. The call flow’s Inbound Call Flow page opens.
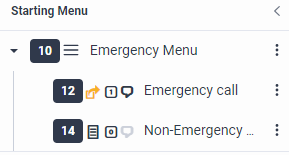
Set up the emergency menu
Next, configure the main menu’s initial greeting and menu prompt. Callers hear the initial greeting only once, when they enter the flow for the first time. The menu prompt plays each time they enter the menu. The main menu is located directly under the Starting Menu area to the right of the Architect Toolbox. Also remove the default Disconnect action from the call flow.
- Under Starting Menu, click Main Menu.
- Change the starting menu name:
- In the starting menu design area, click Main Menu.
- Change the name to Emergency Menu.
- Click Done.
- In the Initial Greeting box, override the default TTS prompt and type prompt.GCACInitialGreeting.
- In the Menu Prompt area, override the default TTS prompt and type prompt.GCACEmergency.
- Leave the remaining settings unchanged.
- In the Starting Menu area under Emergency Menu, click the Disconnect action.
- In the Disconnect action design area, click Delete to remove the action from the call flow.
Create a transfer action for emergency calls
In our scenario, the on-call doctors for Genesys Cloud Animal Care share a designated mobile phone. When veterinarians are on call, they take possession of the mobile phone during the shift. For this lesson, use a fictitious phone number. If you perform this task in your environment, then use a number relevant to your company or situation.
- From the Toolbox, expand the Transfer category and drag a Transfer to Number action below the Emergency menu.
- In the Transfer to Number design area, complete the following steps:
- Change the name to Emergency call.
- Click the DTMF dialpad and then click 1.
- In the Speech Recognition box, type Yes and press Enter.
- In the Number field, type a telephone number appropriate for tutorial testing, such as your mobile phone or direct line.
- In the Pre-Transfer Audio box, type prompt.GCACOnCallVet.
- Leave all other default options unchanged.
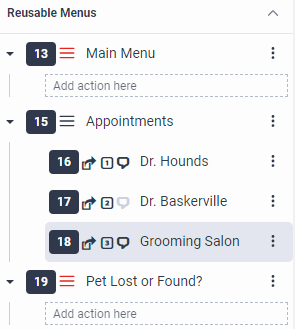
Create a main menu
For now, create the basic menu configuration. In a future lesson, create task and menu actions, and add them to the main menu to complete the flow.
- From the Toolbox, expand the Menu category and drag a Menu action into the Reusable Menus area.
- In the Reusable Menu design area, change the menu name to Main Menu.
- In the Menu Prompt, type prompt.GCACMainMenu.
- Leave all other default options unchanged.
View completed tasks
Practice
In this section, add a non-emergency menu choice to the main menu, which seamlessly transfers callers to the main menu if the call is not an emergency situation. You also create an appointments menu for the veterinarians on staff and for the grooming salon.
Earlier, you created an action to transfer emergency calls to the on-call veterinarian. Here, you transfer non-emergency calls to the main menu. Callers are only transferred to the main menu if they do not press 1 or say “yes” to indicate an emergency. This action is automatic, and the caller does not need to perform any action.
- Drag a Jump to Menu action into the Emergency Menu. This action is located in the Menu category.
- Change the name to Non-Emergency Call.
- Select a DTMF of 0.
- In the Menu box, select Main Menu.
- Leave the remaining settings unchanged.
Genesys Cloud Animal Care has two veterinary specialists on staff, along with a grooming salon. The vets, Dr. Hounds and Dr. Baskerville, each have their own appointment schedulers, and the grooming salon has a separate phone number. Add an appointment menu to the reusable menu area, which you will add to the Main Menu in a future lesson.
Add a menu action to the Reusable Menus area and do the following:
- Change the menu name to Appointments.
- Add the prompt.GCACAppointmentMenu menu prompt.
- Leave the remaining settings unchanged.
Here, you add transfer actions to send callers to the respective veterinarians or to the grooming salon schedulers to make an appointment.
- Drag a Transfer to User action below the Appointments menu and complete the following steps:
-
- Change the name to Dr. Hounds (or an appropriate configured user in your organization).
- Assign a DTMF of 1 and add the selected user’s name as a speech recognition term.
- After you enter your term, press Enter.
- Add the prompt.GCACRepresentative for pre-transfer audio.
- In the User box, select the appropriate configured user for your organization.
- Add your choice of TTS for failed transfer audio.
- Leave all other default options unchanged.
- Repeat step 1 for Dr. Baskerville, or another configured user in your organization, with the following changes:
-
- Change the name to Dr. Baskerville (or another appropriate configured user in your organization).
- Assign a DTMF of 2 and add the selected user’s name as a speech recognition term.
- After you enter your term, press Enter.
- In the User box, select the appropriate configured user for your organization.
- Add the same pre-transfer audio prompt.
- Add your choice of TTS for failed transfer audio.
- Leave all other default options unchanged.
- Drag a Transfer to Number action below the Appointments menu and complete the following steps:
- Change the name to Grooming Salon.
- Select a DTMF of 3 and add Grooming Salon as a speech recognition term.
- After you enter your term, press Enter.
- Add a telephone number appropriate for tutorial testing, such as your mobile phone or direct line.
- Add the prompt.GCACRepresentative for pre-transfer audio.
- Add your choice of TTS for failed transfer audio.
- Leave all other default options unchanged.
- Save your work.
Add a reporting menu to the reusable menu area, which you will complete and add to the Main Menu in a future lesson.
Add a menu action to the Reusable Menus area and complete the following steps:
- Change the menu name to Pet Lost or Found?
- Add the prompt.GCACLostOrFound menu prompt.
- Leave the remaining settings unchanged.