How to use the User Defined (OAuth) credential type
When you add the web services data actions integration, you can select a credential type: Basic Auth, User Defined, or User Defined (OAuth). For more information, see Add a data actions integration and Credential types.
This article explains how to use the User Defined (OAuth) credential type. For more information, see Workflow for User Defined (OAuth) credential type.
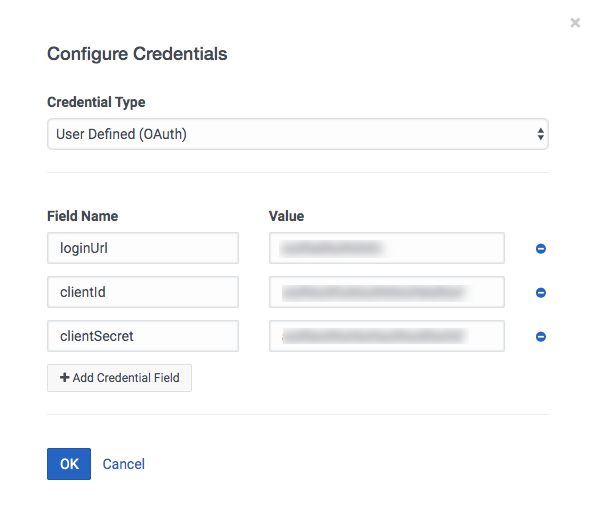
- When you add the integration, configure the User Defined (OAuth) credentials.
Add field names used by your web service and values for these field names.

The integration creates a custom auth action that returns an authentication response.
- Configure the custom auth action with the information needed to authenticate with the defined endpoint.
The integration then makes these field names and values available for use in subsequent custom actions. The authentication response values are accessible in the authResponse Velocity context.
To configure your auth action, follow these steps:
- Open the custom auth action.
You can access the custom auth action two ways:
- From the Credentials page for the action, click Custom Auth Action.
- From the Actions page, click the custom auth action for your integration. For more information, see Manage actions.
- Click the Setup tab.
- Click the Configuration tab.
The Request for the custom auth action includes authorization information. In the following example, the authorization is included in the headers. credentials is a static keyword. loginUrl, clientId, and clientSecret are the field names added to the credential configuration.
Warning: Be sure to escape any use of input or output variables within requestTemplate, successTemplate, or requestUrlTemplate. If you do not properly escape variables with special characters, your data actions will fail at execution.- Use esc.jsonString to escape strings inside JSON bodies.
For more information, see the esc.jsonString section in Velocity macros for data actions.
- Use esc.url() or urlTool.optionalQueryParam() to properly escape path or query parameters for a requestUrlTemplate or requestTemplate if using x-www.form-urlencoded values.
For more information, see the String-escaping library section in Velocity macros for data actions.
Because escaping is JSON context-specific, the following example intentionally does not show escaping.
{ "requestUrlTemplate": "${credentials.loginUrl}", "requestType": "POST", "headers": { "Authorization": "Basic $encoding.base64(\"${credentials.clientId}:${credentials.clientSecret}\")", "Content-Type": "application/x-www-form-urlencoded" }, "requestTemplate": "grant_type=client_credentials" }Note: If your custom auth action does not support Transfer-Encoding set to chunked, add Transfer-Encoding: buffered under headers. For more information, see Custom action fails for unexpected reason. - Use esc.jsonString to escape strings inside JSON bodies.
- Click the Test tab.
- Click Run Action.
The integration executes the custom auth action and outputs what your web service returns (with values redacted). In the following example, the web service returns access_token for clientId, token_type for clientSecret, and expires_in.
{
  "access_token": "<redacted string(86)>",
  "token_type": "<redacted string(6)>",
  "expires_in": "<redacted number>"
}
- Open the custom auth action.
- Use the auth response that your web service returns in the requests of all custom actions that you create.
The following example is a request for a custom action called Get Presence. The header of the custom action request includes the authorization. authResponse is a static keyword. token_type and access_token are the values returned from the web service. For more information, see Create a custom action, Add configuration to custom actions, and Request configuration.
{ "requestUrlTemplate": "https://api.mypurecloud.com/api/v2/users/${input.USER_ID}/presences/PURECLOUD", "requestType": "GET", "headers": { "Authorization": "${authResponse.token_type} ${authResponse.access_token}" }, "requestTemplate": "${input.rawRequest}" }Note: When you test a custom action, the integration redacts any authorization information. For more information, see Test a custom action.
For more information about the integration, see About the web services data actions integration.

