
Place, transfer, and dismiss a callback
The following permissions:
- Conversation > Communication > Target
- To be eligible for callback interactions: Conversation > Callback > Accept
- To use the schedule option to create a callback: Conversation > Callback > Create
- To transfer to a queue: Routing > Queue > View
- To transfer to a queue: Routing > Queue > Search
- To view conversation settings: Conversation > Settings > View
- To perform a blind transfer: Conversation > Communication > blindTransfer
- To perform a blind transfer to another agent: Conversation > Communication > blindTransferAgent
- To perform a blind transfer to an External Contact: Conversation > Communication > blindTransferExternalContact
- To perform a blind transfer to a queue: Conversation > Communication > blindTransferQueue
- To perform a consult transfer: Conversation > Communication > consultTransfer
- To perform a consult transfer to another agent: Conversation > Communication > consultTransferAgent
- To perform a consult transfer to an External Contact: Conversation > Communication > consultTransferExternalContact
- To perform a consult transfer to a queue: Conversation > Communication > consultTransferQueue
A callback is an outbound call that a contact requests. Contacts can request a callback while they are in queue and waiting for an agent. Genesys Cloud calls the contact when the next agent is available instead of making the contact wait on hold.
Place a callback
When you log in as an agent and go on queue, the Interactions panel opens. Callbacks appear in the Active Interactions list. The contact’s information and script appear in the Interaction Details window. For more information about scripts, see Use scripts.
- To accept the callback, click Answer.
Notes:- For in-queue and scheduled callbacks, Genesys Cloud dials the callback recipient.
- For ACD voicemail and callbacks with multiple contact numbers, select the number and click Begin Call.
- If your manager enables auto answer, then do not click Answer. Instead, to alert you of a new callback interaction, Genesys Cloud plays a short audible alert. For more information, see Auto answer incoming interactions.
- If your admin enables automatic callbacks, the callback automatically begins. For more information, see Enable communication level After Call Work and automatic callbacks.
- If your manager enables Customer First callbacks, Genesys Cloud connects to the callback recipient before you accept the interaction. For more information about Customer First callbacks, see Customer first callbacks overview and Create and configure queues.
- Complete the call.
- End the call, complete after contact work (ACW), and click End Callback.Note: If your manager enables auto end callback, then your callback ends automatically. For more information, see Set channel behavior and thresholds.
Transfer a callback
- When you accept a callback interaction but have not dialed the contact, blind transfer is your only transfer option.
- Callbacks consist of callback segments and call segments. After you connect with the contact, you can either consult or blind transfer the call segment of the callback. As the original agent, you end the callback segment.
Use a blind transfer to transfer an ACD call directly to another user, number, external contact, or queue without talking to the intended recipient:
Use a consult transfer to talk with the intended recipient before you transfer a call.
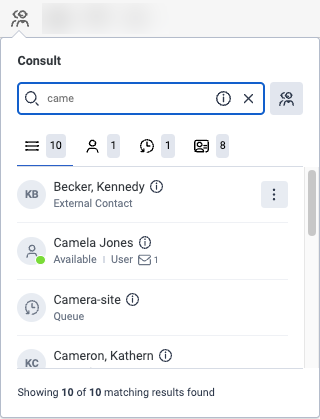
- From the current call, above the Interaction Details, click Consult .
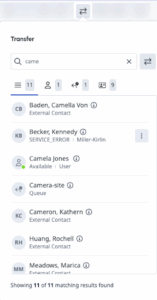
- In the Consult window, begin to type a name, and Genesys Cloud dynamically displays users, queues, and external contacts that match the input.
- To see all results, click All .
- To filter by Genesys Cloud users, click Users .
- To filter by queues, click Queues .
- To filter by External Contacts, click External Contact .
 Notes:
- The All tab shows the sum of the initial results for the Users, Queues, and External Contacts tabs. To see all matching results, click the User, Queue, and External Contact tabs and scroll until the total that appears is the same number as the matching results.
- If the person you want to consult with has more than one phone number, then to select the number that you want, click More .
- To see the number of available agents in a queue and, if available, the estimated wait time for a queue, hover over Information .
- From the results list, click the name of the person or queue to which you want to transfer the interaction. Genesys Cloud places the caller on hold and connects you to the person or queue that you want to consult with. Call controls appear.
 Warning: Be sure to select the transfer recipient from the results list. If you click Transfer without a recipient selected, the call can be lost.
 - To control the original call, use the top controls. To control the consultation, use the bottom controls.Note: Available controls vary based on your organization's settings.
- To use the numeric keypad to enter numbers, click Dialpad .
- To put the second party on hold, click Hold. This action puts the second party on hold and takes the first party off hold. To put the first party back on hold and speak with the second party again, click Hold .
- To to bring the original caller into the conversation with you and the consulted party, click Resume .
- To convert the consult into an ACD conference, click Start Conference.Notes:
- Although the consult is similar to a conference, the consult allows you to put either party on hold.
- To return the original conversation, the consulted party must drop from the conversation.
- To end your conversation with the consulted party, click Disconnect.
- To connect the original caller to the consulted party and leave the conversation, click Transfer.
- To mute your microphone, click Mute . To unmute your microphone, click Unmute .
- To start secure pause session, click Start Secure Pause . To end a secure pause session, click End Secure Pause .
Dismiss a callback
To dismiss the callback without calling the customer or transferring it, click End Callback.
- If you click End Callback before you place the call, Genesys Cloud cancels the callback and does not route the interaction back to the queue.
- If your admin enables automatic callbacks, the callback automatically ends. For more information, see Enable communication level After Call Work and automatic callbacks.