
Start and display the PureCloud Softphone
The PureCloud Softphone allows users in networks restricted from using WebRTC to use a computer with a USB headset to make calls. The PureCloud Softphone runs only on Windows-based computers and is not the same thing as the Genesys Cloud WebRTC phone.
- Download and install the PureCloud Softphone if you have not done so already.
- The PureCloud Softphone launches each time that you log in to Genesys Cloud. At startup, the PureCloud Softphone automatically downloads it configuration and updates to the latest version. The PureCloud Softphone icon
 in the taskbar notification area indicates it is connected.
Note: If a red X appears on the PureCloud Softphone icon, the phone is not connected. Contact the telephony administrator. It may necessary to run the PureCloud Softphone Provisioning Wizard.
- Once you have made any necessary PureCloud Softphone settings changes and set up your headset, the PureCloud Softphone is ready for making calls.
Note: If the PureCloud Softphone icon in the taskbar notification area is not available, double-click the PureCloud Softphone desktop icon to start it.

- Right-click the PureCloud Softphone icon in the taskbar notification area.
- View the options available in the PureCloud Softphone menu.
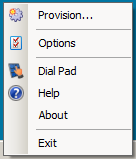
| Name | Description |
|---|---|
| Opens the PureCloud Softphone Provisioning Wizard. Necessary in some circumstances to complete the PureCloud Softphone installation. | |
| Change alerting, audio Configuration, launch at startup, network adapter, and other settings. | |
| Use the PureCloud Softphone dial pad to make calls. | |
|
Exit |
Exit the PureCloud Softphone. |
You can exit the PureCloud Softphone from the PureCloud Softphone menu.
However, it is not necessary to exit the PureCloud Softphone when you log off Genesys Cloud or at any other time. Even if you are not using the PureCloud Softphone to make calls, it can simply run in the background.