
Series: Set up CX Cloud, Digital and AI for Salesforce Service Cloud Voice
Create a Lightning app for Digital and AI for Salesforce Service Cloud
In Salesforce, create a Lightning app that includes:
- The components that are available upon installation of the packages from CX Cloud from Genesys and Salesforce integration. For example, the CX Cloud, Digital and AI, Genesys Cloud Einstein Assist, and Genesys Cloud CX Voice Transcript components.
- The Experience and Email Experience record pages.
To create a Lightning app in Salesforce:
- On the Setup Home page, in the Quick Find box, search for Apps and then select App Manager.
- To open the New Lightning App wizard, click New Lightning App.
- Enter a name for the app; for example, Service Console, and then click Next.
- Select Console navigation as the navigation style and click Next.
- Click Add Utility Item and select the CX Cloud, Digital and AI component from the Custom – Managed list.
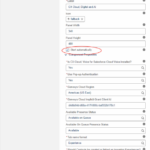
- Enter the following mandatory properties of the component:
- Start automatically – Select this option to launch the component when the app is started.
- Is CX Cloud, Voice for Salesforce Cloud Voice installed? – Select Yes or No.
- Use Pop-up Authentication – Select Yes or No. If set to Yes, the redirect URL uses the static resources in
/resource/genesysps__genesysAuthCallback. For more information, see Create an OAuth Client. - Genesys Cloud Region – Select the appropriate region.
- Genesys Cloud Implicit Grant Client Id – Enter the client Id of your Genesys Cloud OAuth Implicit Grant.
- Tab name format – Enter the firstname and lastname of the agent associated with the Experience or Email Experience object. The name format is used to name the tabs that display Experiences. The firstname and the lastname come from the participant data associated with the object.
- Should contacts be created or linked on incoming Experiences? – Select Yes or No.
Fill other information as required:
- Available Presence Status – Select the Salesforce presence status to use for Available.
- Available On Queue Presence Status – Select the Salesforce presence status to use for Available On Queue.
Click the image to enlarge.
- Click Next.
- Select the Experience and Email Experience record pages and move them from the Available Items list to the Selected Items list. Then, click Next.
- Select to open the record pages as workspace tabs or subtabs of a given list of components and click Next.
- Select System Administrator and the profile assigned to an agent, and move them from the Available Profiles list to the Selected Profiles list.Note: Ensure that the user profiles selected have access to the contact center. For more information, see Assign permissions sets.
- Click Save & Finish.

Note: If you have multiple Genesys Cloud orgs setup, see How to set up for single Salesforce org with multiple Genesys Cloud orgs?.