Ask for Slot action
The Ask for Slot action identifies slots that a caller or chat recipient mentions in an utterance. For example, consider an utterance of “My account number is 12345678.” The bot identifies that the participant’s account number has a value of 12345678.
Access this action from the bot flow’s Ask menu in the Architect toolbox.

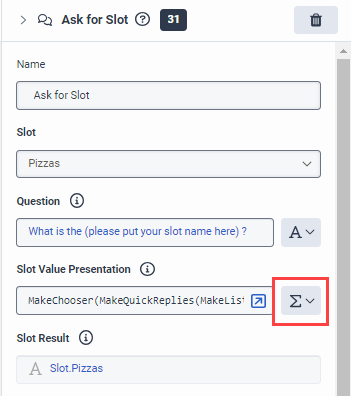
For dynamic list types, you can also specify the slot value presentation using an expression. For example:
MakeChooser(MakeQuickReplies(MakeList(MakePostbackChoice("pepperoni"), MakePostbackChoice("ham"), MakePostbackChoice("mushroom"))))

If you have dynamic slots, you must update and republish your digital bot flow.
| Name | Description |
|---|---|
| Name field | Type a distinctive name for the action. The label you enter here becomes the action’s name displayed in the flow structure. |
| Slot |
Select a preconfigured slot. Depending on the selected slot type, the presentation template switches to either Slot Value Presentation or Time Picker. Slots are configured in the Natural Language Understanding pane. For more information, see Understand Slots and Slot Types. |
| Question |
The communication that the bot produces when it asks for a slot. |
| Slot Value Presentation |
Quick Replies: Select this option to create buttons for the user to indicate what they want to do next. For example, book a hotel room, contact the hotel event center, or listen to dining hours. |
|
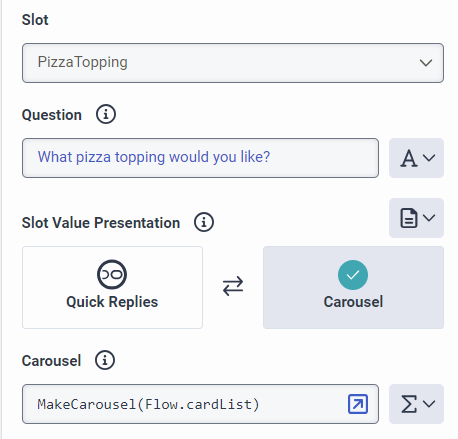
Carousel: Select this option to create cards with images, titles, or descriptions and provide an enhanced visual experience for your users. |
|
| Quick Replies |
When you choose to use quick replies in an Ask for Slot action and select a slot, Architect populates your quick replies for you. In quick reply cards, you can use expressions to specify button types, values, and labels. For example:
|
| Carousel |
The carousel collection must have at least one item and up to three items per card, and 10 cards per carousel. Genesys recommends that you use images that are 800 x 400 pixels or similar for optimum visuals. When you add carousel cards, you can use expressions to add images, card titles, and card descriptions. For example:
|
| Time Picker |
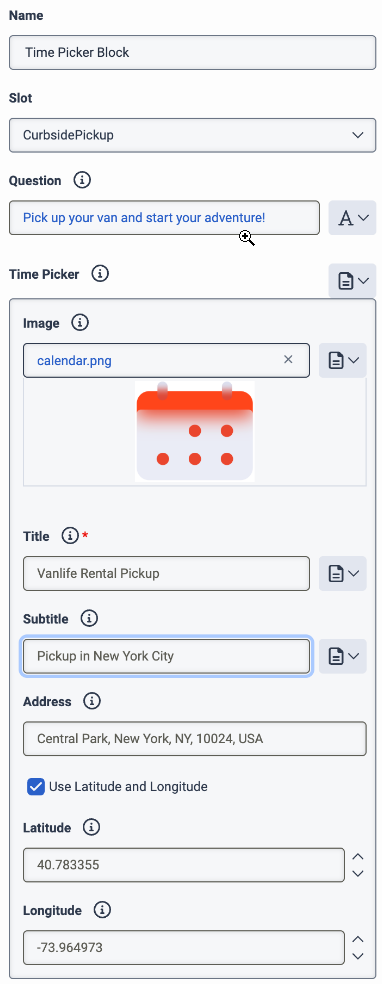
When you add a time picker, you can add an image, title, subtitle, and location.
|
| Slot Result |
The variable that stores the value that the customer selects. If the customer does not make a choice, then the value remains as No value specified. |
| Custom Validation |
This Boolean expression enables you to configure more validation logic. When the flow evaluates the expression at runtime, the flow uses it to determine if the received value meets these additional requirements. If the expression evaluates to false or a NOT_SET Boolean, then the value is considered invalid. |
| Continuation Prompt |
The communication that the bot produces when an AI-powered slot is only partially collected, prompting the user to provide further input. |
| No Input |
Enter the communication that the bot produces when it does not receive user input. Note: No Input reprompts are not enabled for Digital Bot Flows. The bot returns the configuration that you define in Settings > User Input > No Input Detected > No Input Apology combined with the Question communication. |
| Customize No Input |
Enables the No Input Reprompts field and enables you to create a list of no input prompts that the bot incrementally returns after it receives no user input. |
| No Input Reprompts |
After the bot receives No Input, it returns the communication at the position in the No Input Reprompts collection that corresponds to the current number of No Inputs received for that action. For example, the first No Input triggers the bot to use the first No Input reprompt in the defined collection. The length of the No Input Reprompt collection also overrides the maximum number of No Input retries that you define in Settings > User Input > No Input Detected > Maximum Number of No Input Retries for that particular action. For example, if you define two reprompts in the collection, the bot retries twice. An empty collection turns off No Match retries. Note: The bot returns the configuration that you set in Settings > User Input > No Match Detected > No Match Apology combined with the No Match communication. |
| Default No Input |
Enables the No Input field and allows you to define a single No Input prompt that the bot returns after it receives no input. |
| No Match |
The communication that the bot returns when the user’s input is not a valid match. Note: The bot returns the configuration that you set in Settings > User Input > No Match Detected > No Match Apology combined with the No Match communication. |
| Customize No Match |
Enables the No Match Reprompts field and enables you to create a list of no match prompts. The bot returns these prompts incrementally after it receives No Match input events. |
| No Match Reprompts |
When the bot receives a No Match input, it returns the communication at the position in the No Match Reprompts collection that corresponds to the current number of No Match inputs received for that action. For example, the first No Match input triggers the bot to use the first No Match reprompt in the defined collection. The length of the No Match Reprompt collection also overrides the maximum number of No Match retries that you define in Settings > User Input > No Match Detected > Maximum Number of No Match Retries for that particular action. For example, if you define two reprompts in the collection, the bot retries twice. An empty collection turns off No Match retries. Note: The bot returns the configuration that you set in Settings > User Input > No Match Detected > No Match Apology combined with the No Match communication. |
| Default No Match |
Enables the default No Match field and allows you to define a single No Match prompt that the bot returns after it receives No Match input events. |
|
Confirmation mode |
This option controls if the bot confirms the slot value supplied by the participant is correct. If this setting evaluates to “always” at runtime and the participant-supplied value is valid, as per the settings in the ‘Validation’ section, then the bot uses the ‘Confirmation Question’ communication to confirm it with the participant.
|
| Paths |
Notes:
|


