
Knowledge workbench quick start guide V2
- Genesys Cloud CX 1 Digital Add-on II, Genesys Cloud CX 2, Genesys Cloud CX 2 Digital, Genesys Cloud CX 3, Genesys Cloud CX 3 Digital, or Genesys Cloud CX 4
- Knowledge > All permissions
- Analytics > Knowledge Aggregate > All permissions
- Responses > Library > All
- Response Assets > Asset > All
The knowledge base works with knowledge services, a set of AI-powered resources that enable you to build sophisticated knowledge that can be intelligently searched using APIs. In other words, you can author knowledge using the knowledge base so that it can be surfaced intelligently to customers.
This quick start guide describes how to set up and configure a knowledge base.
Step 1: Add a knowledge base
This section describes how to add a knowledge base to your organization.
Review the following articles:
To create a new knowledge base, follow these steps:
- Click Admin.
- Under Knowledge, click Articles.
- Click Menu > Knowledge > Articles.
- Click the Knowledge Base list and then click Create Knowledge Base.
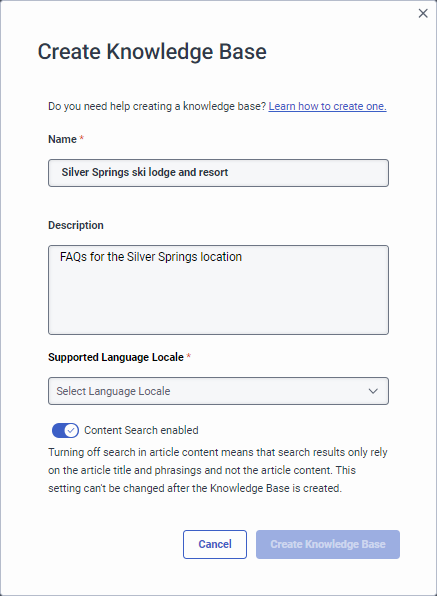
- Add a name and an optional description for the knowledge base.
- Select the language in which to gather knowledge content.
- Click Create. The knowledge base opens to the Knowledge Articles page.
Create a knowledge base
Click the image to enlarge.
Step 2: (Optional) Create categories and labels for the knowledge base
This section describes how to create categories and labels to a knowledge base. You can also add categories and labels to individual articles later.
Create categories for content
To add a category for your knowledge articles, follow these steps:
- Click Admin.
- Under Knowledge, click Categories & Labels.
- Click Menu > Knowledge > Categories and Labels.
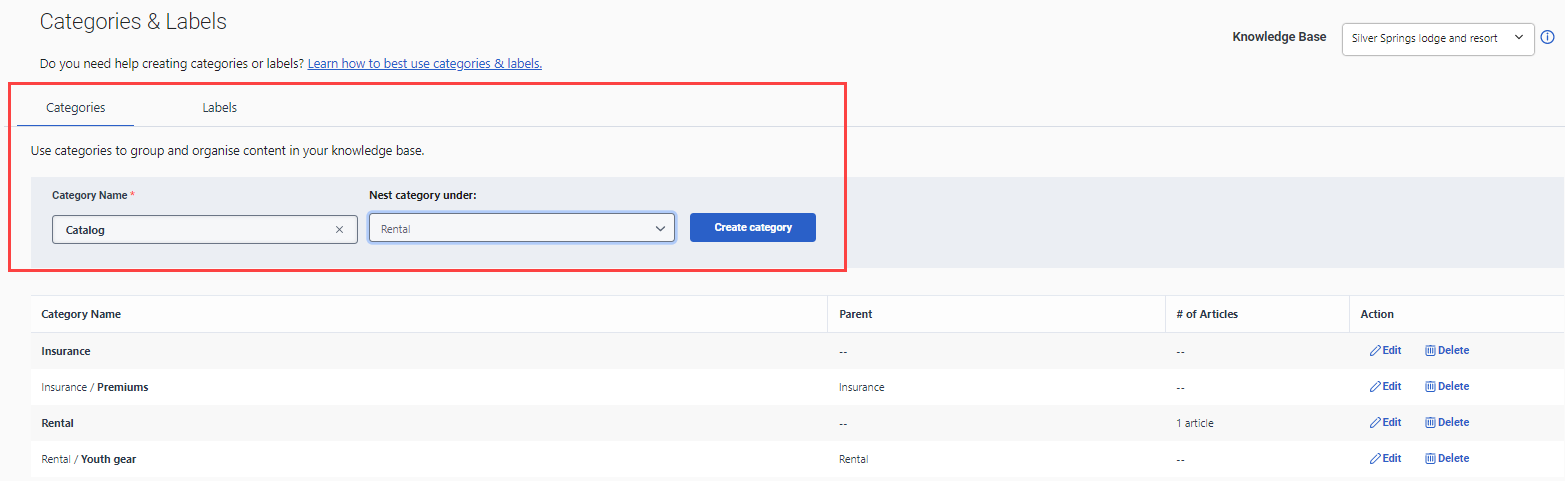
- Under Category Name, give the new category a meaningful name.
- (Optional) To nest the new category under a parent category, click the Nest category under list and select the parent.
- Click Create Category.
Create labels for content
To add a label for your knowledge articles, follow these steps:
- Click Admin.
- Under Knowledge, click Categories & Labels.
- Click Menu > Knowledge > Categories and Labels.
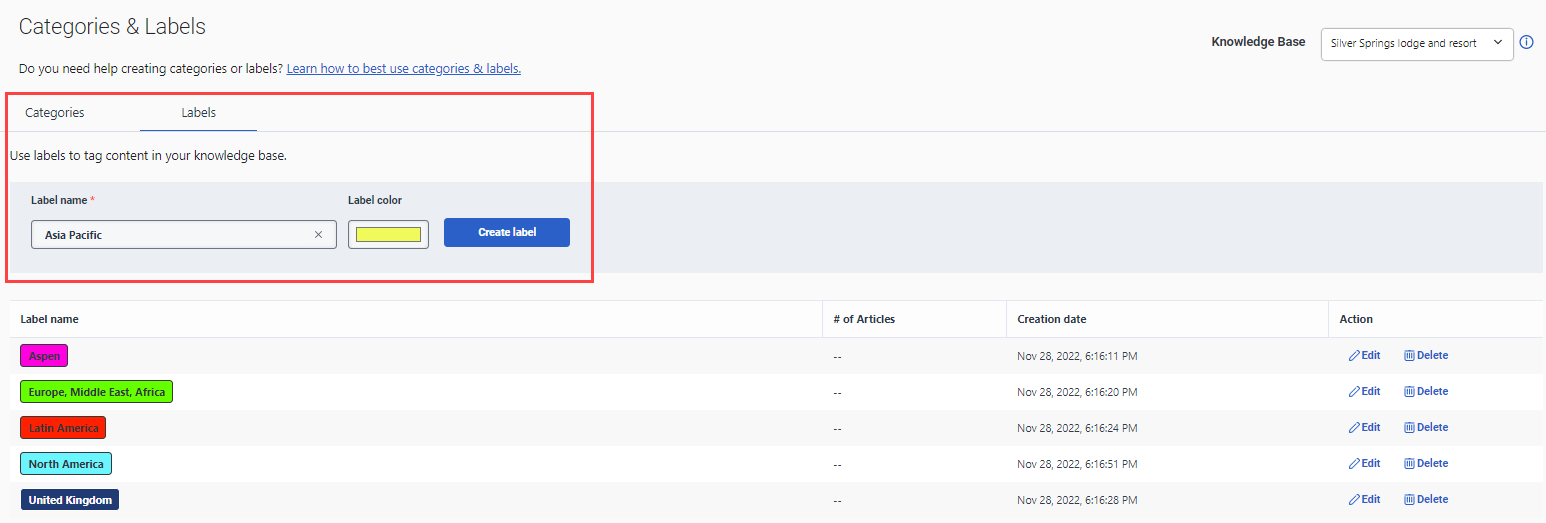
- Click the Labels tab.
- Under Label name, type a meaningful name for the label.
- Click the Label color list and select the appropriate color to assign to the label.
- Click Create label.
- Repeat steps 4–6 for each additional label that you want to add.
Categories
Click the image to enlarge.
Labels
Click the image to enlarge.
 [/hidden]
Step 3: Add or import question and answer articles to the knowledge base
This section describes how to add or import question and answer articles to the knowledge base.
Add new articles to the knowledge base
To add a new question and answer article to your knowledge base, follow these steps:
- Click Admin.
- Under Knowledge, click Articles.
- Click Menu > Knowledge > Articles.
- Create a new knowledge base or open an existing one.
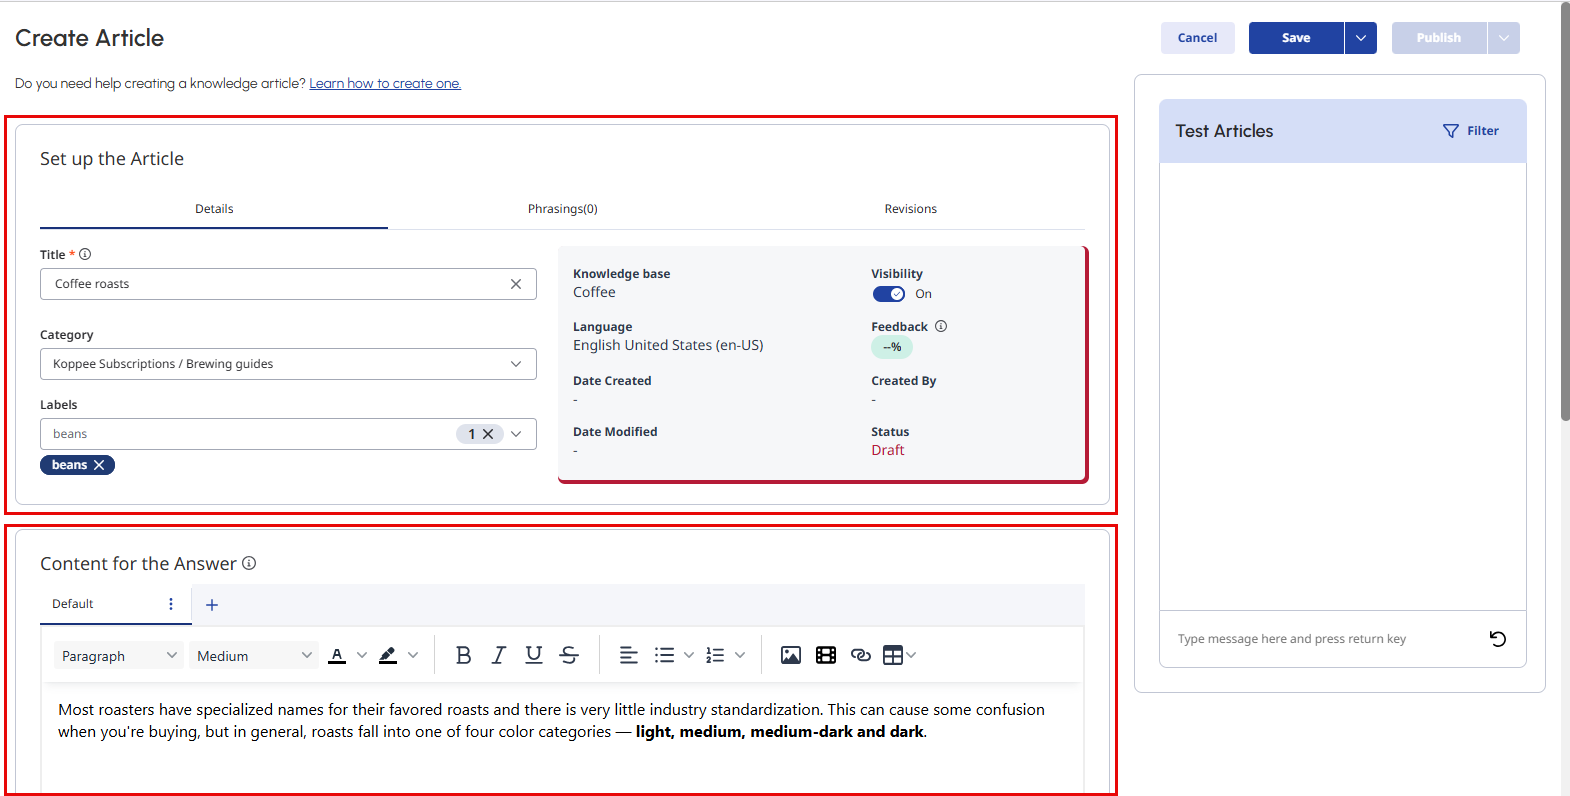
- Click Create Article. The Question & Answer page opens.
- Under Question, add the knowledge article question.
- (Optional) Under Category, select an existing question and answer category from the list.
- In the Content for the answer box, add the knowledge article answer.
- Do one of the following:
- To save the article and continue working, click Save.
- To save the article and close the knowledge base, click Save & Close.
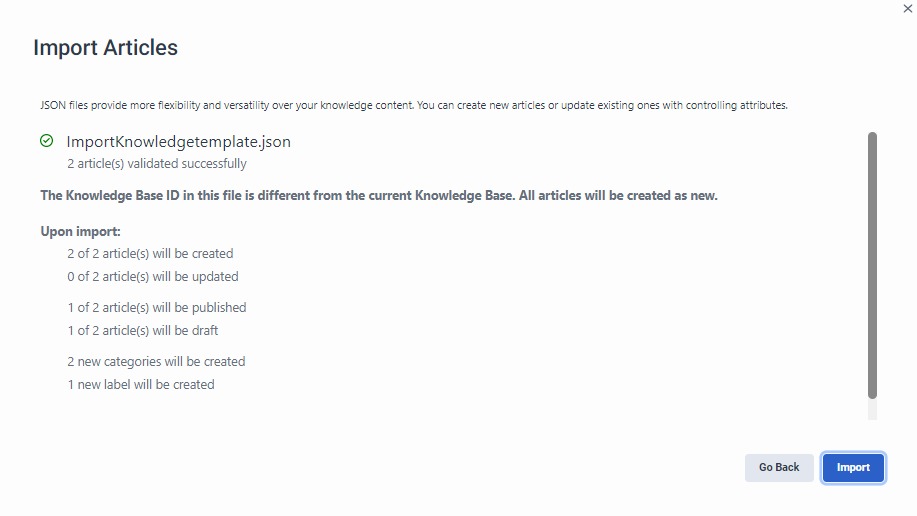
Import articles into the knowledge base
- Click Admin.
- Under Knowledge, click Articles.
- Click Menu > Knowledge > Articles.
- Create a new knowledge base or open an existing one.
- Click Import. The Import Knowledge dialog box opens.
- Navigate to your .json file and select the file.
- Click Import. The system automatically checks for any errors in your file and returns a list of items to check before you continue.
- If the validation check includes no errors, click Import. The system imports the question and answer pairs as individual FAQs.
Add a new question and answer article to the knowledge base
Click the image to enlarge.
Import a knowledge base .json file
Click the image to enlarge.

Validate an imported knowledge base .json file
Click the image to enlarge.
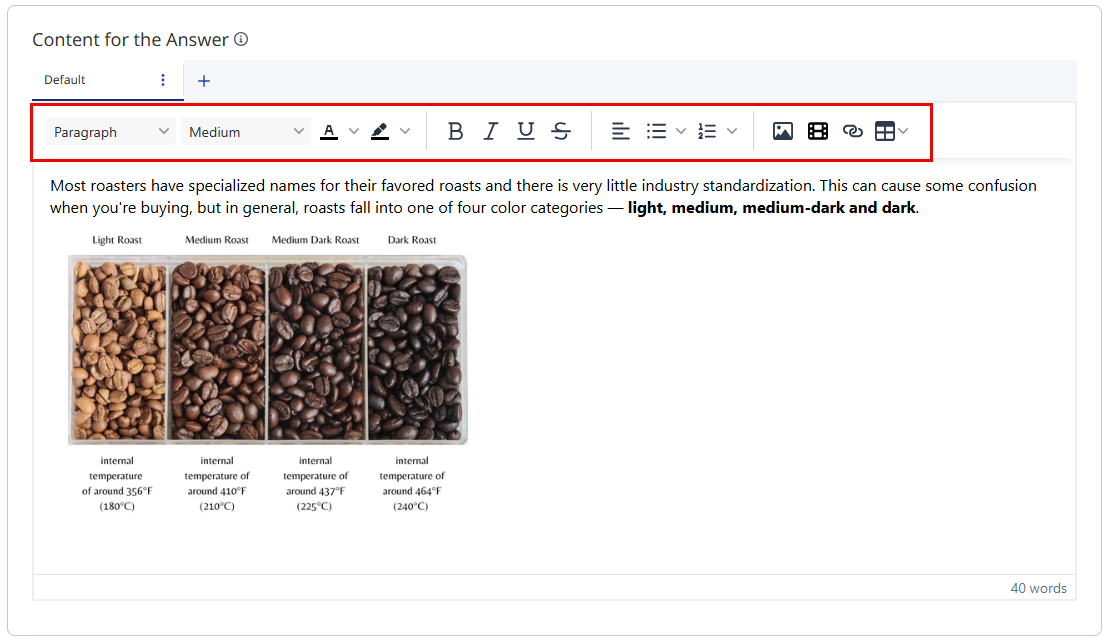
Step 4: Format your articles
This section describes how to format the text in a knowledge answer, and also how to add image or video content.
To format the content in a knowledge base article, follow these steps:
- Click Admin.
- Under Knowledge, click Articles.
- Click Menu > Knowledge > Articles.
- Create a new knowledge base or open an existing one.
- Open an existing question and answer article or create a new one.
- (Optional) After you add text, format it.
- (Optional) Create bulleted lists.
- (Optional) Upload an image to include with the answer.
- (Optional) Embed a video to include with the answer.
- Save the article.
Click the image to enlarge.
Step 5: Add phrases to your article
This section describes how to add various ways that a user asks the question to a knowledge article.
To add phrases to a question and answer article, follow these steps:
- Click Admin.
- Under Knowledge, click Articles.
- Click Menu > Knowledge > Articles.
- Create a new knowledge base or open an existing one.
- Open an existing question and answer article or create a new one.
- Under Set up the Question, click the Phrasings tab.
- Under Phrase, add some words or a sentence that represents another way that a user asks the primary question in the article.
- Click Add.
- To help a user complete the query by generating this phrase as a prediction of the intended question, enable the Autocomplete check box.
- Do one of the following:
- To save the article and continue working, click Save.
- To save the article and close the knowledge base, click Save & Close.
Click the image to enlarge.

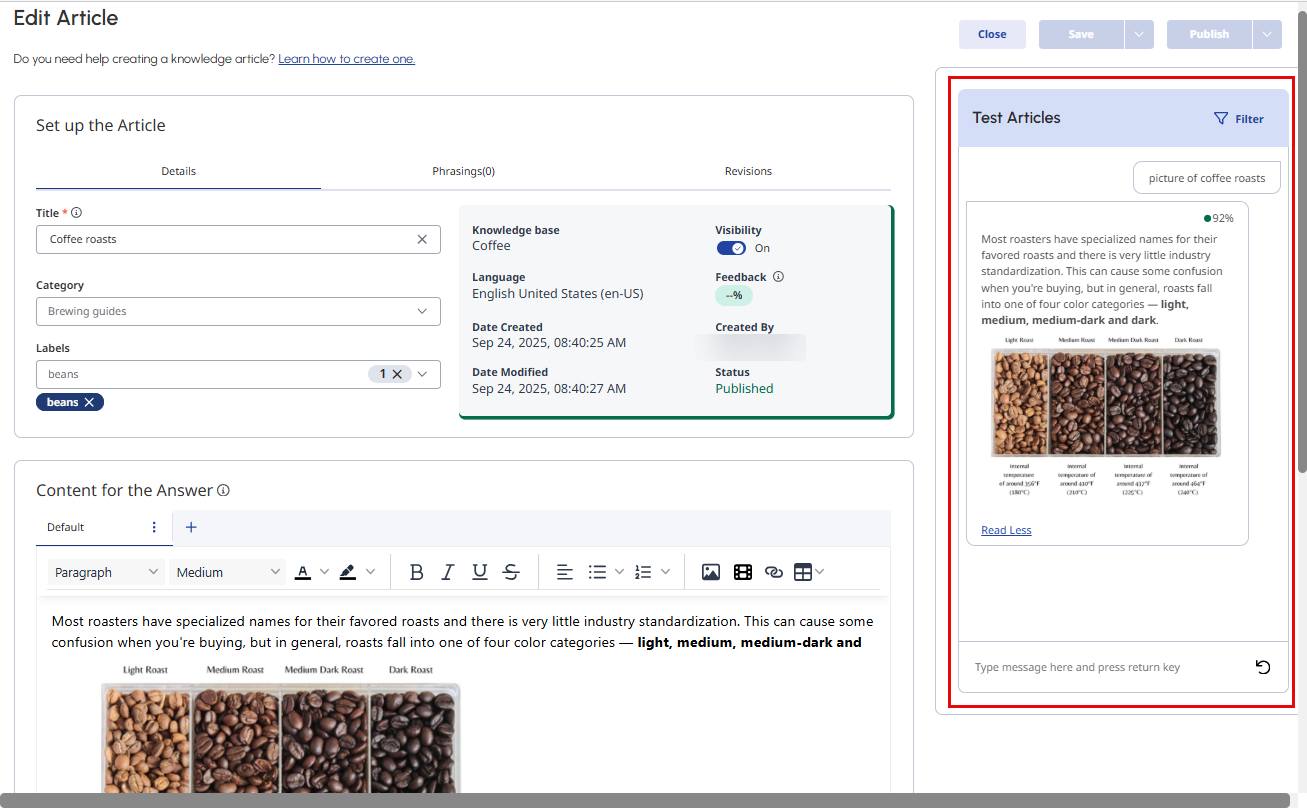
Step 6: Preview and test a knowledge article
This section describes how to view and test a question and answer article in a chat bot.
To preview and test a question and answer article, perform these steps:
- Click Admin.
- Under Knowledge, click Articles.
- Click Menu > Knowledge > Articles.
- Create a new knowledge base or open an existing one.
- Open an existing question and answer article or create a new one.
- In the Test Articles pane, enter the query that you want to test.
- Press Enter.
The knowledge base displays the question and answer. The answer includes a confidence percentage.
Click the image to enlarge.
Step 7: Publish a knowledge base article
After you create and test the knowledge base, publish it.
- Click Admin.
- Under Knowledge, click Articles.
- Click Menu > Knowledge > Articles.
- Open the knowledge base that contains the article to publish.
- If you edit the knowledge article, click Save.
- Do one of the following:
- To publish the knowledge article and continue working in it, click Publish.
- To publish the knowledge article and close it, click Publish and then click Publish & Close.
If the knowledge base publishes without errors, the system returns a message indicating that the publish process completed successfully.