
Use Architect to create a digital bot for an inbound message flow
You can create a digital bot flow in Architect to use in inbound message flows. Create the digital bot within the flow, or create it separately and then call it from the flow.
Create a digital bot for an inbound message flow using Architect
This procedure describes how to create a bot for an inbound message flow. In this example, users choose what they want to do. They can purchase a guitar or book studio time.
- Click Admin.
- Under Architect, click Architect.
- Click Menu > Orchestration > Architect.
- From the Architect home page, click or hover over the Flows menu and select Digital Bot Flows.
- Click Add. The Create Bot Flow dialog box opens.
- In the Name field, enter a unique name for the flow.
- (Optional) In the Description field, add a short sentence or phrase to describe this flow.
- Click the Default Language list and select the flow’s default supported language.
- Click the Divisions list and select the division in which to place the flow.
- Click Create Flow. The flow’s configuration page opens.
In this example, add slots to enable a user to select a guitar type, select a studio date to book a date, and select a studio time to reserve recording time.
- Under Natural Language Understanding, click Slot Types.
- Click Add Slot Type.
- Name the slot type guitarType.
- Click Save.
- Under Slot Type Value, in the Type a new Slot Type Value box, type Electric.
- Press Enter.
- Repeat step 5-6 to add these guitar types:
- Semi-acoustic
- Electric-acoustic
- Classical
- Bass
- Acoustic
Click the image to enlarge.
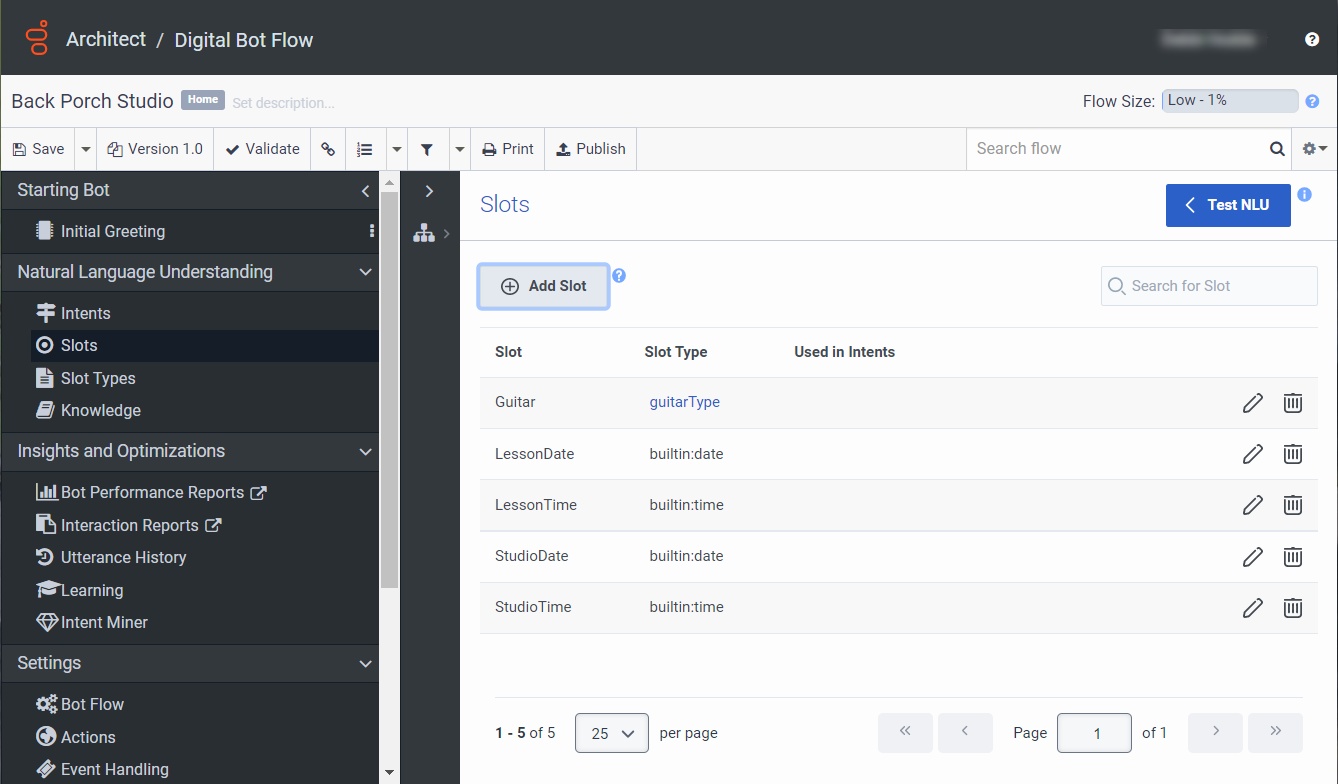
- Under Natural Language Understanding, click Slots.
- Add a slot to enable users to choose the guitar type.
- Click Add Slot. The Add Slot dialog opens.
- Name the slot Guitar.
- Under Associated Slot Type, select Existing.
- Under Existing Slot Type, click guitarType.
- Click Save.
- Add a slot to enable users to book a studio date.
- Click Add Slot. The Add Slot dialog opens.
- Name the slot StudioDate.
- Under Associated Slot Type, select Existing.
- Under Existing Slot Type, click builtin:date.
- Click Save.
- Add a slot to enable user to book a studio time.
- Click Add Slot. The Add Slot dialog opens.
- Name the slot StudioTime.
- Under Slot Type, select Existing.
- Under Existing Slot Type, click builtin:time.
- Click Save.
- Add a slot to enable users to schedule a lesson date.
- Click Add Slot. The Add Slot dialog opens.
- Name the slot LessonDate.
- Under Slot Type, select Existing.
- Under Existing Slot Type, click builtin:date.
- Click Save.
- Add a slot to enable user to specify the lesson time.
- Click Add Slot. The Add Slot dialog opens.
- Name the slot LessonTime.
- Under Slot Type, select Existing.
- Under Existing Slot Type, click builtin:time.
- Click Save.
Click the image to enlarge.

- Under Reusable Tasks, click Add reusable task here > Toolbox > Task.
- Rename the task Book guitar lesson and click Done.
- From the Toolbox, open the Ask menu, add an Ask for Slot action below the Start box, and configure it:
- Leave the default name, or enter a new one.
- Click the Slot list and select Guitar.
- Under Question, click What is the (please put your slot name here). The Rich Text Editor opens.
- Replace the content with What kind of guitar do you want to learn? and click Save.
- Under Invalid Response > No Match, click Please give me the (please put your slot name here) link and replace (please put your slot name here) with guitar type.
- Click Save.
- From the Toolbox, open the Ask menu, add an Ask for Slot action below the Start box, and configure it:
- Leave the default name, or enter a new one.
- Click the Slot list and select lessonDate.
- Under Question, click the What is the (please put your slot name here) link and replace the content with What day do you want to schedule the lesson?
- Under Invalid Response > No Match, click Please give me the (please put your slot name here) link and replace the content with Please tell me the lesson date.
- From the Toolbox, open the Ask menu, add another Ask for Slot action below action that you added in step 3, and configure it:
- Leave the default name, or enter a new one.
- Click the Slot list and select LessonTime.
- Under Question, click the What is the (please put your slot name here) link and replace the content with What time do you want to schedule the lesson?
- Under Invalid Response > No Match, click Please give me the (please put your slot name here) link and replace the content with Please tell me the time you want to reserve.
- From the Toolbox, open the Ask menu and drag a Ask for Yes / No action below the Ask for Slot action that you added in step 5, and configure it:
- Leave the default name, or enter a new one.
- Under Question, click the Do you want to proceed link. The Rich Text Builder opens.
- Type OK, you want to schedule a.
- Click the Expression button and type Slot.guitar.
- After the expression, type lesson on.
- Click the Expression button and type Slot.lessonDate.
- After the expression, type at.
- Click the Expression button and type Slot.lessonTime.
- After the expression, to complete the sentence, type correct?. The complete string looks like OK, you want to schedule a {{Slot.guitar}} lesson on {{Slot.lessonDate}} at {{Slot.lessonTime}}.
- Click Save.
- From the Toolbox, drag a Communicate action below the Ask for Yes / No action’s Yes path and configure it:
- Leave the default name, or enter a new one.
- Under Communication, click the Click to add text link. The Rich Text Builder opens.
- Type We reserved your lesson.
- Click Save.
- From the Toolbox, drag a Communicate action below the Ask for Yes / No action’s No path and configure it:
- Leave the default name, or enter a new one.
- Under Communication, click the Click to add text link. The Rich Text Builder opens.
- Type OK, we did not book the lesson.
- Click Save.
- Open the Task menu and drag an End Task below the Communicate actions and select the Default output path.
- Under Reusable Tasks, click Add reusable task here > Toolbox > Task.
- Rename the task Book Studio Time.
- From the Toolbox, open the Ask menu, add an Ask for Slot action below the Start box, and configure it:
- Leave the default name, or enter a new one.
- Click the Slot list and select StudioDate.
- Under Question, click the What is the (please put your slot name here) link and replace the content with What is the booking date?
- Under Invalid Response > No Match, click Please give me the (please put your slot name here) link and replace the content with Please tell me the date you want to reserve.
- From the Toolbox, open the Ask menu, add another Ask for Slot action below action that you added in step 3, and configure it:
- Leave the default name, or enter a new one.
- Click the Slot list and select StudioTime.
- Under Question, click the What is the (please put your slot name here) link and replace the content with What time do you want to book the studio?
- Under Invalid Response > No Match, click Please give me the (please put your slot name here) link and replace the content with Please tell me the time you want to reserve.
- From the Toolbox, open the Ask menu and drag an Ask for Yes / No action below the Ask for Slot action that you added in step 5, and configure it:
- Leave the default name, or enter a new one.
- Under Question, click the Do you want to proceed link. The Rich Text Builder opens.
- Type OK, you want to book studio time on.
- Click the Expression button and type Slot.studioDate.
- After the expression, type on.
- Click the Expression button and type Slot.studioTime.
- After the expression, to complete the sentence, type correct?. The complete string looks like OK, you want to book studio time on {{Slot.studioDate}} at {{Slot.studioTime}}.
- Click Save.
- From the Toolbox, drag a Communicate action below the Ask for Yes / No action’s Yes path and configure it:
- Leave the default name, or enter a new one.
- Under Communication, click the Click to add text link. The Rich Text Builder opens.
- Type We reserved your studio time.
- Click Save.
- From the Toolbox, drag a Communicate action below the Ask for Yes / No action’s No path and configure it:
- Leave the default name, or enter a new one.
- Under Communication, click the Click to add text link. The Rich Text Builder opens.
- Type OK, we will cancel the reservation.
- Click Save.
- Open the Task menu and drag an End Task below the Communicate actions and select the Default output path.
- Under Reusable Tasks, click Add reusable task here > Toolbox > Task.
- Rename the task Main menu.
- From the toolbox, open the Ask menu and drag a Digital Menu below the Start box.
- Leave the default Question and No Match entries unchanged.
- Click Add a button and under Enter choice, type Schedule a lesson.
- Click Add a button and under Enter choice, type Book studio time.
- Configure the Schedule a lesson path:
- Open the Task menu and drag a Call Task action below the Schedule a lesson path.
- Under Task, select Book guitar lesson.
- Configure the Book studio time path:
- Open the Task menu and drag a Call Task action below the Book studio time path.
- Under Task, select Book a studio.
- Under Starting Bot, click Initial Greeting.
- From the Toolbox, drag a Communicate action below the Start box.
- Under Name, rename the Communicate action, or leave the default Communicate name unchanged.
- Under Communication, click Click to add text. The Rich Text Builder opens.
- Use the toolbar in the Rich Text Builder to create an initial greeting to the user:

- Add a text string and format the text using bold, italics, or strikethrough text.
- To add customizable text and a link to an external URL, click the Add Link icon.
- To add a variable value for a preconfigured slot, click the Add Variable icon.
- To enter a manual expression and inert the result into the rich text, click the Add Expression icon.
- To add an image from a URL, click the Insert Image icon.
- Click Save. In this example, the bot thanks the user for contacting the store and presents an image of a record shop.
Click the image to enlarge.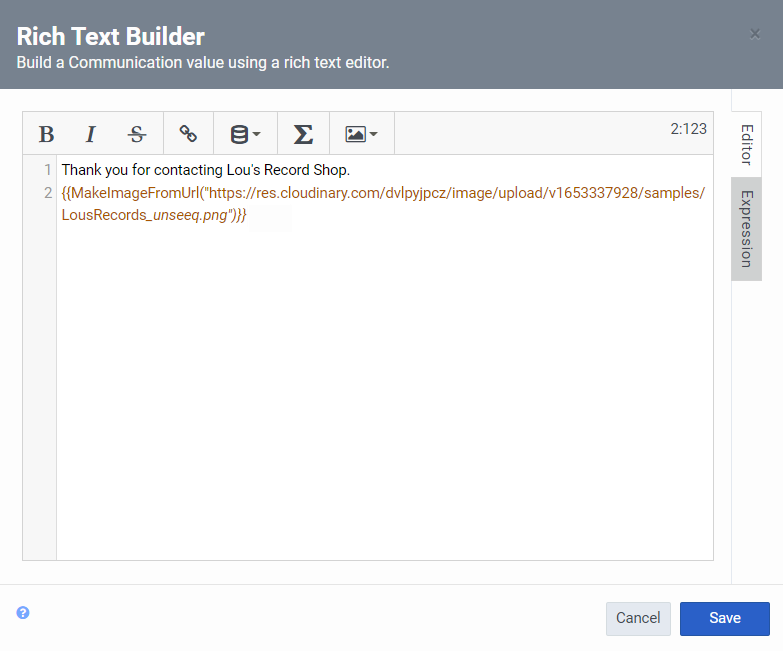
- Click Save.
- Open the Task menu and drag a Call Task action below the Communicate action.
- Under Task, select Main menu.
- Save and publish the digital bot flow.
You can now call this digital bot flow from an inbound message flow.