
Amazon Lex V2 quick start guide
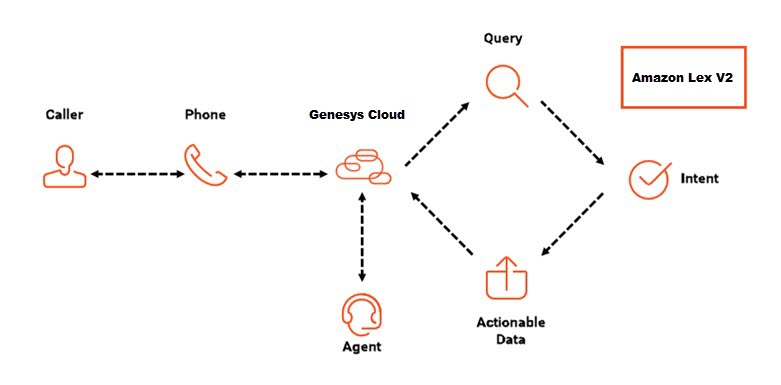
Amazon and Genesys developed a partnership to help organizations deliver advanced capabilities to enhance customer experiences, blending AI and Amazon Lex V2 voice interaction technologies with Genesys Cloud contact center automation.
Click the image to enlarge.
Quick start steps
This quick start article helps guide you through implementing the Amazon Lex V2 integration. Here, you learn how to perform the following steps:
- Create an Amazon Lex V2 bot.
- Grant Genesys permissions to call the Amazon Lex V2 bot.
- Obtain the Amazon Lex V2 integration from Genesys AppFoundry.
- Configure and activate the Lex V2 integration in Genesys Cloud.
- Create a Genesys Cloud Architect flow and configure it with an Amazon Lex V2 bot.
- Use Genesys Cloud to call the Architect inbound call flow.
Step 1: Create an Amazon Lex V2 bot
The process of creating Lex V2 bots is documented by Amazon. Since the process could change, refer to Amazon documentation when creating bots. This example explains how to create a simple bot. Then, you can learn how to add intents and build the slots in either the visual builder or the editor. To create this bot, use the Bots interface in Amazon Web Services (AWS).
Prerequisites
To create the initial bot and add a name, language, voice, and basic information, follow these steps:
- Sign in to the AWS Management Console and open the Amazon Lex V2 console.
- Click Create bot.
- Under Creation method, select Create.
- Under Bot configuration, give the bot a name and an optional description. For example, “BankBot.”
- Under IAM permissions, choose a role that defines permissions for the bot. Here, select an existing role.
- Under Children’s Online Privacy Protection Act (COPPA), choose the appropriate response. In this example, select No.
- Under Idle session timeout, choose the duration that Amazon Lex V2 keeps a session with a user open. Amazon Lex V2 maintains session variables during the session so that your bot can resume a conversation with the same variables. In our example, leave the default setting.
- Leave all other settings unchanged.
- To create the bot and continue to adding a language, click Next. The Add language to a bot page opens.
- Add language and a voice for the bot to use:
- Under Select Language, choose the appropriate language for the bot. Here, leave the default English language.
- Under Voice interaction, select the text-to-speech voice that your bot uses to interact with users. Here, select Kendra.
- Under Intent classification confidence score threshold, set the value that Amazon Lex uses to determine whether an intent is the correct intent. In our example, leave the default value of 4.0.
- Click Done. The Intent editor opens.
This example uses the AWS visual builder. Create two intents: an account balance intent with a simple utterance and a single slot, and an empty closing slot. Then, build the bot.
To add intents and slots and then build the bot in the visual builder, follow these steps:
- At the bottom of the editor, click Visual builder.
- Add an empty intent and type “ClosingIntent”. This intent does not include configuration and the bot uses it to end the conversation.
- Add the account balance intent.
- Click Add intent.
- Click Add empty intent.
- Under Intent name, type “CurrentBalance” and then click Add.
- Edit the Start block:
- Click Edit .
- Enable the Include initial response check box.
- In the Message box, type “Thank you for calling. I can help with routing banking tasks. How can I assist you?”
- In the Sample utterances box, type, “What is my account balance?”
- Click Add utterance.
- Create and configure a single slot:
- From the toolbar, drag a Get slot value block into the visual builder.
- In the Name box, type AccountNumber.
- Under Slot type, select AMAZON.number.
- Under Slot Prompts, type, “Please enter your account number.”
- Connect the Start block to the AccountNumber slot block.
- Create and configure two intent blocks:
- From the toolbar, drag two Go to Intent blocks into the visual builder.
- Click the first Go to Intent block and under Intent Name, select the ClosingIntent that you created in step 1.
- Click the second Go to Intent block and under Intent Name, select FallbackIntent.
- Connect the AccountNumber slot block’s Success path to the ClosingIntent block.
- Connect the AccountNumber slot block’s Failure path to the FallbackIntent block.
- Click Save intent.
- Click Build.
- Create a version and an alias.
In this example, create two intents: a welcome message intent and an account balance intent with a simple utterance and a single slot. Then, build the bot.
To add intents and slots and then build the bot in the editor, follow these steps:
- Add the welcome message intent. This intent does not have slots, but has a closing message. This message is the first thing that the caller hears.
- Click Add intent and then click Add empty intent.
- Under Intent name, type “WelcomeMessage” and then click Add.
- Under Closing responses, in the Message box type “Thank you for calling. I can help with routing banking tasks. How can I assist you?”
- Leave the remaining settings unchanged.
- Click Save intent.
- Add the account balance intent.
- Click Add intent and then click Add empty intent.
- Under Intent name, type “CurrentBalance” and click Add. The Intent editor opens.
- Under Sample utterances, type “Account balance.”
- In the Sample utterances text box, type, “What is my account balance?” and then click Add utterance.
- Under Slots, click Add slot.
- In the Name box, type AccountNumber.
- Under Slot type, select AMAZON.number.
- Under Prompts, type, “Please enter your account number.”
- Click Add.
- Click Save intent.
- Click Build.
- Create a version and an alias.
Step 2: Grant Genesys the permissions to call the Amazon Lex V2 bot
To access Amazon Lex V2 bots, Genesys Cloud must have permission to use resources in Amazon Web Services (AWS). This procedure explains how to set up an IAM role in AWS. This role is assigned to Amazon Lex V2 later, when you configure and activate the app in Genesys Cloud.
Prerequisites
- Sign Up for AWS and create an Administrator User
- Create an IAM User
To configure an IAM role:
- Log in to AWS.
- Navigate to the AWS Services page and select IAM.
- Under Dashboard, select Roles.
- On the Roles page, click Create role.
- Select Another AWS Account as the type of trusted entity.
- In the Account ID box, enter 765628985471 (Core/Satellite regions) or 325654371633 (FedRAMP region (US-East-2)) in the Account ID box. This number is Genesys Cloud’s production account ID.
- To enhance security, Genesys recommends that you check the Require External ID box and enter your organization’s ID.
- Click Next: Permissions.
- Next, assign permission policies to the role. In the search box, type Lex V2. Then select the AmazonLexReadOnly and AmazonLexRunBotsOnly policies check boxes.
- Click Next: Tags.
- (Optional) Add metadata to the role by attaching tags as key-value pairs.
- Click Next: Review.
- In the Role Name box, type a name. For example, DemoLexRole.
- In the Role description box, enter descriptive text about the role.
- Verify that the account number for Trusted entities matches the Genesys Cloud production account ID you entered in step 6.
- Click Create Role.
- In the listing page, click the name of the role. This link is the name you entered in the Role Name box in step 12. Summary details about the role appear.
- Note the Role ARN. You need this credential later. An Amazon Resource Name (ARN) is a unique identifier that unambiguously identifies a resource.
- Click the Copy icon (to the right of Role ARN), which copies your ARN to the clipboard.
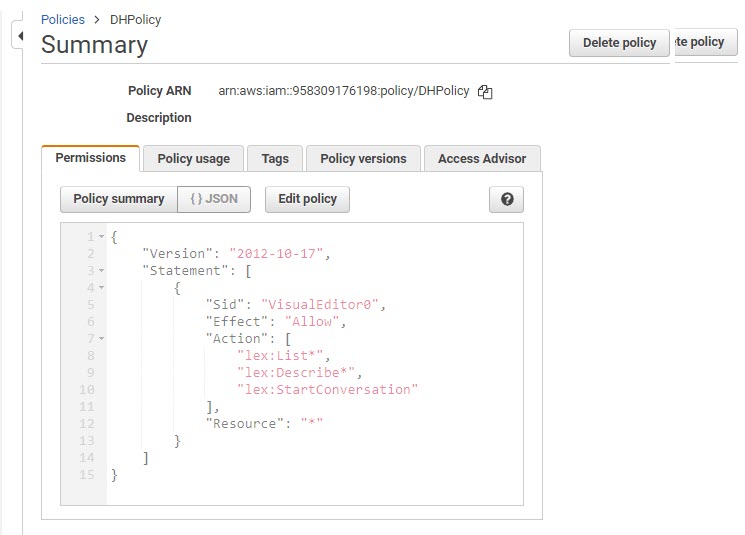
Create a Lex V2 policy in JSON format in the AWS console and then assign it to your IAM role. This policy ensures that Genesys Cloud Architect can interact with an Amazon Lex V2 bot.
- Sign in to the AWS Management Console and open the IAM console.
- In the navigation pane on the on the left side, click Policies.
- Click Create policy.
- Click the JSON tab.
- Type or paste the following JSON content:
{

      "Version": "2012-10-17",

     "Statement": [

          {

               "Sid": "VisualEditor0",

               "Effect": "Allow",

               "Action": [

                    "lex:List*",

                    "lex:Describe*",

                    "lex:StartConversation",

                ],

                "Resource": "*"

          }

     ]

} - Resolve any security warnings, errors, or general warnings that the policy validation generates, and then click Review policy. Note: You can switch between the Visual editor and JSON tabs anytime. However, if you make changes or choose Next: Tags in the Visual editor tab, IAM might restructure your policy to optimize it for the visual editor.
- Click Next: Tags.
- (Optional) Add metadata to the policy by attaching tags as key-value pairs.
- On the Review policy page, type a Name and a Description (optional) for the policy. Review the policy Summary to see the permissions that your policy grants.
- Click Create policy.
- After you create a policy, attach it to the IAM role that you created above.
Example:
Learn more
AWS Identity and Access Management User Guide
- IAM Roles
- Tagging IAM Entities
- Creating IAM policies
- Adding and removing IAM identity permissions
- Creating roles and attaching policies
Step 3: Obtain the Amazon Lex V2 integration from Genesys AppFoundry
This section describes how to obtain and install the Amazon Lex V2 integration in Genesys Cloud.
Prerequisites
- Contact Genesys Cloud Sales and request to update your subscription.
To install Amazon Lex V2 in your org:
- Log in to Genesys Cloud for the org in which to add Amazon Lex V2.
- Click Admin.
- Under Integrations, click Integrations.
- Click Menu > IT and Integrations > Integrations.
- Click Integrations.
- In the Search box, type Amazon Lex V2. The card for Amazon Lex V2 appears.
- Click the Amazon Lex V2 card. Information about the app appears.
- Click Install.
Amazon Lex V2 is now available to configure and activate from Genesys Cloud’s Admin > Integrations page.
Learn more
Amazon Lex V2 documentation
Step 4: Configure and activate the Lex V2 integration in Genesys Cloud
This section describes how to enable and set up the Amazon Lex V2 integration in Genesys Cloud.
To access the Call Lex V2 Bot action in Architect, you must first add and configure the Amazon Lex V2 integration and then grant permission to access AWS resources in your org.
- In Genesys Cloud, click Admin.
- Under Integrations, click Integrations.
- Click Menu > IT and Integrations > Integrations.
- Click Integrations.
- Locate the Amazon Lex V2 integration.
- In the Amazon V2 Lex tile, click Install. Genesys Cloud installs the integration.
- Click Integrations.
- Next to Amazon Lex V2, click More and select Edit Integration.
- Click the Configuration tab and then click the Credentials tab.
- Click Configure.
- In the Role ARN box, press Ctrl+V to paste the ARN you stored on the Clipboard into the Role ARN box. If you use a Mac, press Command+V to paste.
- Click OK and then click Save.
- Select the Details tab.
- To activate the integration, click Inactive. The Change Status dialog appears and asks you to confirm that you want to activate Amazon Lex.
- Click Yes. The status changes to Active.
Step 5: Create a Genesys Cloud Architect flow and configure it with an Amazon Lex V2 bot
These steps ensure consistency between the bot and the flow.
Prerequisite
To create an Architect flow, perform these steps:
- In Genesys Cloud, click Admin.
- Under Architect, click Architect. The Architect home page appears.
- Click Menu > Orchestration > Architect.
- From the Architect home page, click or hover over the Flows menu and choose Inbound Call Flow.
- Click Add . The Create Flow dialog box opens.
- In the Name field, enter a unique name for the flow. Here, enter “BankingBot.”
- (Optional) In the Description field, include a short sentence or phrase to describe this flow.
- Click the Default Language list and select the flow’s default supported language. In this example, leave the default English language.
- Click the Divisions list and select the division in which to place the flow. In this example, use the default Home division.
- Click Create Flow. The flow configuration page opens.
These steps ensure consistency between the bot and the flow.
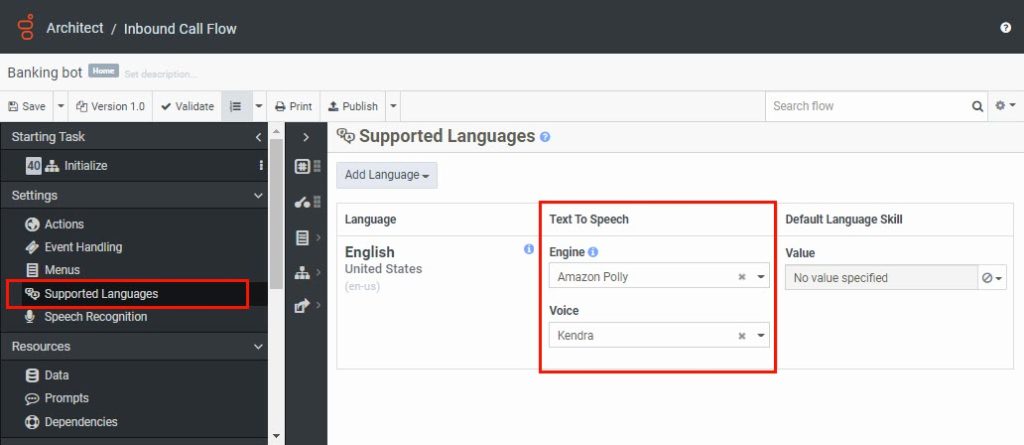
- Under Settings, click Supported Languages.
- In the Supported Languages panel, under Text To Speech, choose Amazon Polly.
- Under Voice, select Kendra.
Example:
Create a new task and call the Lex V2 bot.
- Under Reusable Tasks, click Add reusable task here, then click Toolbox and select Task.
- Above the task editor, rename the task “Self-service” and click Done.
- Click More and from the menu that appears, click Set this as the starting task.
- From the Toolbox, expand the Bot category and drag a Call Lex V2 bot action into the task editor.
- In the Call Lex V2 Bot panel, configure the action:
- Under Bot Name, select BankBot.
- Under Bot Alias, select TestBotAlias.
- Under Initial Intent Name, specify the welcome message intent that you created previously:
- If you created the intent in the visual builder, select CurrentBalance.
- If you created the intent in the editor, select WelcomeMessage.
Under Intents, notice that Architect includes paths for each possible matching intent.
- To capture the account number into an Architect variable, under CurrentBalance type “Task.AccountBalance.”
- Add an audio sequence to the CurrentBalance path.
- From the Toolbox, expand the Audio category and drag a Play Audio action into the task editor, below the CurrentBalance path.
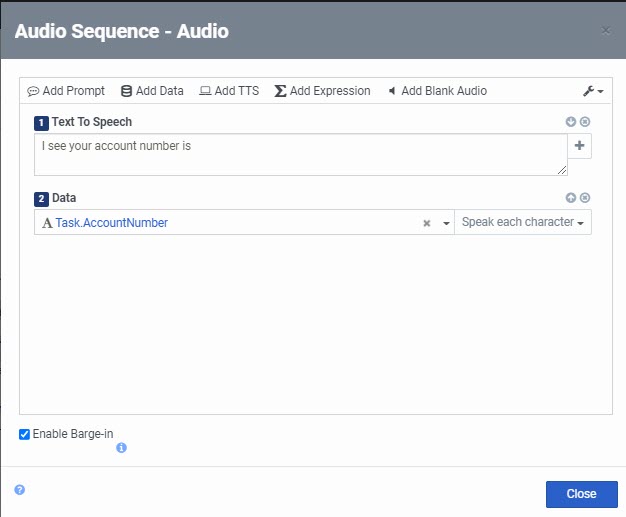
- In the Play Audio panel, next to Audio click Audio Sequence . The Audio Sequence dialog box opens.
- In the Text To Speech box, type “I see that your account number is.”
- Click Add Data, and in the Data box type Task.AccountNumber.
- Click Select options and choose Speak each character.
- Click Close.
- Continue to add outcome paths for each intent. For example:
- Add another Play Audio action below the CurrentBalance path that reads the account balance back to the customer.
- Add a Transfer to ACD action and transfer the call to a support team in case the flow takes the Failure path.
- Add a Disconnect action to the end of the task.
- Click Publish.
Example:
Example:

Step 6: Use Genesys Cloud to call the inbound call flow
Now, call the BankingBot flow in Genesys Cloud and test the bot.
To configure the call route entry, perform the following steps:
- In Genesys Cloud, to open the Calls panel click Calls .
- In the Enter names and numbers field, type BankingBot.
- Click the Call button or press Enter.
- Follow the bot prompts.
Summary
Congratulations! You are now set up and ready to route voice interactions to an Amazon Lex V2 bot that you call with Genesys Cloud Architect. You can also use the Amazon Lex V2 bot to steer interactions and set up escalation to a live agent in Genesys Cloud.